Three-Factor Factorial CRD
A three-factor factorial CRD tests three factors, their three two-way interactions and their three-way interaction in one experiment, under complete randomization and without requiring equal replication. This tutorial explains the design, how to size it, and how to run and read the whole analysis in RAISINS… Read more …
A three-factor factorial experiment studies three factors at the same time. It shows the effect of each factor, whether two factors work together, and whether all three factors interact. In a Completely Randomized Design (CRD), all treatment combinations are assigned randomly to the experimental units, without using blocks. This design is suitable when the experimental material is fairly uniform, such as in a laboratory or growth chamber. Unlike a blocked design, the number of replications does not have to be the same for every treatment combination. In RAISINS, the complete analysis can be done without coding, including factorial ANOVA, mean comparisons, effect sizes, diagnostic plots, interaction plots, and multivariate analyses. This tutorial explains the process step by step.
1 What is a three-factor factorial CRD?
Imagine a food technologist who is testing a preservative treatment on a stored product. In this trial, the technologist changes three things: the chemical used, which can be A, B, or C; the dose, which can be Low, Medium, or High; and the method of application, which can be I or II. You might think it is easier to study one factor at a time while keeping the other two constant. However, this approach has a major flaw. If chemical B works well only at a high dose or only with method II, you will not discover this by testing one factor alone. This is because when you fix the other two factors, you miss how they interact with the one you are studying. Therefore, to understand how these factors work together, you need to test them all at the same time.
A factorial experiment removes this blind spot by combining every level of every factor, so that each chemical is seen at every dose and under every method. With three chemicals, three doses and two methods there are
\[ 3 \times 3 \times 2 = 18 \]
treatment combinations, and each one is prepared and measured. From this single experiment you can estimate several things at once: the effect of the chemical, the effect of the dose, the effect of the method, whether any pair of them acts jointly, and whether all three act jointly.
Does the effect of one factor depend on the levels of the others?
Factorial designs are used to study how factors work together. In a Completely Randomized Design (CRD), all treatment combinations are assigned to the experimental units completely at random. There are no blocks or other restrictions on the assignment. CRD is suitable when the experimental material is fairly uniform, such as in a laboratory, growth chamber, or homogeneous batch of material. When three factors are studied together using complete randomization, the design is called a three-factor factorial CRD (3F-CRD). This module is designed for analysing this type of experiment.
A Completely Randomised Design (CRD) allows you to use different numbers of samples for each treatment without needing to replicate every treatment the same number of times. For example, if one of your samples is contaminated or fails quality control, you can simply remove that sample from your analysis and continue with the remaining data.
A three-factor factorial CRD tests three factors together under complete randomization, so that from one experiment you can read three main effects, three two-way interactions and one three-way interaction, without needing equal replication.
2 How many observations will you need?
To size a three-factor factorial CRD, you need to know two things: the number of levels for each factor and how many times you will repeat each treatment (replications).
- Let factor A have \(a\) levels, factor B have \(b\) levels and factor C have \(c\) levels.
- The number of distinct treatment combinations is the product
\[ a \times b \times c \]
- If each combination is replicated \(r\) times, the total number of observations is
\[ N = a \times b \times c \times r \]
This tutorial uses a dataset that includes \(a = 3\), \(b = 3\), \(c = 2\), and \(r = 3\). From this dataset, you will have \(3 \times 3 \times 2 = 18\) different treatment combinations and \(N = 18 \times 3 = 54\) observations to work with.
In a Completely Randomised Design (CRD), you use degrees of freedom to account for the treatments you are testing. For example, if you have three treatments, you will use two degrees of freedom for those treatments. This means that any remaining degrees of freedom are assigned to the error. The error degrees of freedom are calculated by taking the total number of observations and subtracting the number of treatments. This helps you understand how much variability is due to random error rather than the treatments themselves.
\[ df_{error} = abc(r - 1) \]
This experiment has \(18 \times (3 - 1) = 36\) error degrees of freedom. You will find this number in the Error row of the ANOVA table. When the number of observations is not the same for each treatment, you calculate the error degrees of freedom as \(N - abc\). This is the total number of observations minus the number of treatment combinations.
3 Main effects and interactions
In a three-factor experiment, you break down the treatment variation into seven different parts. Each part helps you answer a specific question about the data.
| Term | Degrees of freedom | The question it answers |
|---|---|---|
| A, B, C | \(a-1\), \(b-1\), \(c-1\) | Does this factor change the response, averaged over the other two? |
| A × B, A × C, B × C | \((a-1)(b-1)\), etc. | Does the effect of one factor depend on the level of the other, averaged over the third? |
| A × B × C | \((a-1)(b-1)(c-1)\) | Does the two-way interaction itself change from one level of the third factor to the next? |
The main effect of a factor shows how the average response changes when that factor changes from one level to another. This change is calculated while considering all levels of the other two factors. For example, if you are studying the effect of different fertilizers on crop yield, the main effect would tell you how yield changes when you switch from one type of fertilizer to another, regardless of the other factors like water and sunlight. A two-way interaction looks at how the effect of one factor is influenced by another factor. If the two factors do not affect each other, the interaction is zero, and you can rely on the main effects alone to understand the results. A three-way interaction goes a step further. It examines whether the relationship between two factors changes depending on the level of a third factor. For instance, it would check if the effect of fertilizer and water on yield is different when you have low sunlight compared to high sunlight. In your working example, \(a = 3\), \(b = 3\) and \(c = 2\) represent different factors, and the seven terms in your analysis have \(2, 2, 1, 4, 2, 2\) and \(4\) degrees of freedom, along with 36 degrees of freedom for error. This setup matches the layout of the ANOVA table in Section 9.
When you find that several terms in your analysis are significant, start by looking at the highest-order significant term first. For example, if the interaction A × B × C is significant, this means that the average effects of A, B, and C together show a pattern that changes and is not constant. Reporting just the main effects or two-way interactions could give a misleading picture of your results. Instead, you should focus on the cell means from the three-way table, as these provide a clearer understanding of the interaction. Only when the higher-order terms are not significant can you rely on the main effects to fully summarise your experiment.
4 Getting to the module
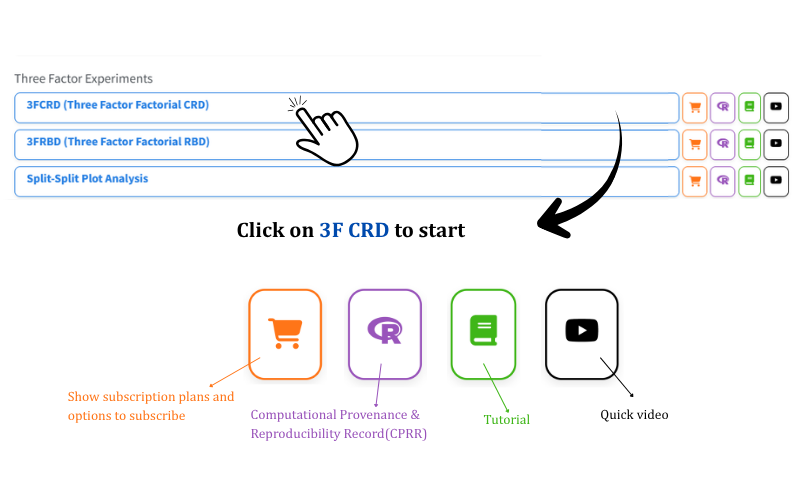
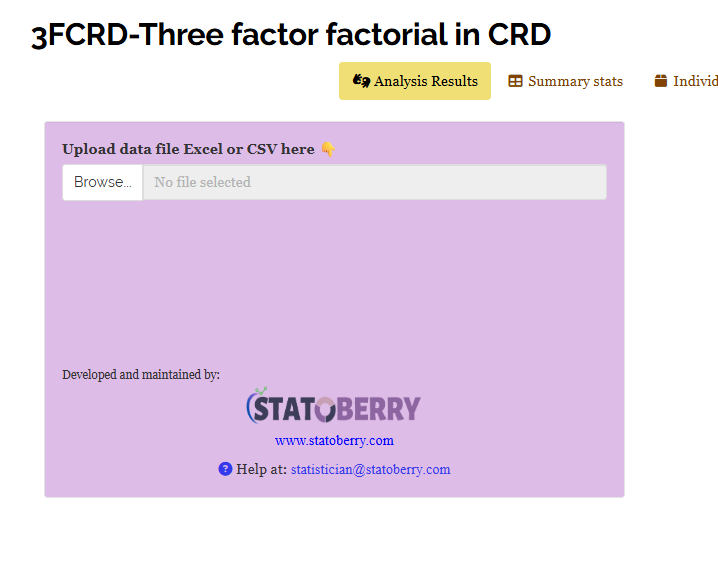
Visit the RAISINS home page at www.raisins.live and open the Analysis of Experiment section, which lists the single-factor and multifactor experimental designs. Under Three Factor Experiments, choose 3FCRD (Three Factor Factorial CRD) (Figure 1). No programming is required: you upload your data, select the three factor columns and the response columns, and it produces every table, plot and interpretation for you. The module opens on the Analysis Results tab with the upload panel ready.
Upload Your data
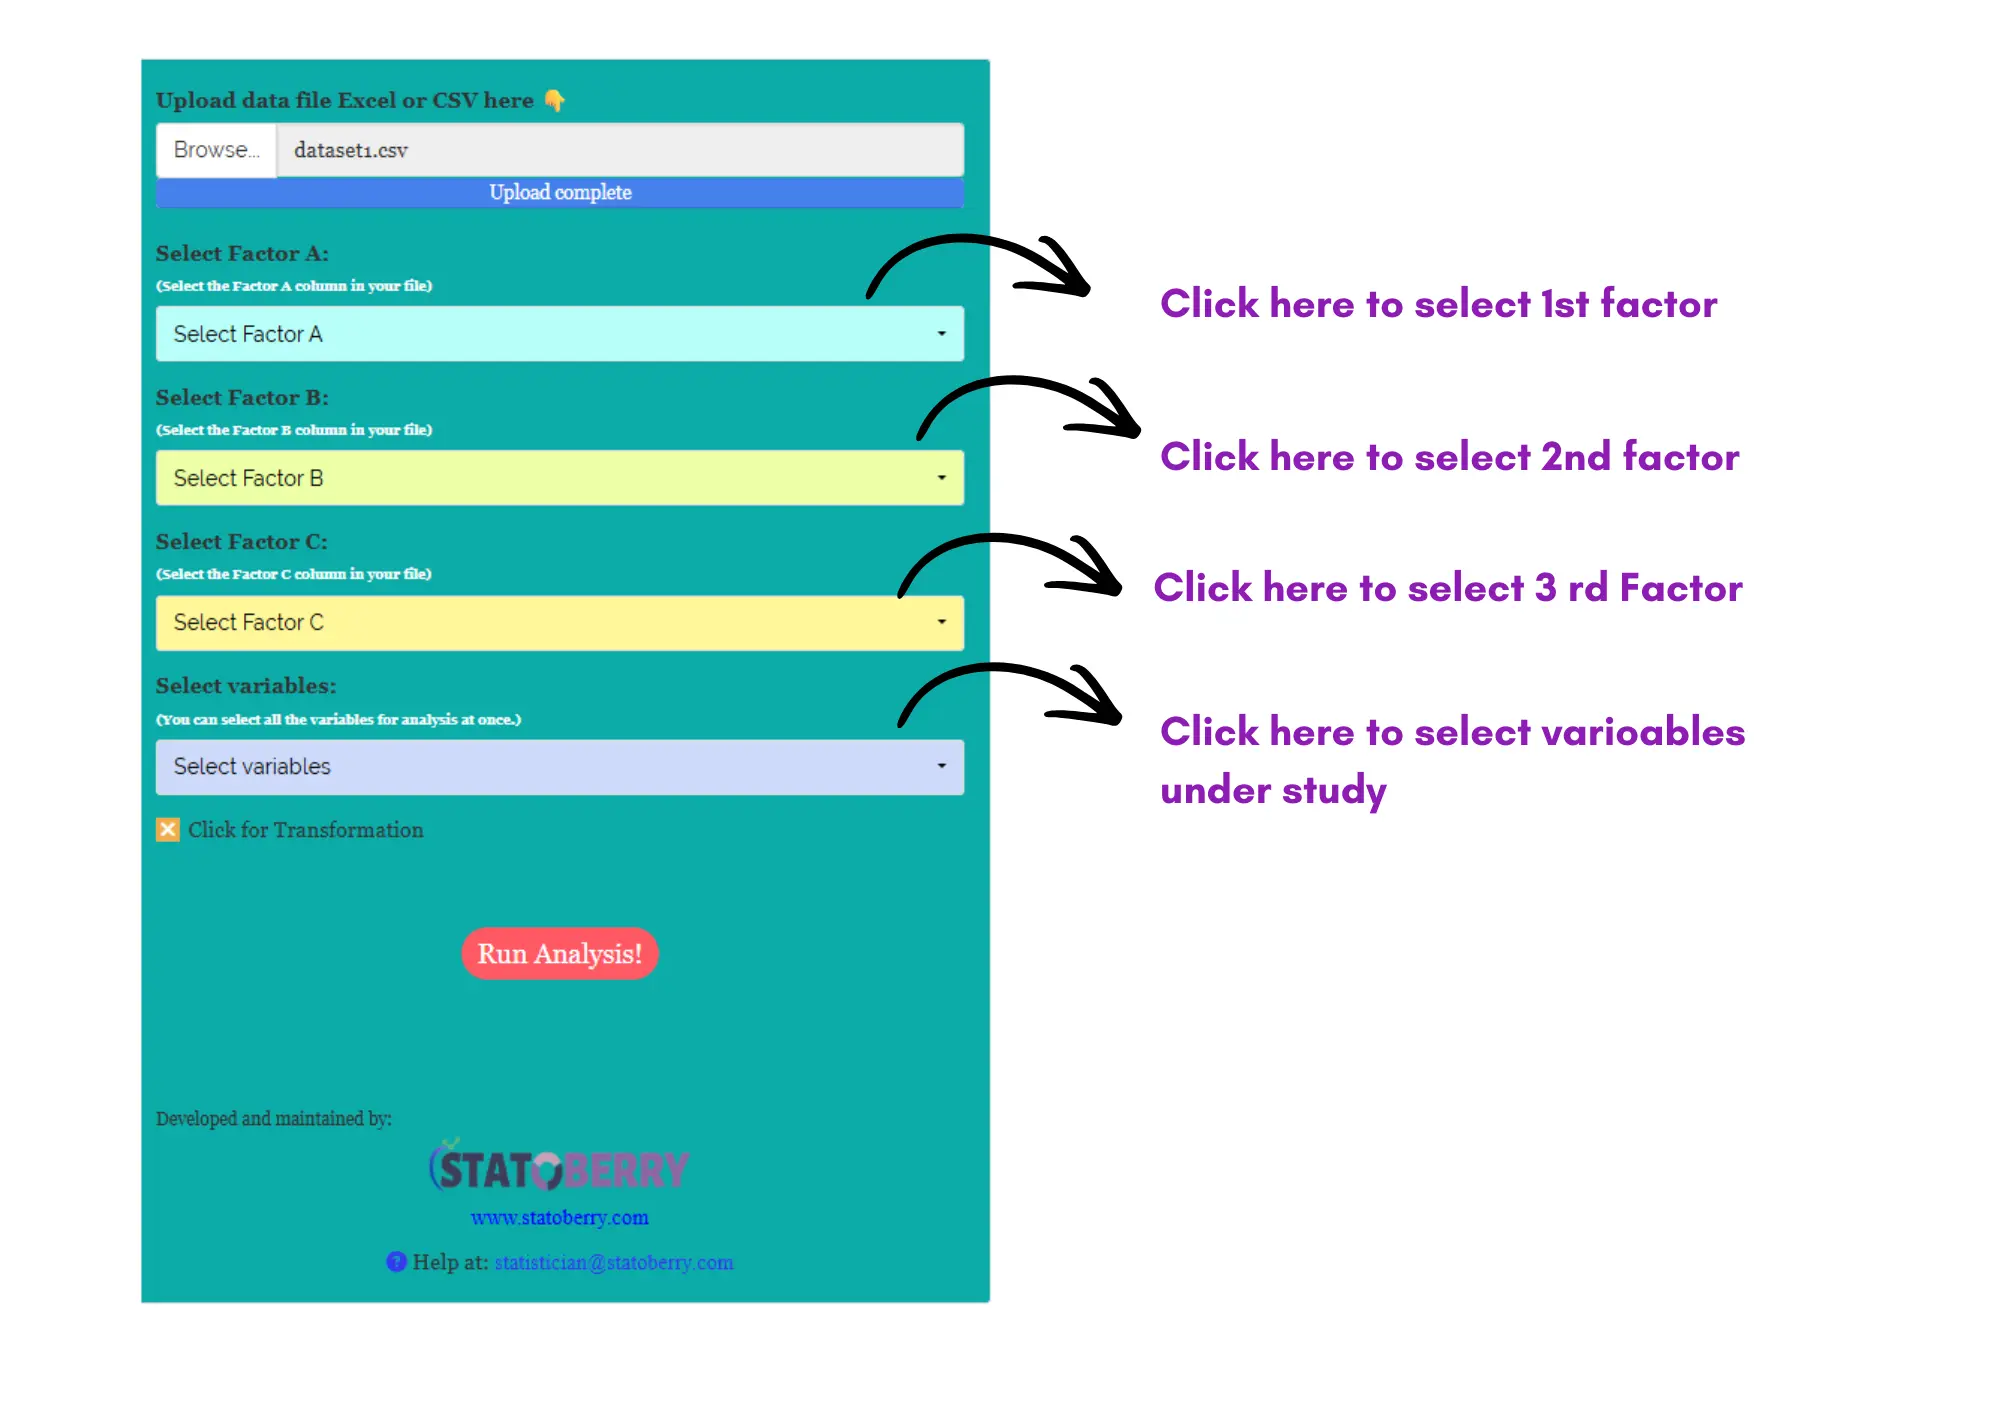
Select the factors and response column and click on run analysis
4.1 Computational Provenance & Reproducibility Record
CPRR (Computational Provenance & Reproducibility Record) provides a transparent and comprehensive record. Click the CPRR icon in the module header to see the exact computational workflow behind the analysis. The record for this module states the R version and the exact version of every package used, and names the specific function behind each reported result. CPRR lists every default parameter and decision rule applied by the module and provides fully runnable R code that reproduces each analytical step. Users can execute the code in R to independently reproduce and verify the results. It carries its own DOI.
To cite the platform itself in a paper, thesis, or report, use the RAISINS citation, available in APA, Harvard, and BibTeX formats at www.raisins.live/citation.html. That is the primary reference, and for most manuscripts it is all you need.
The CPRR for the three-factor factorial CRD module is at www.raisins.live/module_record/3FCRD.html.
Cite the RAISINS paper as your primary reference for the platform. Add the CPRR as supporting documentation when a journal asks for details of the computing environment, or when you want your methods section to be precise about versions and functions rather than saying “analysis was carried out using an online tool.” The CPRR supports the citation and ensures computational reproducibility.
5 Preview mode and Quick Tour
Before subscribing, you can explore the entire module using Preview mode, reached from the Welcome page. Preview mode loads a built-in three-factor dataset so that every feature, the factorial ANOVA, the post-hoc comparisons, the interaction and diagnostic plots, the MANOVA and PCA index, and the RA-One assistant, can be tried without uploading your own file. First-time users are also offered a Quick Tour, an interactive walkthrough that highlights each control and explains what it does. The tour can be retaken at any time from the Quick Tour tab. 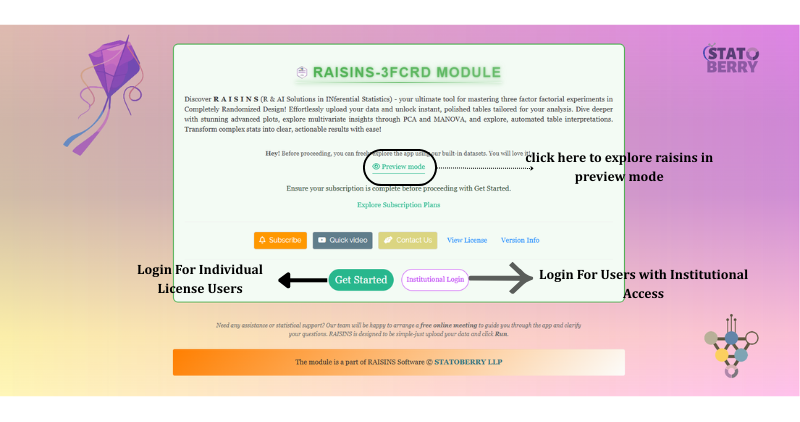
6 A working example
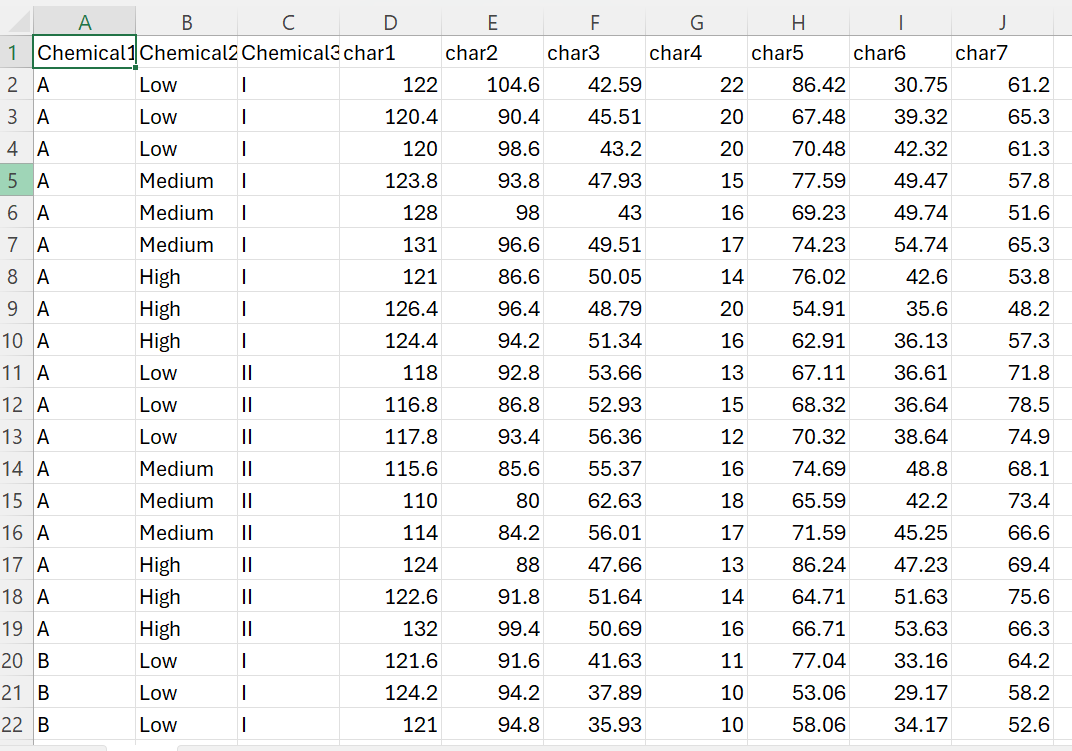
The rest of this tutorial follows one dataset, shown in Figure 2. It is a three-factor factorial in CRD with Chemical1 as Factor A at 3 levels (A, B, C), Chemical2 as Factor B at 3 levels (Low, Medium, High) and Chemical3 as Factor C at 2 levels (I, II), giving \(3 \times 3 \times 2 = 18\) treatment combinations, each replicated 3 times for \(N = 54\) observations. Seven traits were recorded, char1–char7; the four analysed in this tutorial are char1–char4. The first three columns hold the three factor labels and every remaining column is a response. The question the module will settle, for each character, is whether it depends on Chemical1, on Chemical2, on Chemical3, on any pair of them, or on all three together.
7 How to prepare your data
Your analysis is only as good as your data. Feed RAISINS high-quality data and it will deliver powerful insights; feed it messy data and the results will not be trustworthy. You have four routes:
- Create your dataset in MS Excel
- Build your dataset directly within the RAISINS app (Section 7.2)
- Use the Model dataset in RAISINS as a reference (Section 7.3)
- Create your dataset using the RA-One chat assistant (Section 7.4)
7.1 Preparing data in MS Excel
Lay the file out exactly as in Figure 2, with the role of each column marked in ?@fig-excel: the first column holds the levels of Factor A (here Chemical1, with levels A, B, C), the second column the levels of Factor B (here Chemical2, with levels Low, Medium, High), the third column the levels of Factor C (here Chemical3, with levels I, II), and each further column is one response variable (char1, char2, …). Every row is one experimental unit, so a combination replicated three times appears on three rows. Spell each level label consistently, leave no blank rows above or inside the data, and save the finished sheet as CSV before uploading. 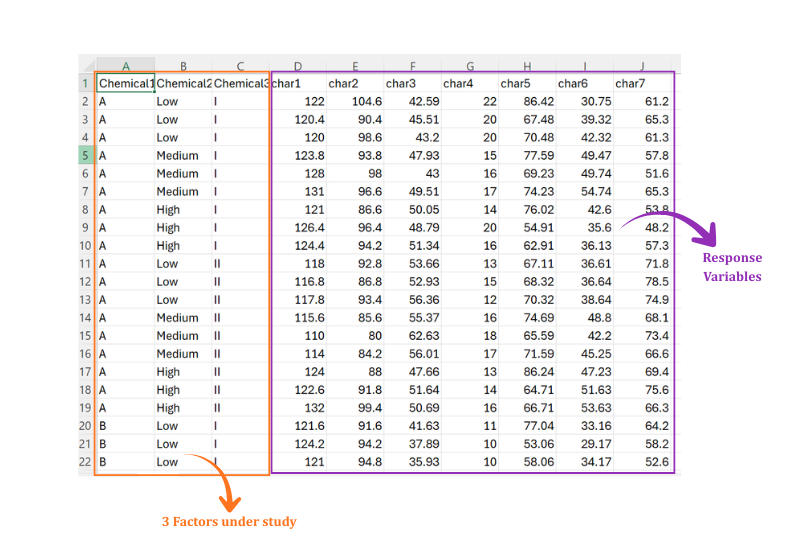
Dataset creation rules
- Column naming convention
- No spaces allowed in column names.
- Use underscores (
_) or full stops (.) for separation. - Avoid symbols and special characters such as %, #.
- Data arrangement
- Start the data towards the upper-left corner.
- Ensure the row above the data is not blank.
- Cell management
- Avoid typing or deleting in cells without data.
- If needed, select the affected cells, right-click, and choose Clear Contents.
- Factor and response columns
- The first three columns must be the three factors (factorA, factorB, factorC); every remaining column is a numeric response.
- Use the same label for a level everywhere it appears, so RAISINS reads the correct number of levels.
- Replication
- Enter one row per replicate; do not average replicates into a single row. Replication may be unequal across treatment combinations, but every combination must appear at least twice for the error to be estimable.
How to save as CSV in MS Excel
Open your workbook. Ensure your data is arranged properly with only one sheet.
Click the ‘File’ menu. Go to the top-left corner and click File.
Choose ‘Save As’ or ‘Save a Copy’. Select the location where you want to save your file.
Set file type to CSV. In the ‘Save as type’ dropdown, choose CSV (Comma delimited) (*.csv).
Name your file. Enter a relevant file name without spaces (use underscores if needed).
Click ‘Save’. Click Save to export the file.
💡 Tip: Before saving, double-check that your data is on the first sheet and follows the required format.
7.2 Prepare using Create Data in RAISINS
If you are unsure about the correct format, RAISINS can build the layout for you. Open the Create Data tab (Figure 3), enter the levels of Factor A, Factor B and Factor C, the number of replications and the number of response columns, then click Create. The data-entry panel on the right fills with every treatment combination repeated once per replication, with empty response columns waiting for your readings. Type the values in, or paste a column straight from Excel with Ctrl + V, then click Download CSV file and upload it under the Analysis tab.
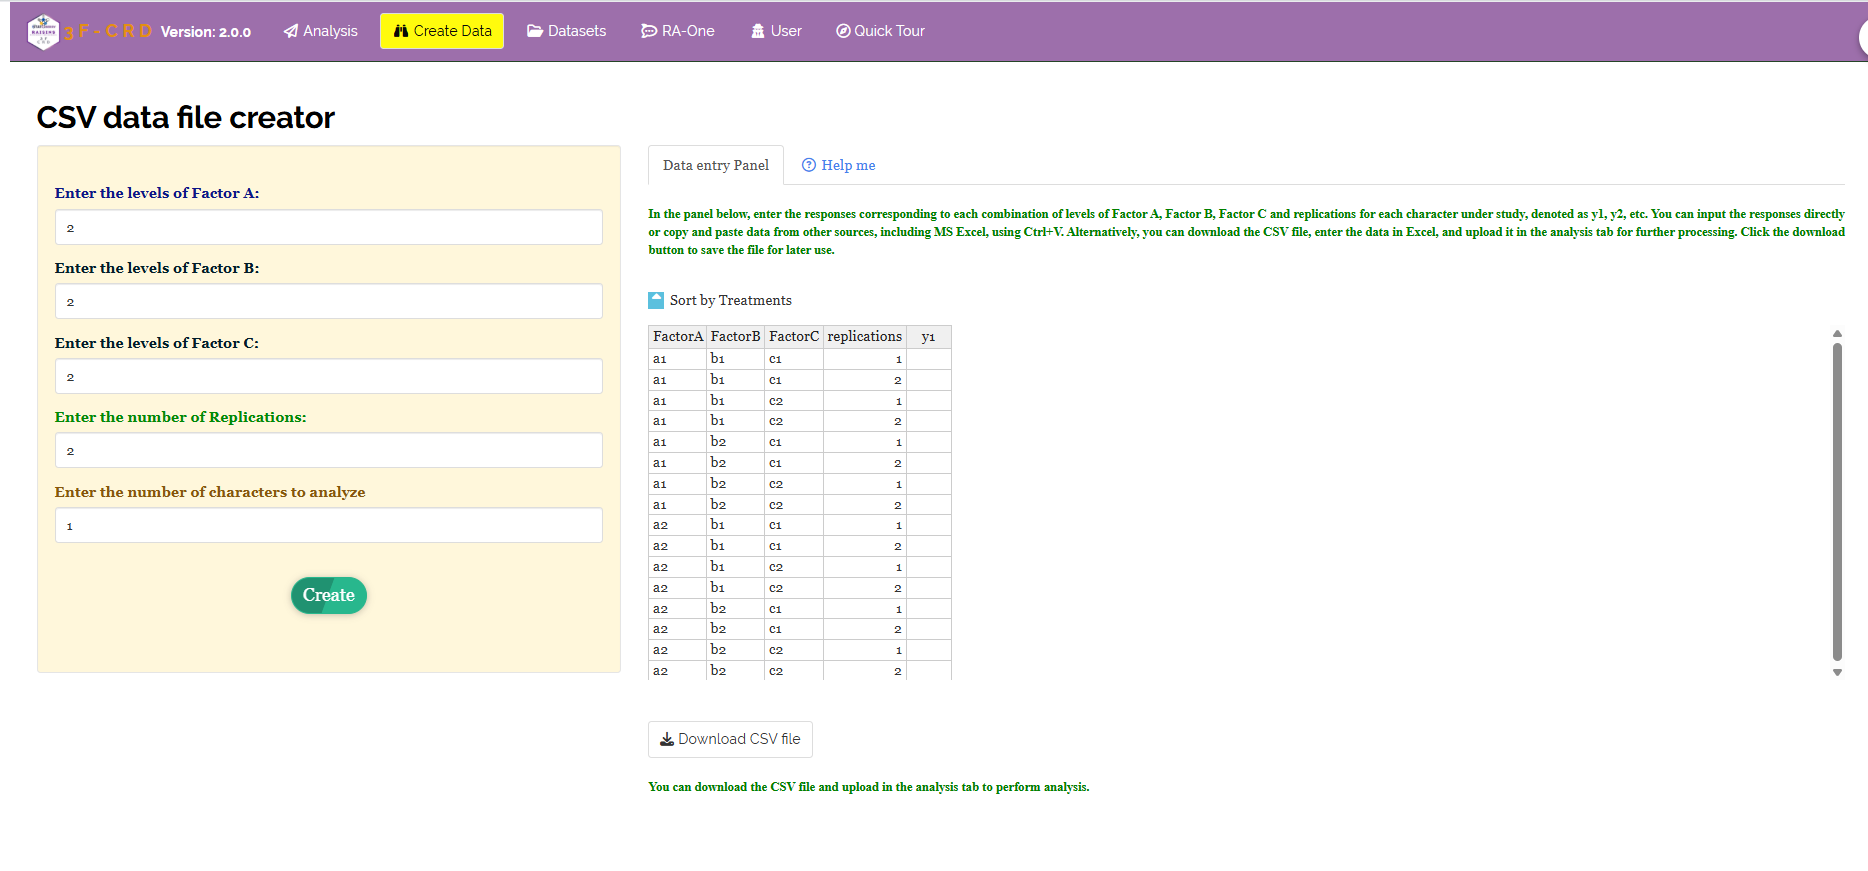
y1 column empty for your readings. Download CSV file saves the completed sheet for upload under the Analysis tab
7.3 Download the Model dataset
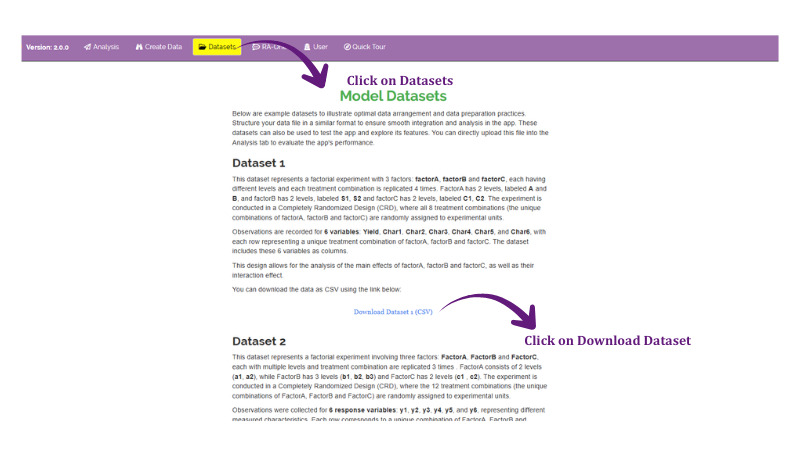
If you would like to explore the module before using your own data, RAISINS provides a model dataset, the very dataset in Figure 2. To use it:
- Open the Datasets tab (Figure 4)
- Click the Download CSV link for the three-factor factorial CRD dataset
- Save the file, then either study its layout as a reference for your own file or upload it directly under Analysis to see the full analysis at once
7.4 Creating a dataset using RA-One chat
RA-One, the built-in chat assistant (Section 14), can produce a correctly formatted template through a simple conversation. Describe the experiment in words, for instance “Create a 3FCRD data template for 3 Factor A levels, 2 Factor B levels, 2 Factor C levels, 3 replications, 2 variables” (Figure 5), and it returns a ready-to-fill table (Figure 6), reporting the error degrees of freedom so you can judge whether the design is adequately powered before collecting any data. Fill in the responses, download the CSV, and upload it under the Analysis tab, all without leaving the chat.

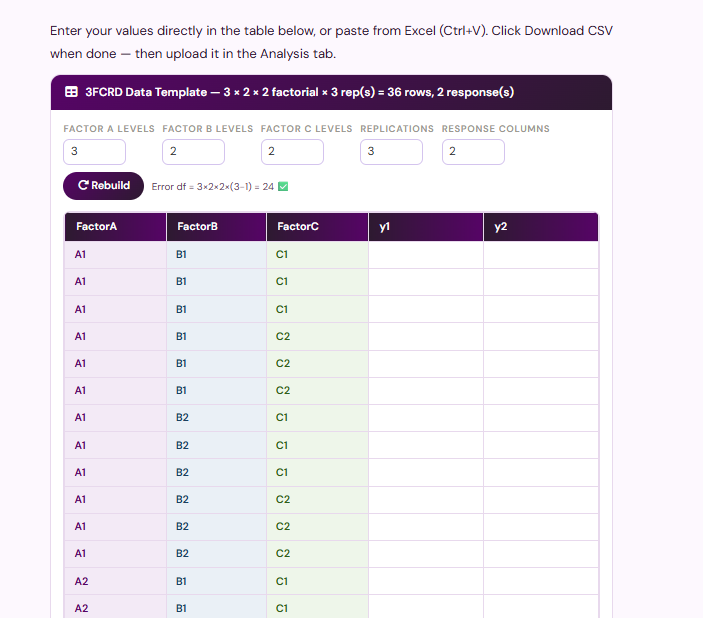
y1 and y2 columns, or paste them from Excel with Ctrl + V, then click Download CSV and upload the file under the Analysis tab
8 The Analysis tab
With your CSV ready, open the Analysis tab. Click Browse… under Upload data file Excel or CSV here and select your file; a blue Upload complete bar confirms it has loaded. RAISINS then reads the column names and asks you to point it at the right columns:
- Select Factor A - the column holding the levels of the first factor (here,
Chemical1). - Select Factor B - the column holding the levels of the second factor (here,
Chemical2). - Select Factor C - the column holding the levels of the third factor (here,
Chemical3). - Select variables - one or more response columns to analyse; you may select several at once (here
char1–char4), and RAISINS analyses each in turn. - Click for Transformation - an optional toggle to transform a skewed response before analysis.
When the columns are chosen, click Run Analysis!. RAISINS fits the full factorial model to every selected response and fills the sub-tabs: Analysis Results, Summary stats, Individual ANOVA, Basic Plots, Advanced Plots, Interpretation, Multivariate, FAQs and View Data.
You do not need to run the module once per response. Select all the response columns together and RAISINS produces a complete ANOVA, mean-comparison and effect-size table for each, plus a single MANOVA across all of them. This is why every results table in the next section carries one column per trait (char1–char4).
8.1 Optional: transforming a response
The factorial ANOVA assumes the response is approximately normal with similar variability across treatments. When a trait is strongly skewed, or when its spread grows with its mean, tick Click for Transformation and choose a transformation before running the analysis. RAISINS offers the three standard choices and applies safe adjustments for awkward values:
| Transformation | Use it when | What RAISINS applies |
|---|---|---|
| Logarithmic | The spread grows in proportion to the mean (multiplicative data) | \(\log_{10}(x)\); if any value is \(\le 0\), it shifts first as \(\log_{10}(x - \min + 1)\) |
| Square-root | Counts, or data following a Poisson-like pattern | \(\sqrt{x}\); if any value is \(0\), it uses \(\sqrt{x + 0.5}\); negative values are not allowed |
| Arcsine | Proportions or percentages between 0 and 1 | \(\arcsin(\sqrt{x})\), with \(0\) and \(1\) nudged by \(1/(4n)\) so the transform stays finite |
A transformation is a temporary change of scale that makes the test valid; it does not change your experiment. Report that a transformation was used, but discuss the means and recommendations in the original units. If no assumption is violated, leave the toggle off, an unnecessary transformation only makes the results harder to read. The QQ plot in Section 11 is the quickest check of whether one is needed.
8.2 Optional: adjusting for multiple comparisons (P-adjustment)
When many treatment means are compared, each pairwise comparison carries its own chance of a false positive, and those chances accumulate, which matters especially in a three-factor design where the interaction table holds eighteen cell means. The P-adjustment control in the strip above the results tables (Figure 7) corrects for this. It is offered only for the LSD post-hoc method, the most liberal test, and applies to the pairwise comparisons of every factor and interaction, recomputing the letter groupings accordingly. The choices are None (plain LSD, the default), Bonferroni (the strictest control of the family-wise error rate), Holm (the same control as Bonferroni but uniformly more powerful) and Benjamini–Hochberg (controls the false-discovery rate, suited to screening). Tukey’s HSD and Duncan’s DMRT build in their own error control, so the option does not appear for them.
Once an adjustment is applied, a single critical difference (CD) is no longer well defined, because the effective threshold differs from one comparison to the next. RAISINS therefore hides the CD and per-source p-value rows and carries the adjusted result entirely through the letter groupings. The working example below uses P-adjustment = None, so those rows are shown.
9 Analysis results
The Analysis Results sub-tab is where the factorial ANOVA lands. A control strip at the top sets the multiple-comparison test (LSD by default, with Tukey’s HSD and Duncan’s DMRT as alternatives), the P-adjustment (Section 8), the level of significance (\(\alpha\), 0.05 by default), the digits after decimal, and the font. Below the strip, a short paragraph restates the experiment that was analysed, and then eight tables follow: the ANOVA summary, one table for each of the three factors, one for each of the three two-way interactions, and one for the three-way interaction. Every table carries one column per response (char1–char4).
Table 1: ANOVA summary - mean squares and significance
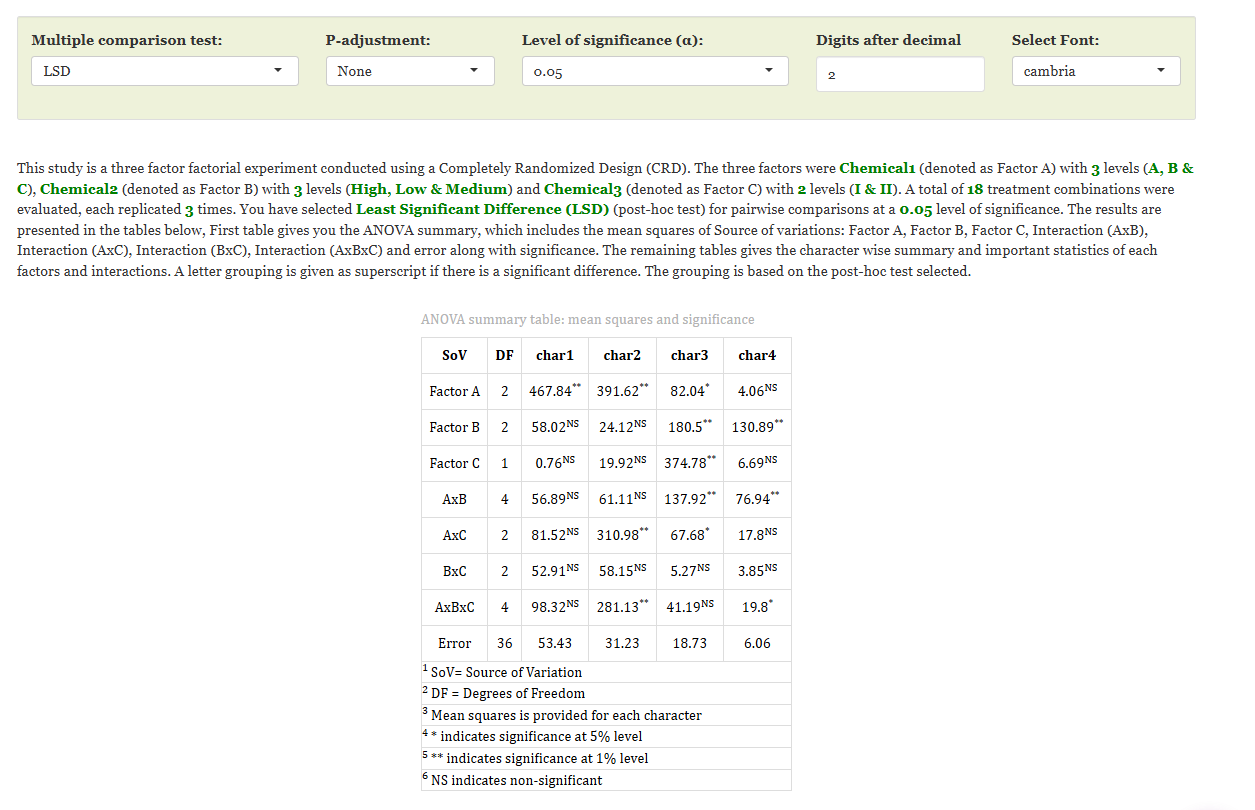
Each row is a source of variation, Factor A (2 df), Factor B (2 df), Factor C (1 df), A × B (4 df), A × C (2 df), B × C (2 df), A × B × C (4 df) and Error (36 df), matching the degrees of freedom predicted in Section 2 and Section 3 for a \(3 \times 3 \times 2\) experiment with three replications. Each cell is that source’s mean square for the response, with a superscript flag: * for significance at 5%, ** at 1%, and NS for non-significant. The flags tell the whole story at a glance. char1 responds to Factor A alone (\(467.84^{**}\)) and to nothing else. char2 responds to Factor A (\(391.62^{**}\)), to the A × C interaction (\(310.98^{**}\)) and to the three-way A × B × C interaction (\(281.13^{**}\)). char3 is the busiest column, with Factor A (\(82.04^{*}\)), Factor B (\(180.5^{**}\)), Factor C (\(374.78^{**}\)), A × B (\(137.92^{**}\)) and A × C (\(67.68^{*}\)) all significant. char4 responds to Factor B (\(130.89^{**}\)), to A × B (\(76.94^{**}\)) and to the three-way interaction (\(19.8^{*}\)). The B × C interaction is non-significant for every trait. Each significant cell is unpacked in the tables that follow.
How this table is built
RAISINS fits the full factorial linear model response ~ A * B * C for each trait, which expands to the three main effects, the three two-way interactions and the three-way interaction, and forms the analysis-of-variance table from it. Each source’s mean square is its sum of squares divided by its degrees of freedom, and the F-test divides each treatment mean square by the error mean square; the p-value behind each F decides the * / ** / NS flag against the chosen \(\alpha\). Because a CRD has no blocking term, everything not explained by the seven treatment terms falls to the error, which is why the error carries 36 of the 53 total degrees of freedom here.
Table 2: Factor A - means and comparison statistics
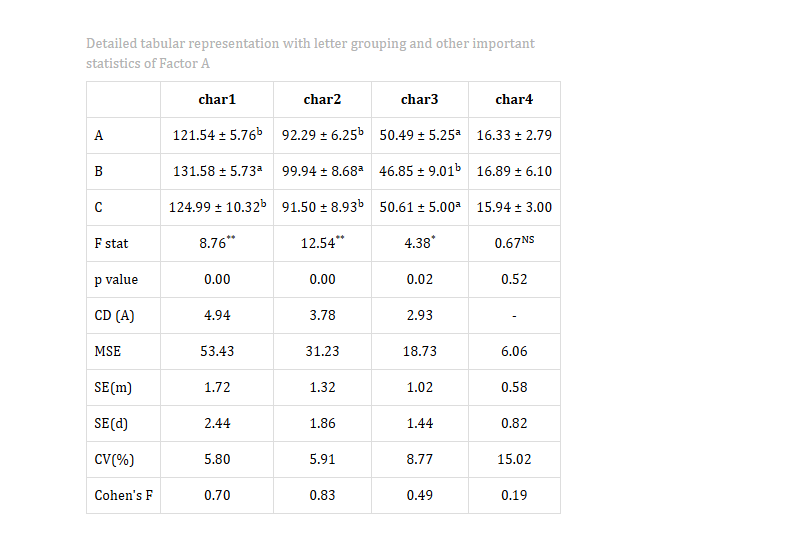
This table averages over Factor B, Factor C and the replications to show the main effect of Factor A across its three levels. Factor A affects three of the four traits. For char1, \(F = 8.76^{**}\) (\(p = 0.00\)) with CD (A) \(= 4.94\) and a large Cohen’s F of 0.70: B (\(131.58 \pm 5.73\), letter a) is significantly above A (\(121.54 \pm 5.76\)) and C (\(124.99 \pm 10.32\)), which share letter b. For char2 the pattern repeats, \(F = 12.54^{**}\) (CD \(= 3.78\), Cohen’s F 0.83), with B highest at \(99.94 \pm 8.68\) (a) and A and C on par (b). For char3 the order reverses: \(F = 4.38^{*}\) (\(p = 0.02\), CD \(= 2.93\)), with C (\(50.61 \pm 5.00\)) and A (\(50.49 \pm 5.25\)) sharing letter a and B (\(46.85 \pm 9.01\)) alone at letter b. For char4 the F-statistic is non-significant (\(0.67^{NS}\)), so its CD row reads “–”: RAISINS withholds the post-hoc yardstick when there is nothing to separate. The lower rows report the pooled MSE, the standard error of a mean SE(m) and of a difference SE(d), the coefficient of variation CV(%), and the Cohen’s F effect size.
Table 3: Factor B - means and comparison statistics
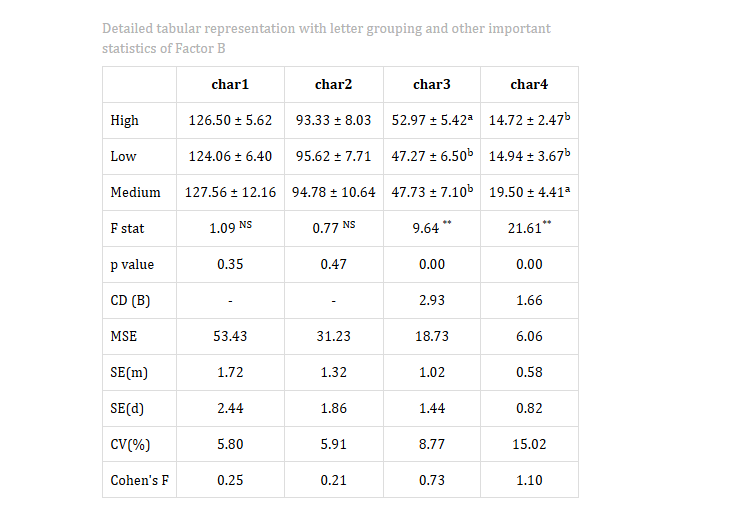
The same layout (Figure 9), now averaging over Factors A and C to show the main effect of Factor B. Factor B matters for two traits. For char3, \(F = 9.64^{**}\) (\(p = 0.00\), CD (B) \(= 2.93\), Cohen’s F 0.73): High (\(52.97 \pm 5.42\), letter a) stands above Medium (\(47.73 \pm 7.10\)) and Low (\(47.27 \pm 6.50\)), which share letter b. For char4 the ranking is different, \(F = 21.61^{**}\) (\(p = 0.00\), CD (B) \(= 1.66\), Cohen’s F 1.10): Medium is highest at \(19.50 \pm 4.41\) (a) while Low (\(14.94 \pm 3.67\)) and High (\(14.72 \pm 2.47\)) share letter b. So the dose that maximises char3 is not the dose that maximises char4. For char1 and char2 no level of Factor B stands out.
Table 4: Factor C - means and comparison statistics
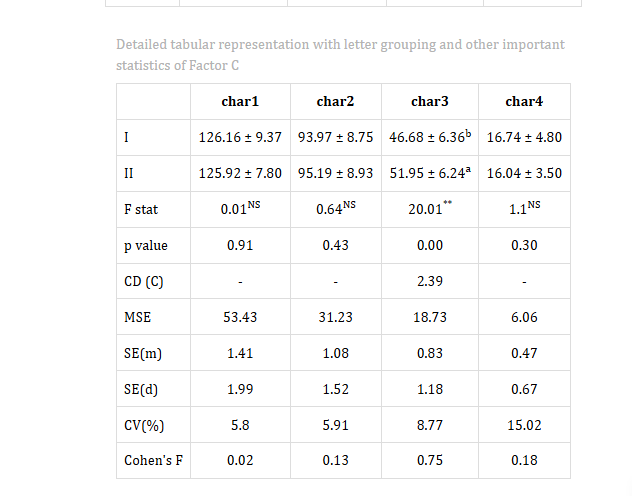
Factor C has only two levels, so its table (Figure 10) has only two mean rows and its F-test is equivalent to a comparison of the two. It is significant for a single trait: char3, \(F = 20.01^{**}\) (\(p = 0.00\), CD (C) \(= 2.39\), Cohen’s F 0.75), with II (\(51.95 \pm 6.24\), letter a) clearly above I (\(46.68 \pm 6.36\), letter b). For char1, char2 and char4 the two application methods are indistinguishable on average. Note that the SE(m) and SE(d) rows are smaller here than in Tables 2 and 3, because each Factor C mean is based on twice as many observations.
Tables 5–7: the two-way interactions
Three further tables follow, one for each pair of factors. Their rows are the level combinations of that pair, averaged over the third factor, shown as mean ± SD with a letter grouping as superscript wherever the interaction is significant; combinations sharing a letter are not significantly different.
Table 5, A × B, has nine rows and is significant for char3 (\(F = 7.36^{**}\), CD (A×B) \(= 5.07\)) and char4 (\(F = 12.71^{**}\), CD (A×B) \(= 2.88\)). For char3, B×High is highest at \(56.47 \pm 6.68\) (a) while B×Medium (\(40.92 \pm 5.55\)) and B×Low (\(43.17 \pm 5.54\)) are lowest (c): chemical B is the best performer at a high dose and the worst at a low or medium dose, which is precisely what an interaction means. For char4, B×Medium is highest at \(24.50 \pm 3.45\) (a) and B×Low lowest at \(12.00 \pm 1.90\) (d).
Table 6, A × C, has six rows and is significant for char2 (\(F = 9.96^{**}\), CD (A×C) \(= 5.34\)) and char3 (\(F = 3.61^{*}\), CD (A×C) \(= 4.14\)). For char2, B×II is highest at \(105.00 \pm 3.97\) (a) and A×II lowest at \(89.11 \pm 5.82\) (c), so method II raises chemical B but lowers chemical A. For char3, A×II (\(54.11 \pm 4.24\)) is highest (a) and B×I (\(42.97 \pm 6.92\)) lowest (c).
Table 7, B × C, has six rows and is non-significant for every trait, so no letters appear and its CD row reads “–” throughout. Dose and application method act independently of one another.
Table 8: the three-way interaction A × B × C
The last table has eighteen rows, one for every treatment combination actually applied (A×High×I, A×High×II, A×Low×I, …, C×Medium×II). It is the finest resolution the experiment offers, and it is significant for two traits. For char2, \(F = 9^{**}\) with CD (A×B×C) \(= 9.25\) and a Cohen’s F of 1.00: three combinations share the top letter a, B×High×II (\(106.67 \pm 2.08\)), B×Medium×I (\(106.07 \pm 0.81\)) and B×Low×II (\(106.00 \pm 2.46\)), while C×Medium×I is lowest at \(82.33 \pm 13.07\) (g). For char4, \(F = 3.27^{*}\) (\(p = 0.02\), CD \(= 4.07\)): B×Medium×I is highest at \(25.67 \pm 4.04\) (a) and B×Low×I lowest at \(10.33 \pm 0.58\) (f). For char1 and char3 the three-way interaction is non-significant, so those columns carry no letters.
Reading every row of the factor and interaction tables
- Mean ± SD - the level (or cell) mean and its standard deviation; a transformed mean, if a transformation was applied, is shown in parentheses.
- F stat / p value - the F-test for that source and its probability; the superscript (
*,**,NS) marks significance at the chosen \(\alpha\). - CD - the critical difference from the selected post-hoc test; two means differing by more than the CD are significantly different. Shown as “–” when the source is non-significant, and hidden entirely when a P-adjustment is applied.
- MSE - the pooled error mean square, common to all comparisons of that response.
- SE(m) / SE(d) - standard error of a single mean and of a difference between two means. Both grow as the table becomes finer, because each cell mean rests on fewer observations.
- CV(%) - coefficient of variation, the error SD as a percentage of the grand mean; it gauges experimental precision and is common to the whole experiment.
- Cohen’s F - a standardised effect size for the source (roughly: below 0.10 very small, 0.25 small, 0.40 medium, above 0.40 large).
9.1 Interpretation from Figure 7
Put the eight tables together, applying the rule of Section 3 that the highest-order significant term governs the reading. Each character tells a different story.
char1 shows that only Factor A is significant; the main-effect table indicates that chemical B (\(131.58\)) is superior, while chemicals A and C are on par. char3 is influenced by two-way interactions (A × B and A × C), so its three significant main effects are averages over changing patterns; the cell means, B×High for the A × B table and A×II for the A × C table, provide the honest recommendation. char2 and char4 exhibit a significant three-way interaction, meaning no pair of factors can be chosen without considering the third; the eighteen cell means of Table 8 should be reported, B×High×II for char2 and B×Medium×I for char4. This illustrates the advantage of the three-factor factorial: it distinguishes a trait explained by a single factor (char1) from traits whose optimum exists only as a full combination (char2, char4).
When you find a significant effect, it means that the pattern you see is probably not due to chance. However, this does not mean that the difference is important or large enough to matter in real life. To understand the importance of the effect, look at the Cohen’s F effect size along with the p-value. For example, the char2 three-way interaction is significant and has a large effect size of Cohen’s F 1.00. In contrast, the char3 A × C interaction is also significant, but its effect size is smaller at 0.45. Before making any decisions based on these results, consider what these sizes mean in the context of your own study.
10 Summary stats and Individual ANOVA
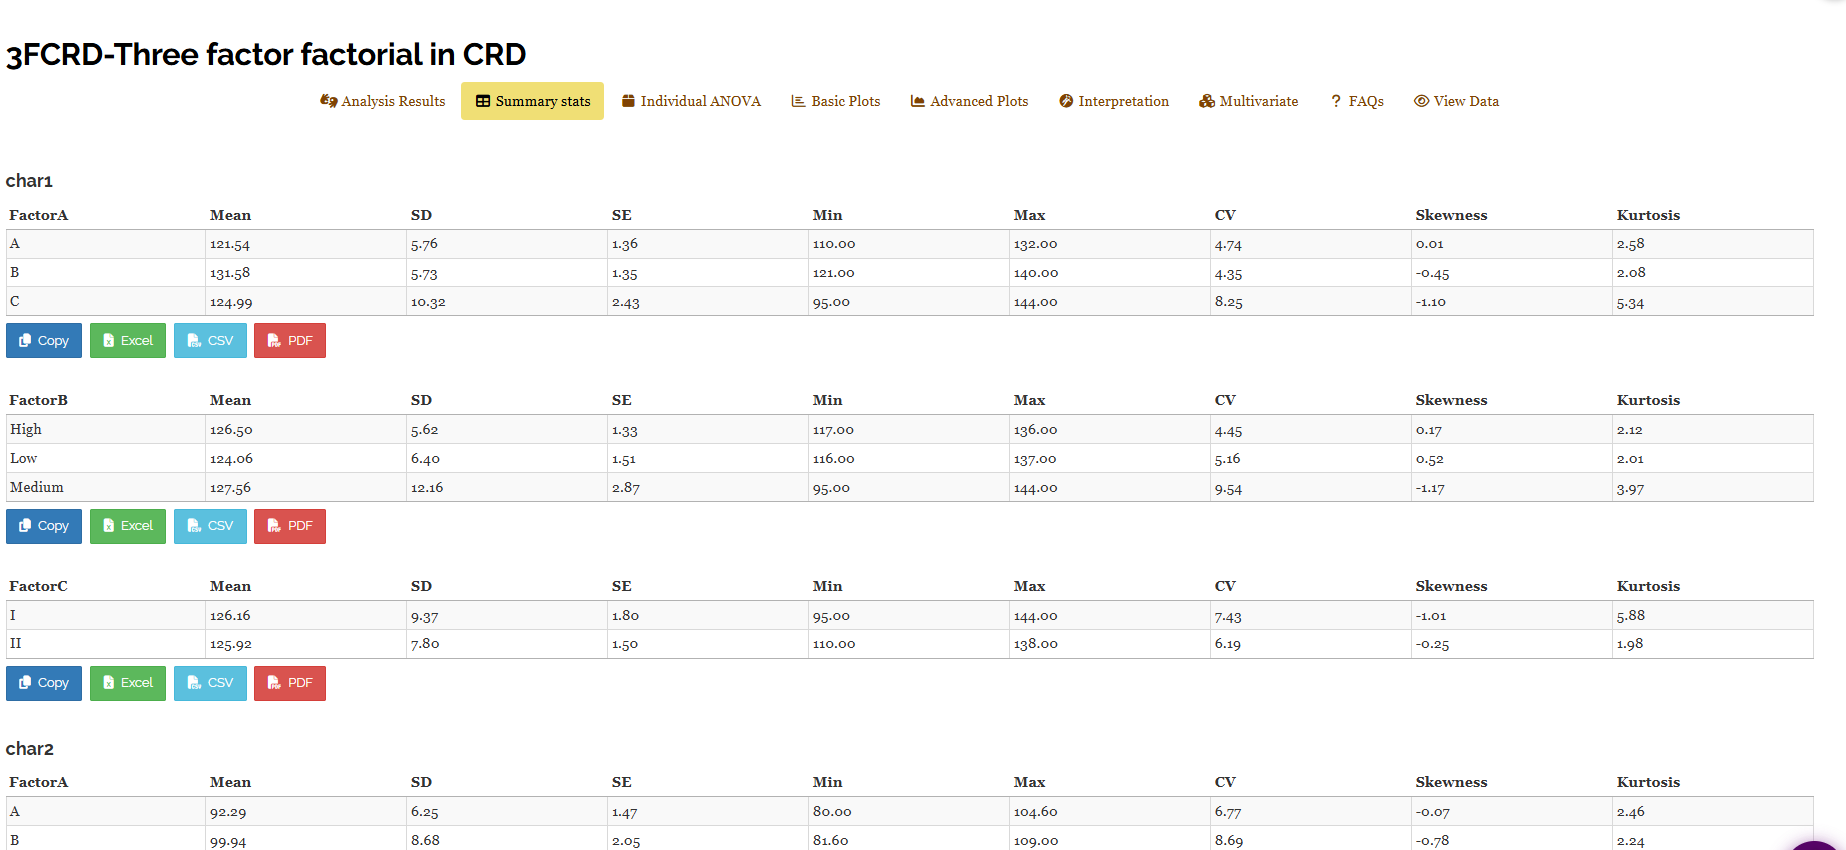
Two sub-tabs sit between the main results and the plots. The Summary stats tab (Figure 11) reports, for each character in turn and separately for Factor A, Factor B and Factor C, the level Mean, SD, SE, Min, Max, CV, Skewness and Kurtosis. It is the descriptive companion to the inferential tables: the skewness and kurtosis columns are where you would first notice that a trait needs the transformation described in Section 8. Each block can be copied or exported as Excel, CSV or PDF.
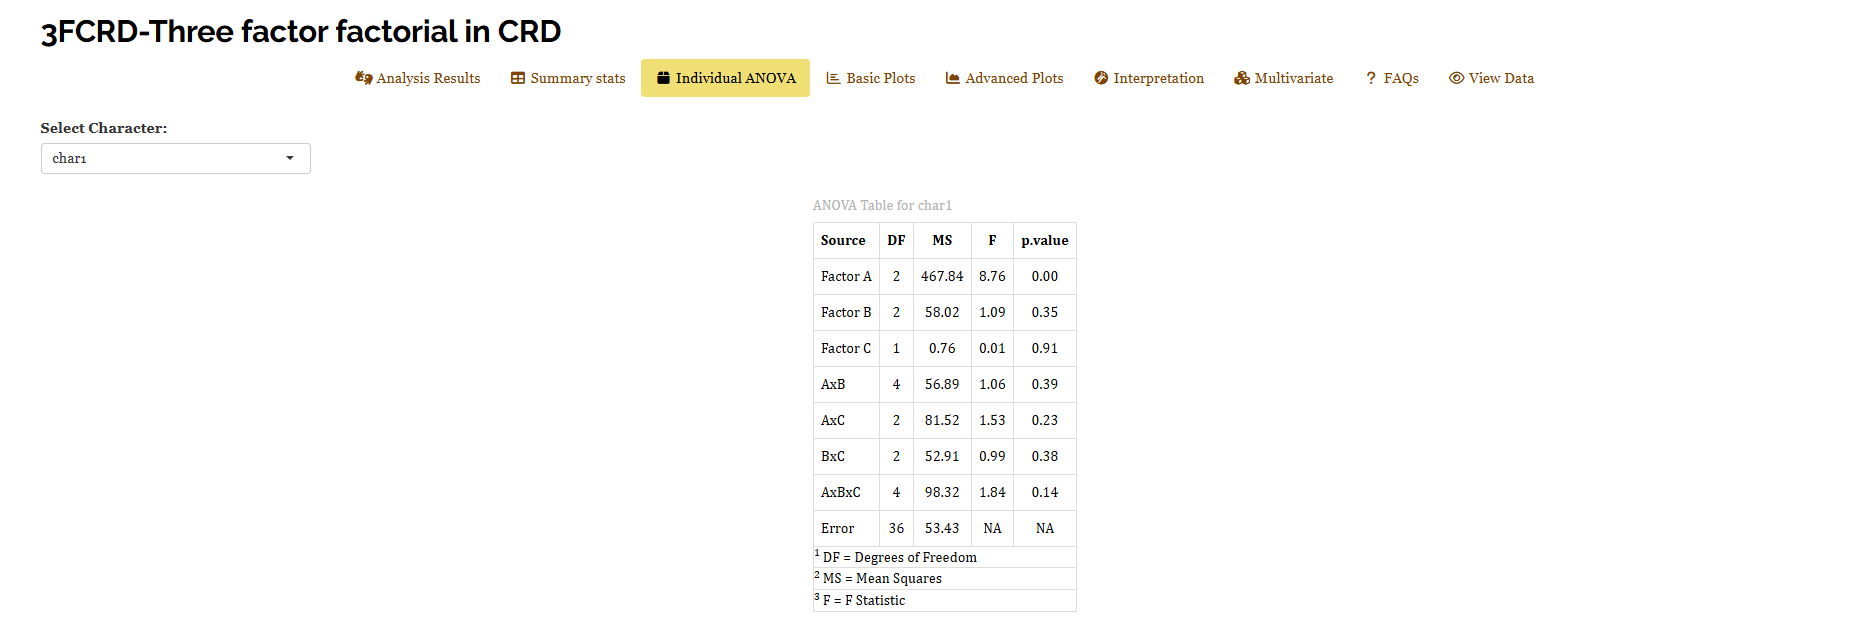
The Individual ANOVA tab (Figure 12) presents the same analysis one character at a time. Choose a trait from Select Character and the tab shows its ANOVA table with the DF, MS, F and p.value columns spelled out for all seven sources plus error, followed by the CD at 1% and 5%, the CV(%), MSE, SE(m) and SE(d) for each factor and interaction, and the level means with their groupings (Figure 13). Where Table 1 compresses each trait into a single column of mean squares, this tab expands one trait into the full classical ANOVA layout, which is the form most journals expect in a methods appendix.
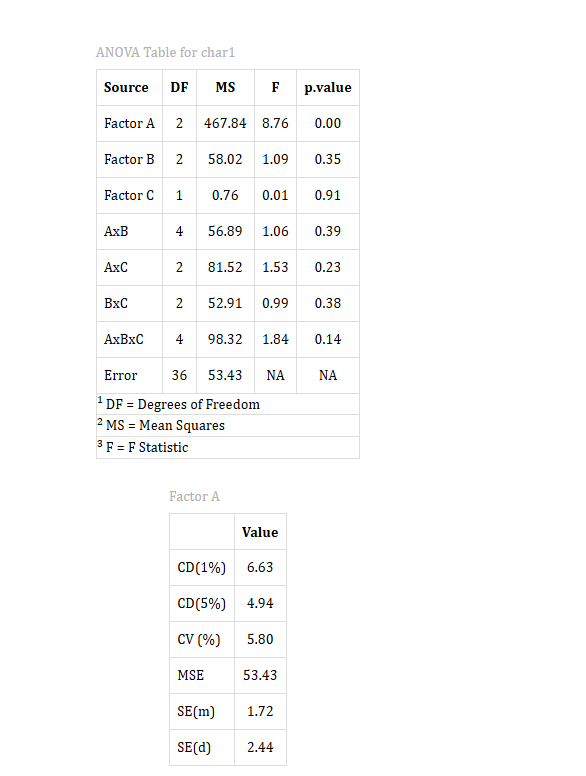
The Individual ANOVA tab prints CD(1%) and CD(5%) side by side, here 6.63 and 4.94 for Factor A on char1, whereas the main results table prints only the CD at the \(\alpha\) you selected. They are the same quantity computed at two significance levels; quote the one that matches the \(\alpha\) stated in your methods section.
11 Visualising the results
Numbers in a table are convincing; a picture is persuasive. RAISINS groups its graphics into two sub-tabs, Basic Plots and Advanced Plots. In both, the plots sit behind a row of icon buttons: click an icon to draw that plot, then open the Plot Settings panel beside it to choose the factor for the x-axis, the response to plot, and the export format (PNG, JPEG, TIFF, PDF or SVG).
11.1 Basic Plots
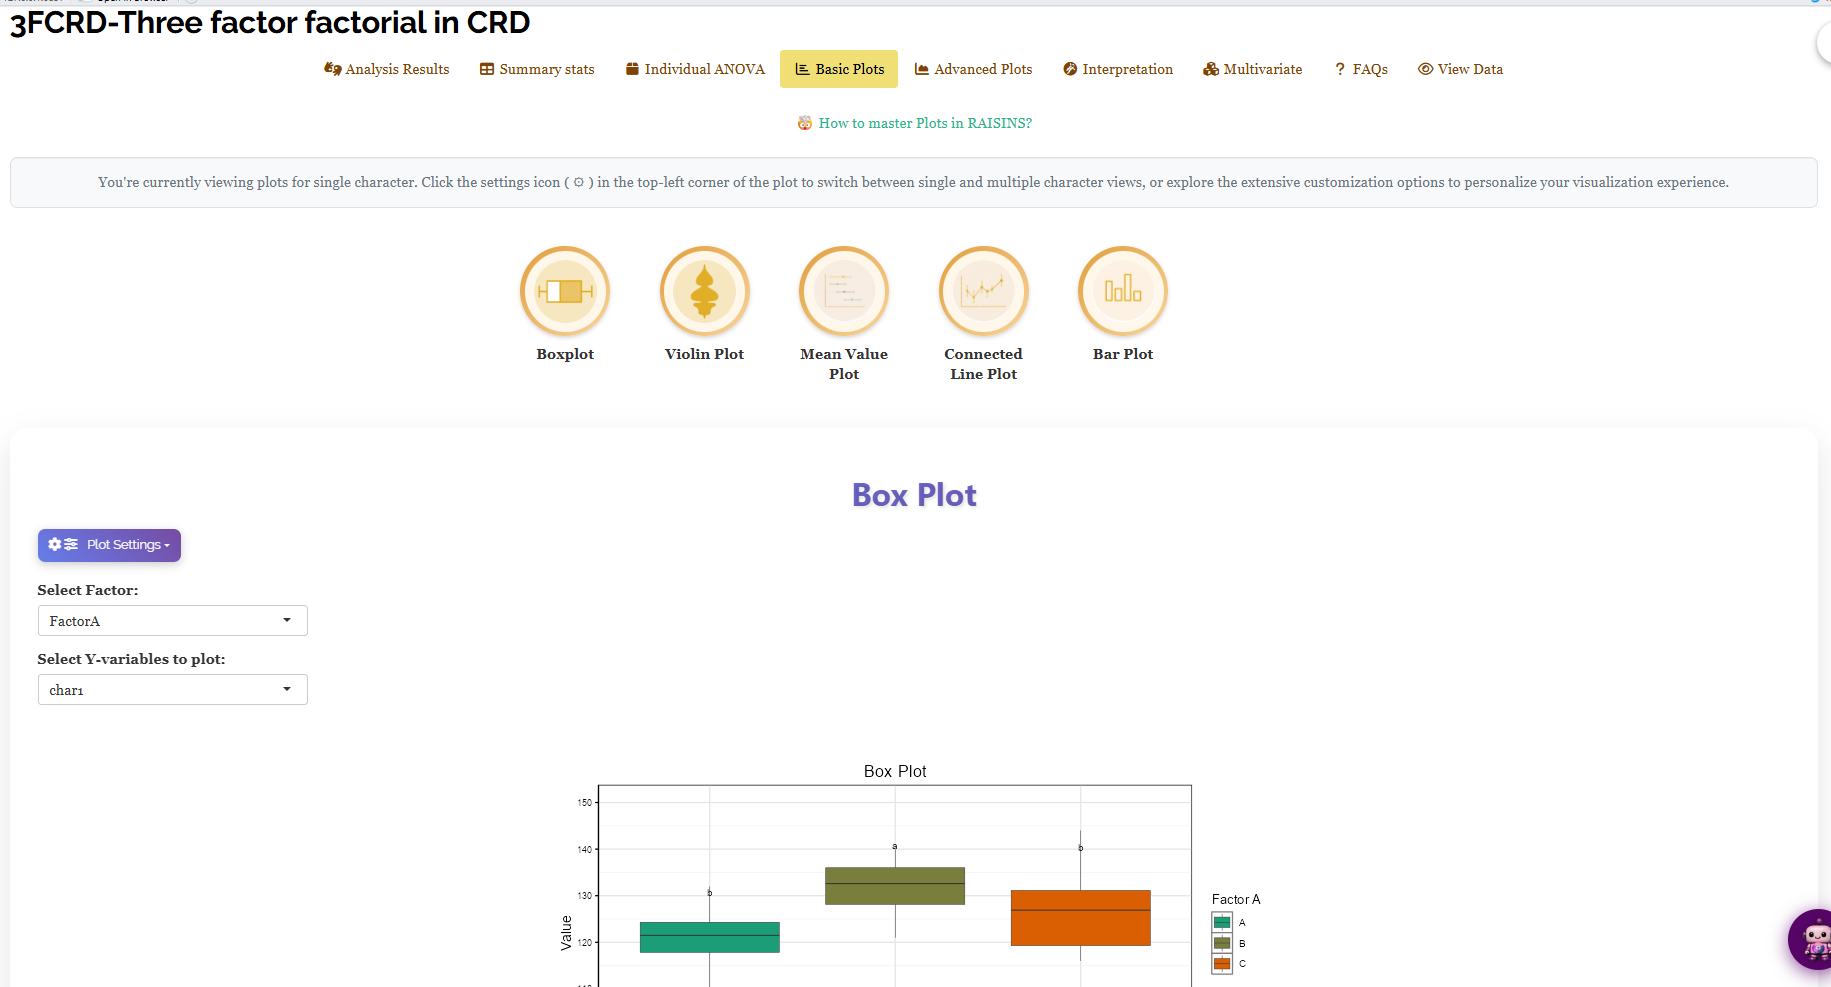
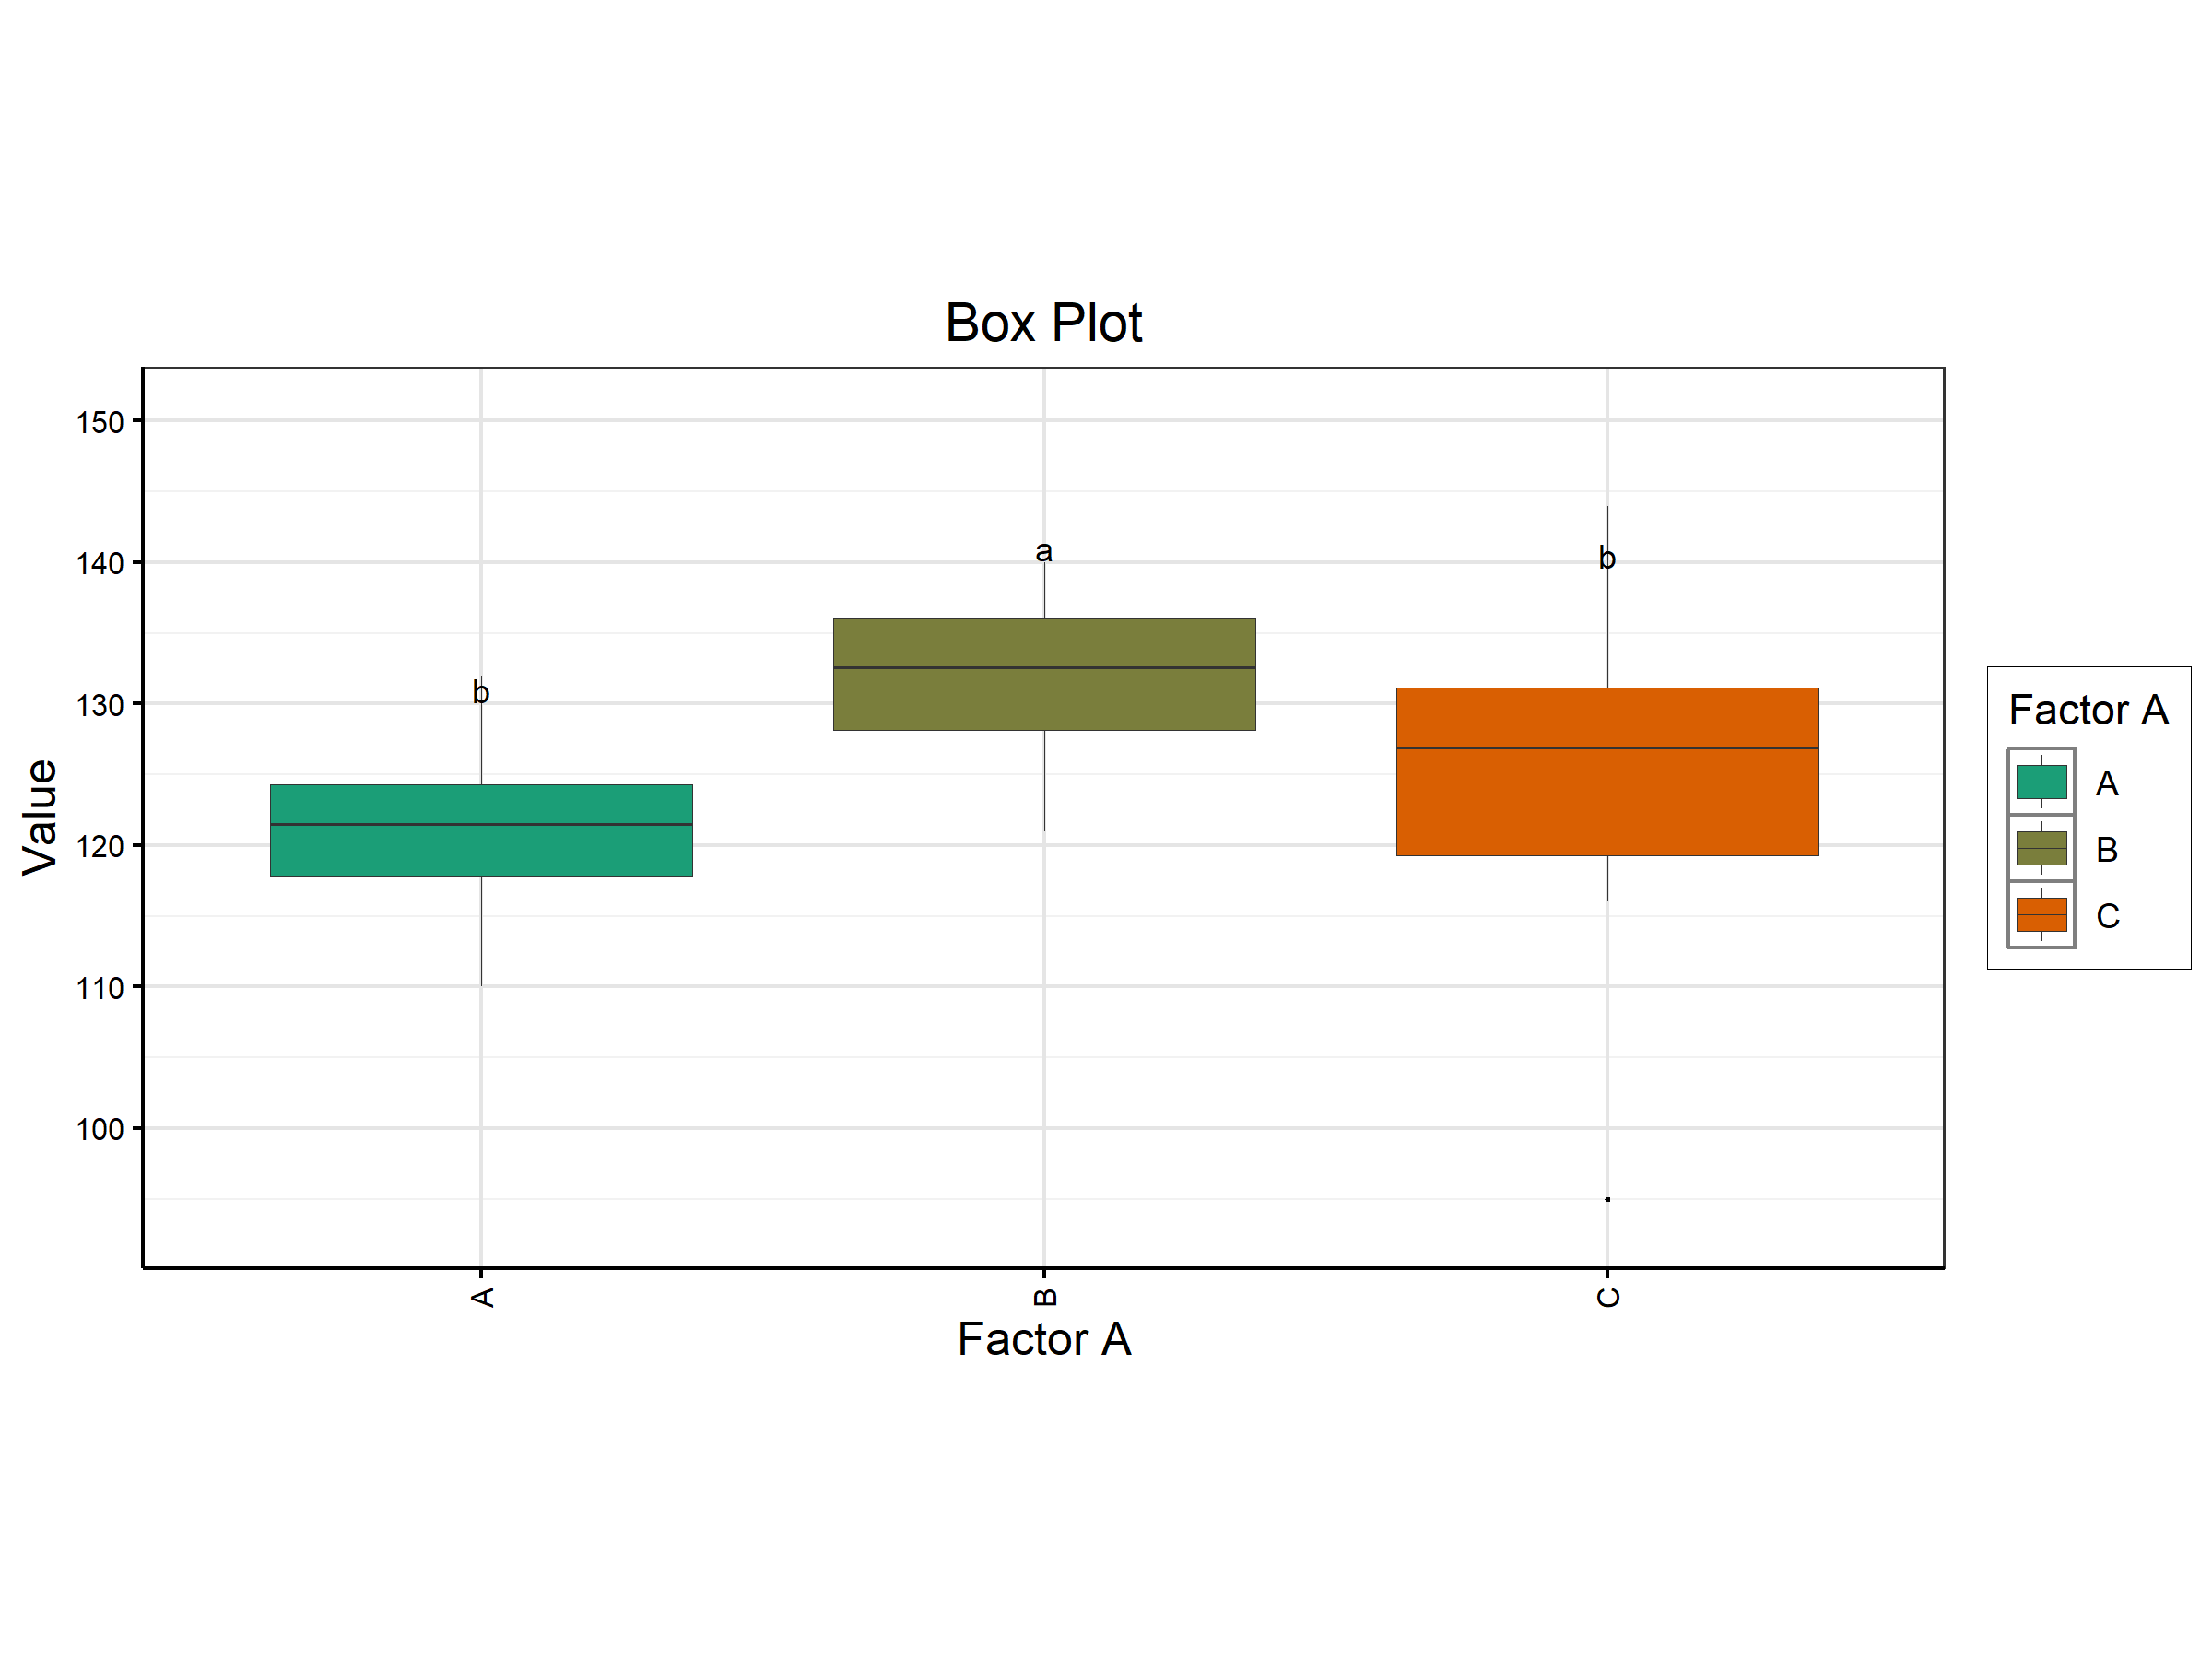
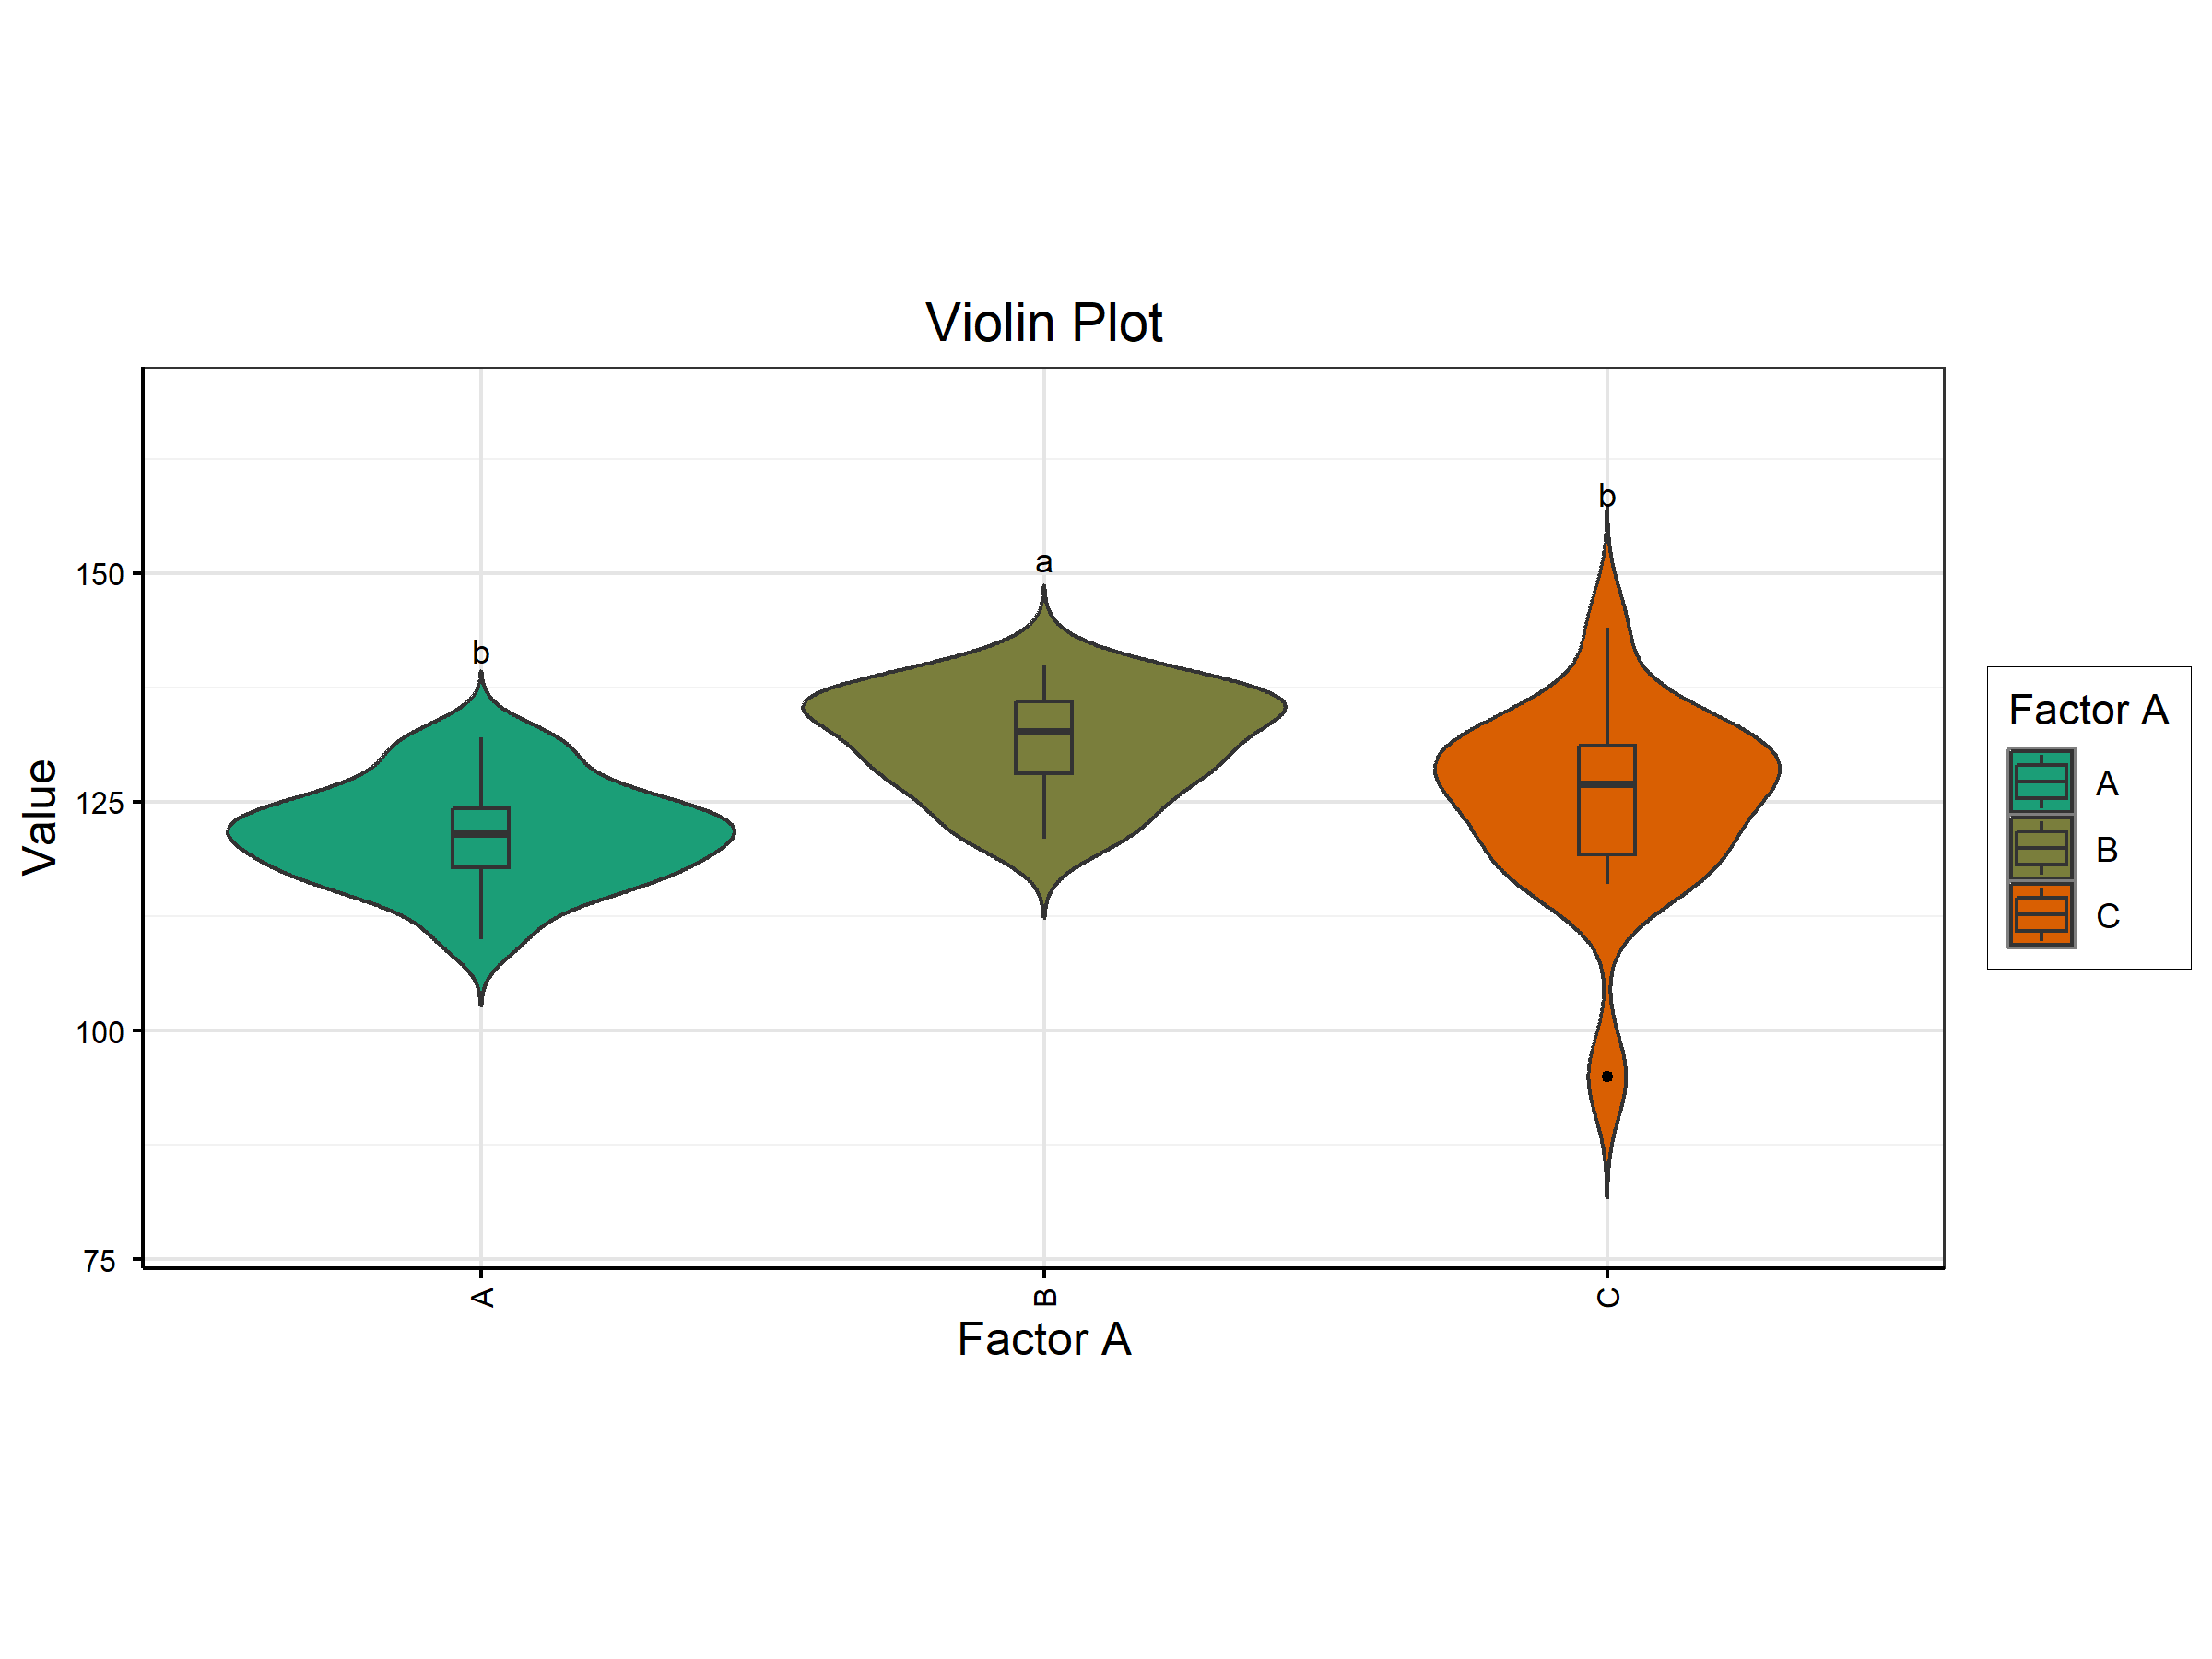
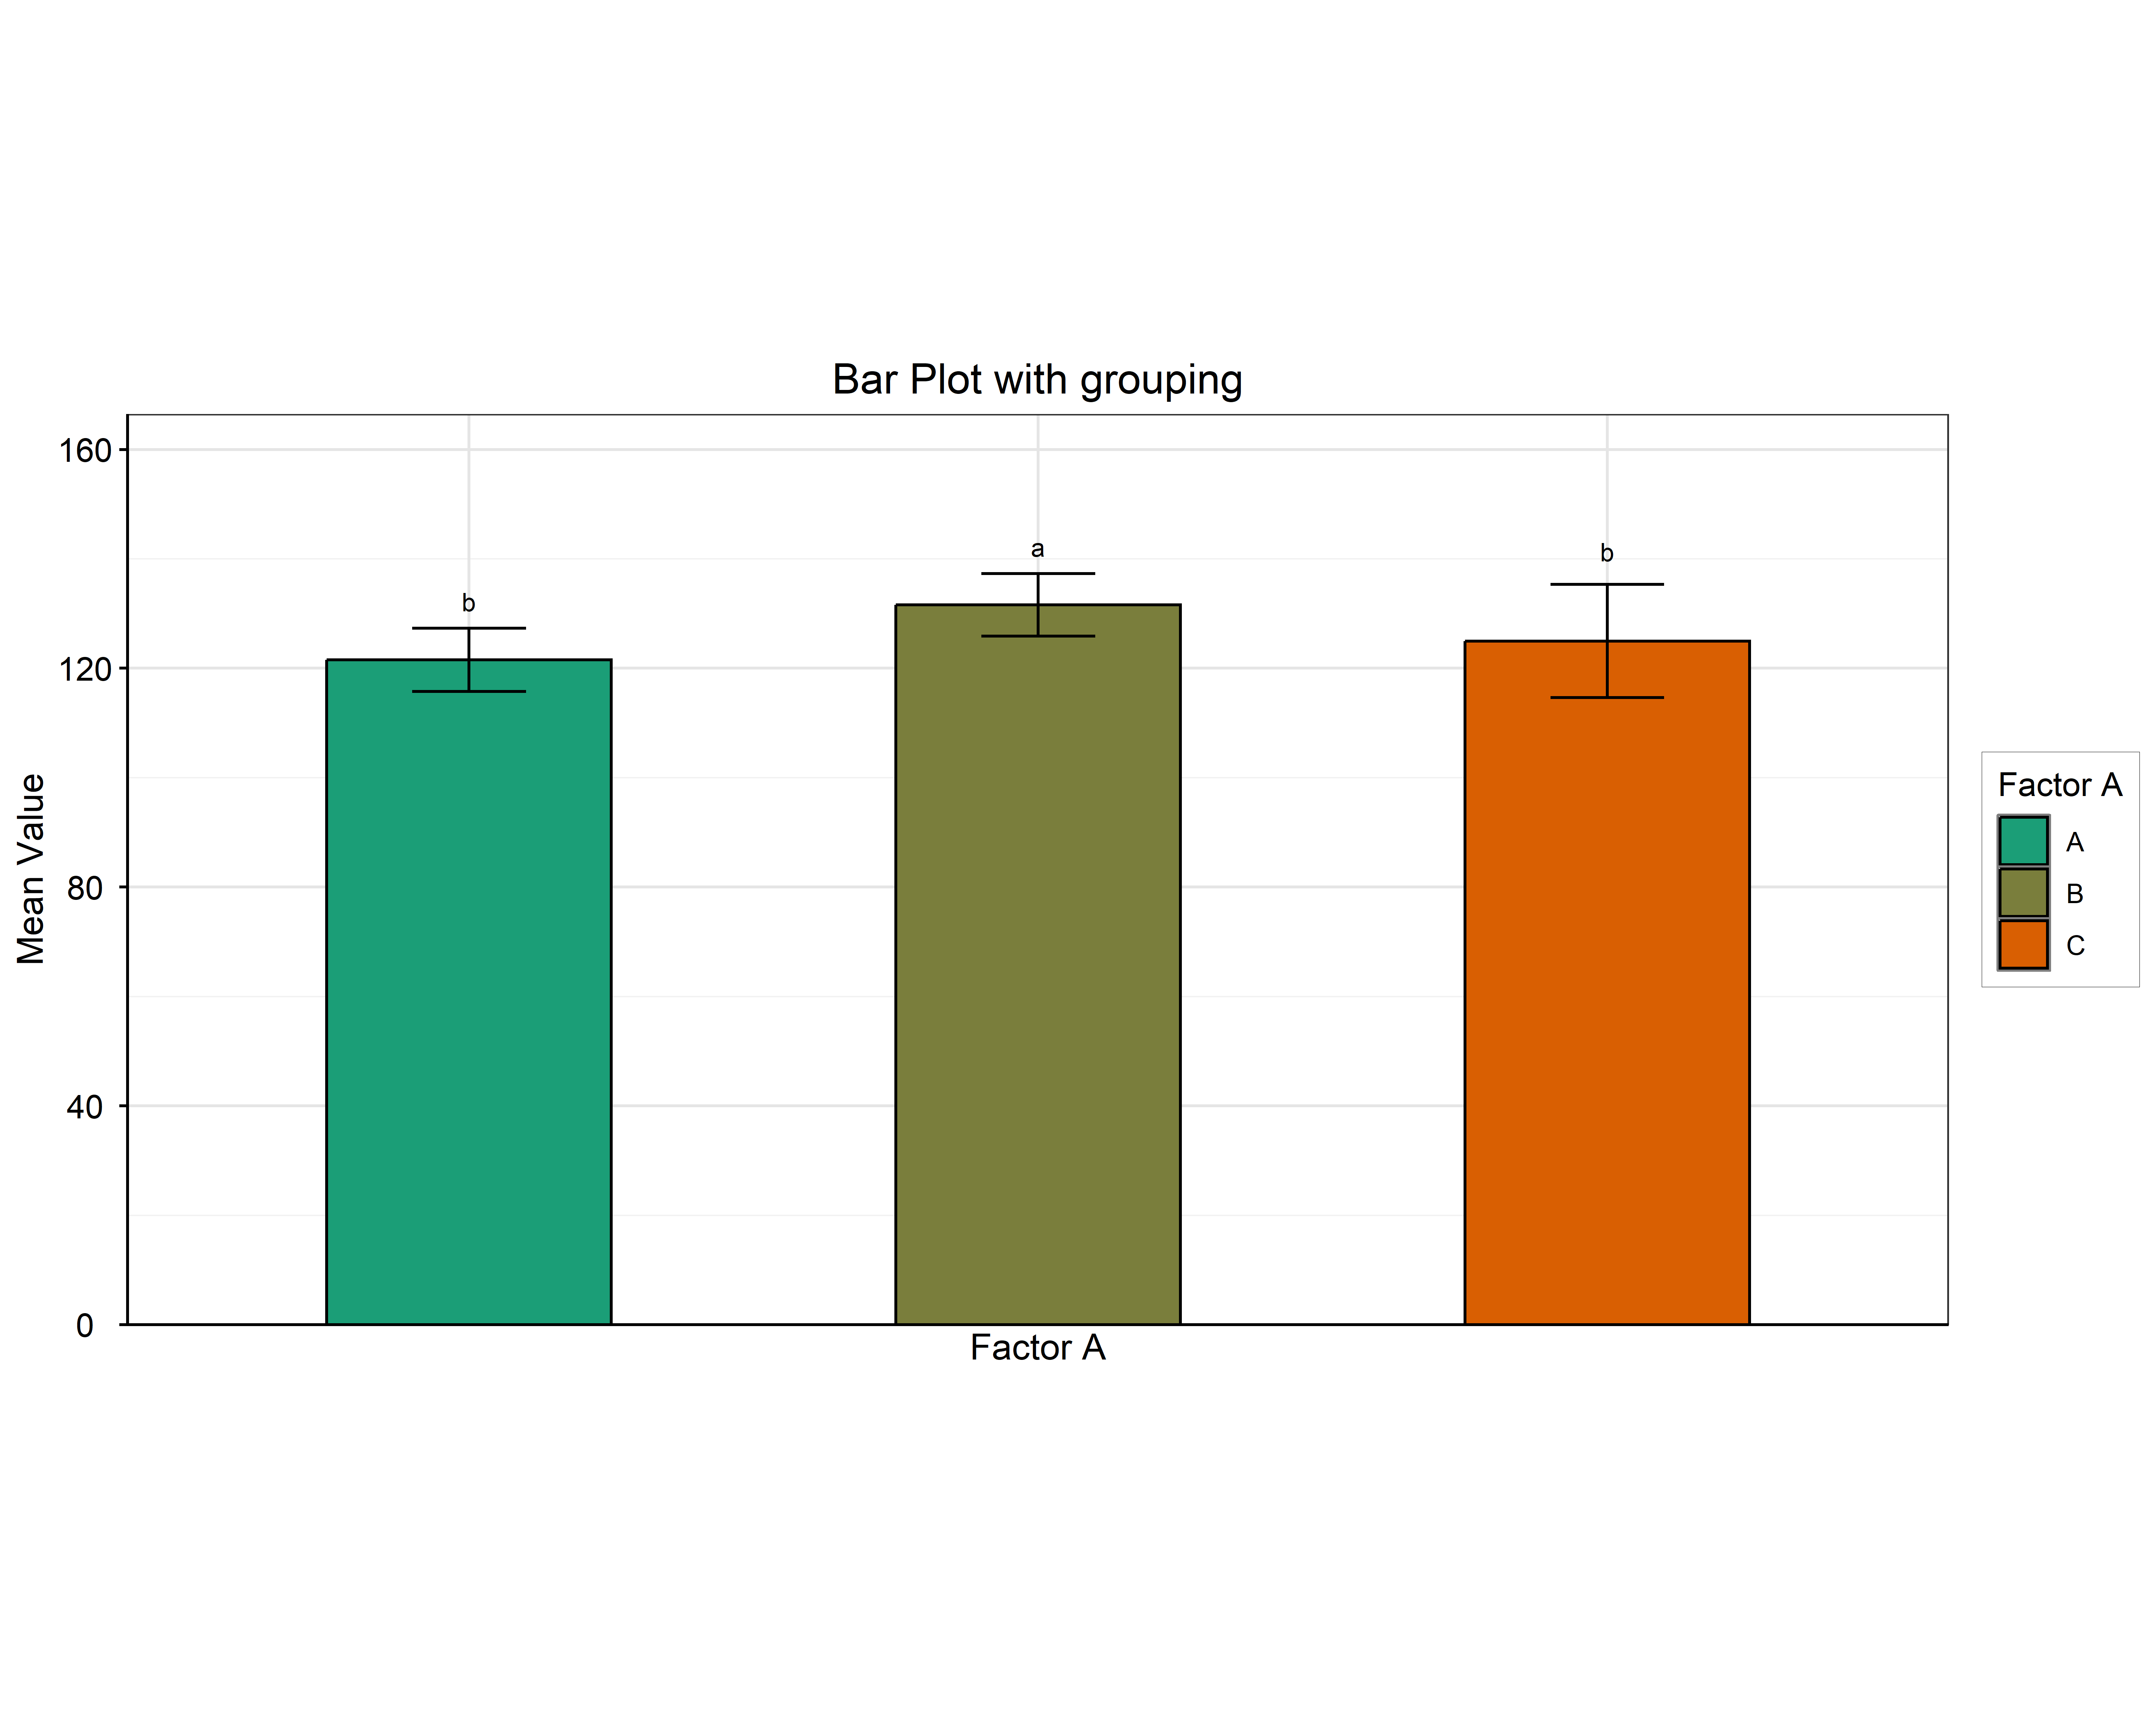
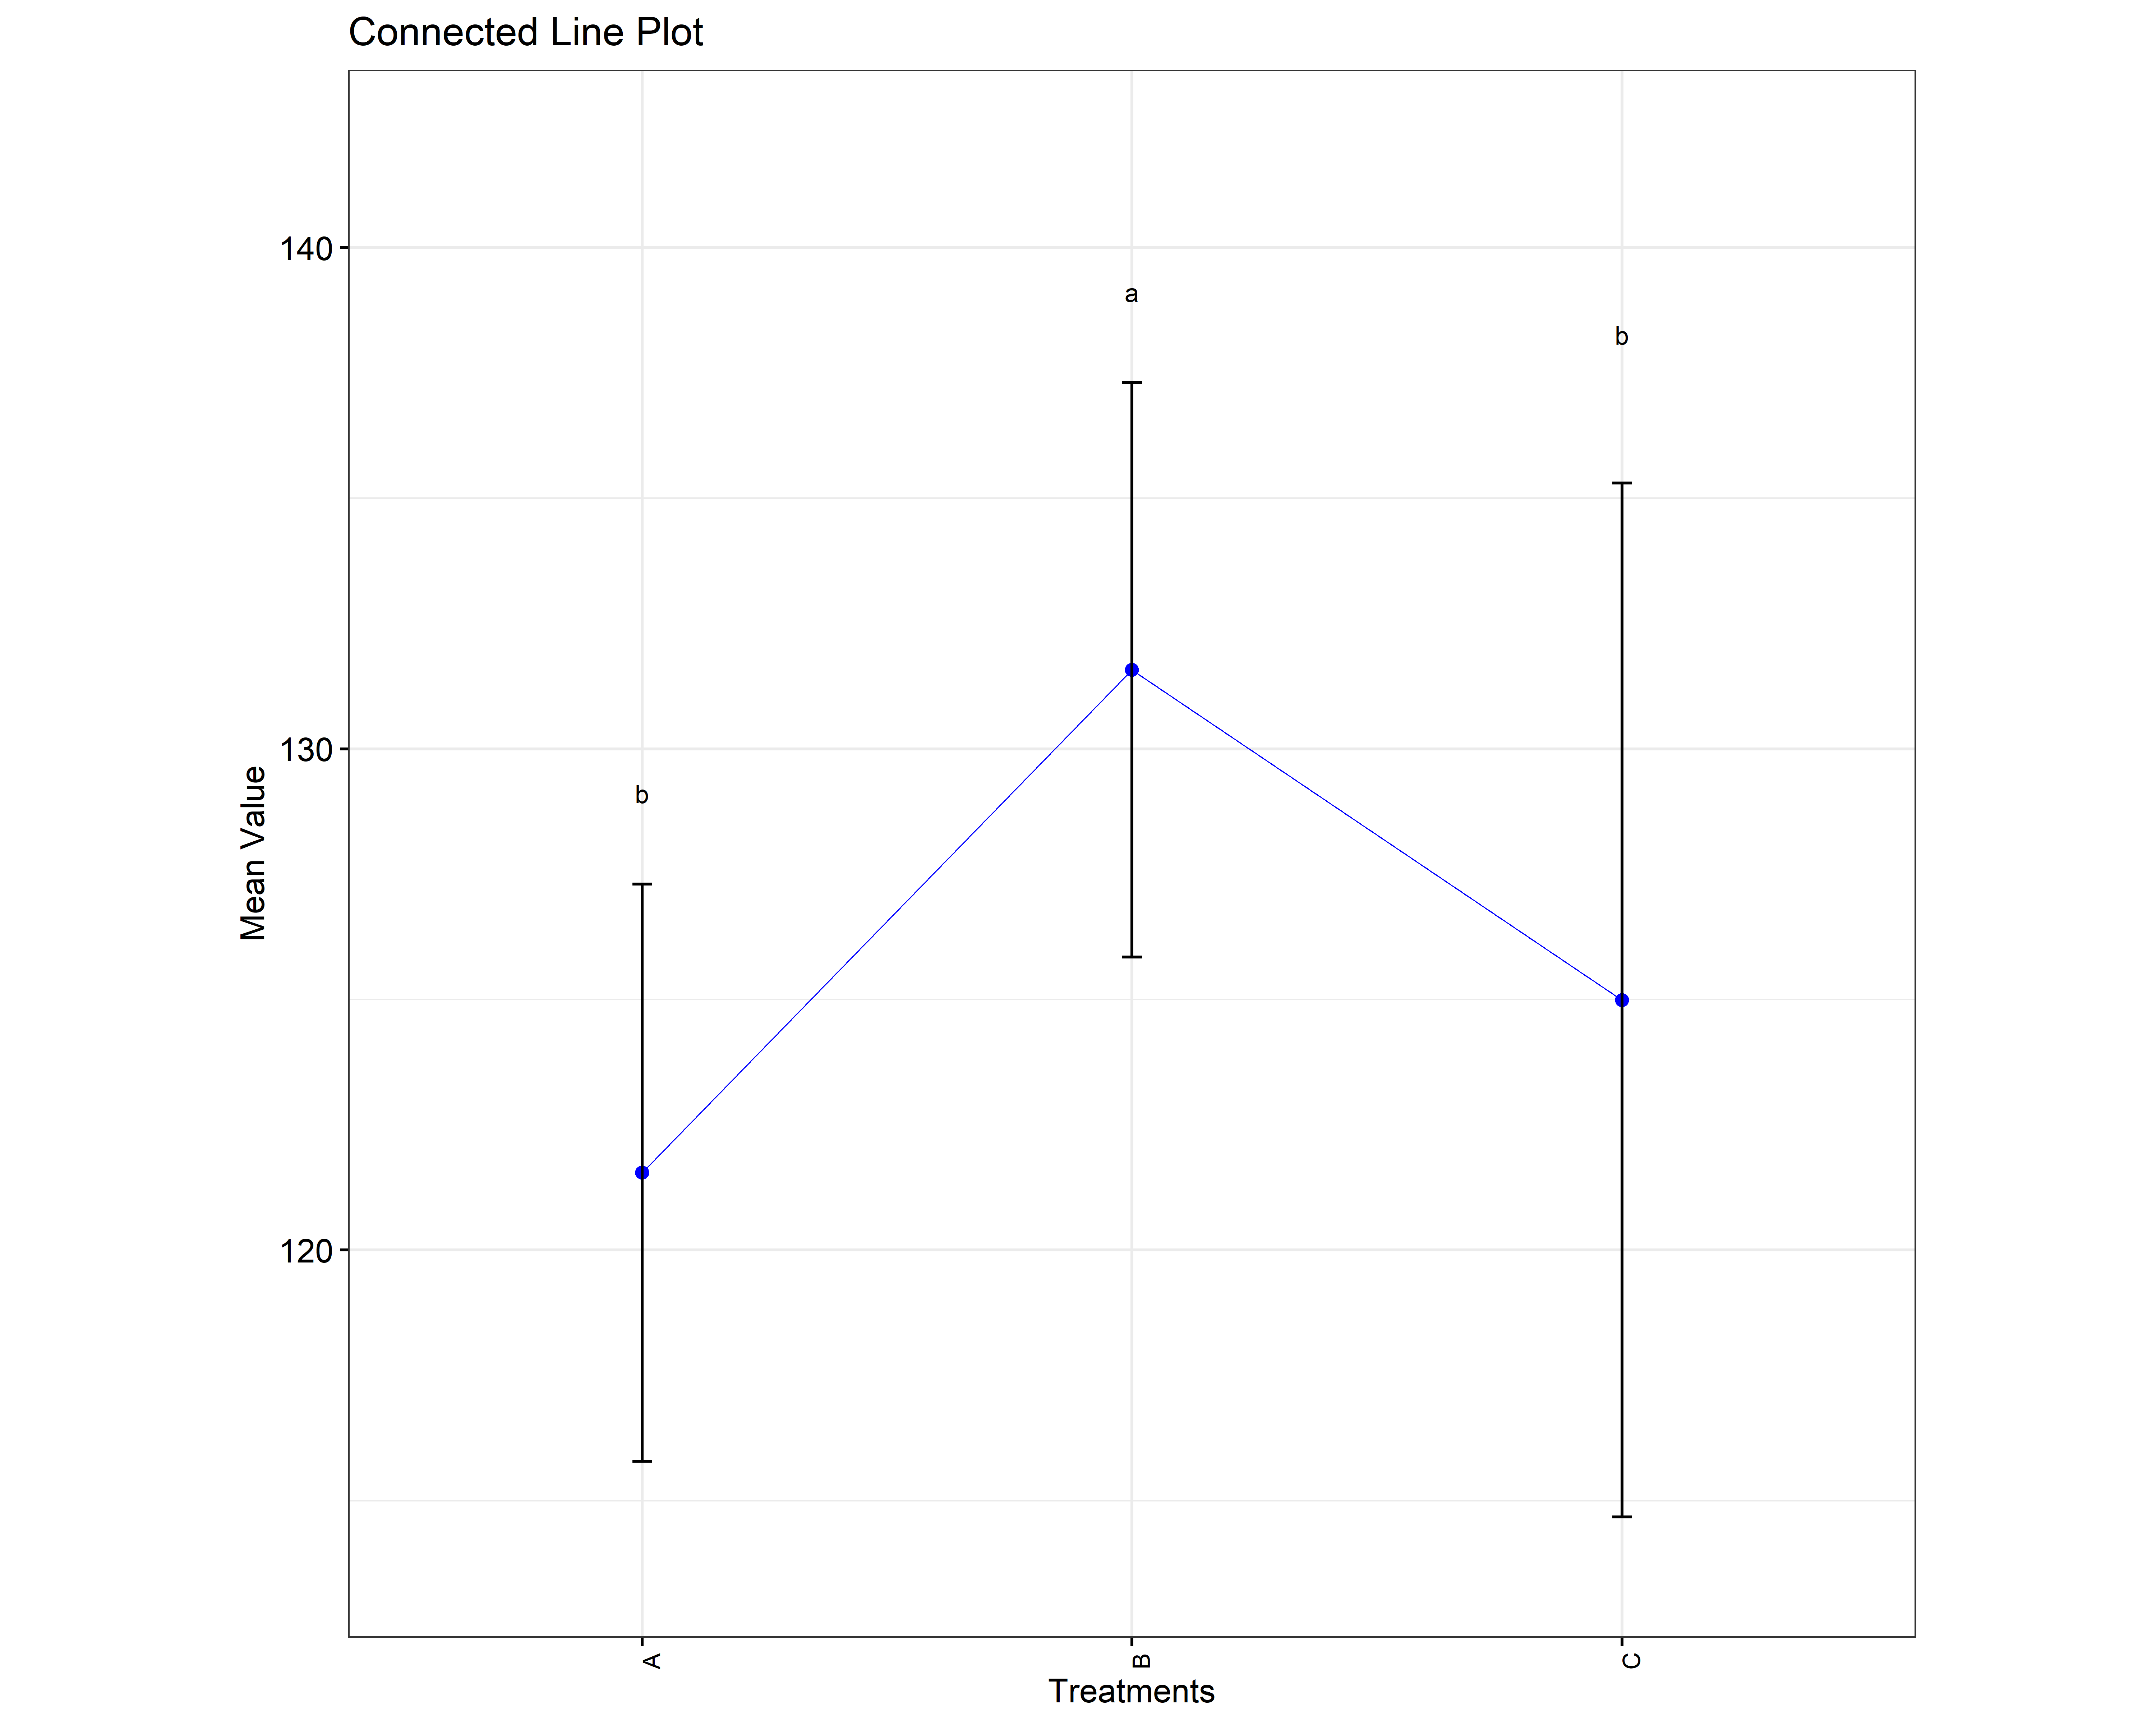
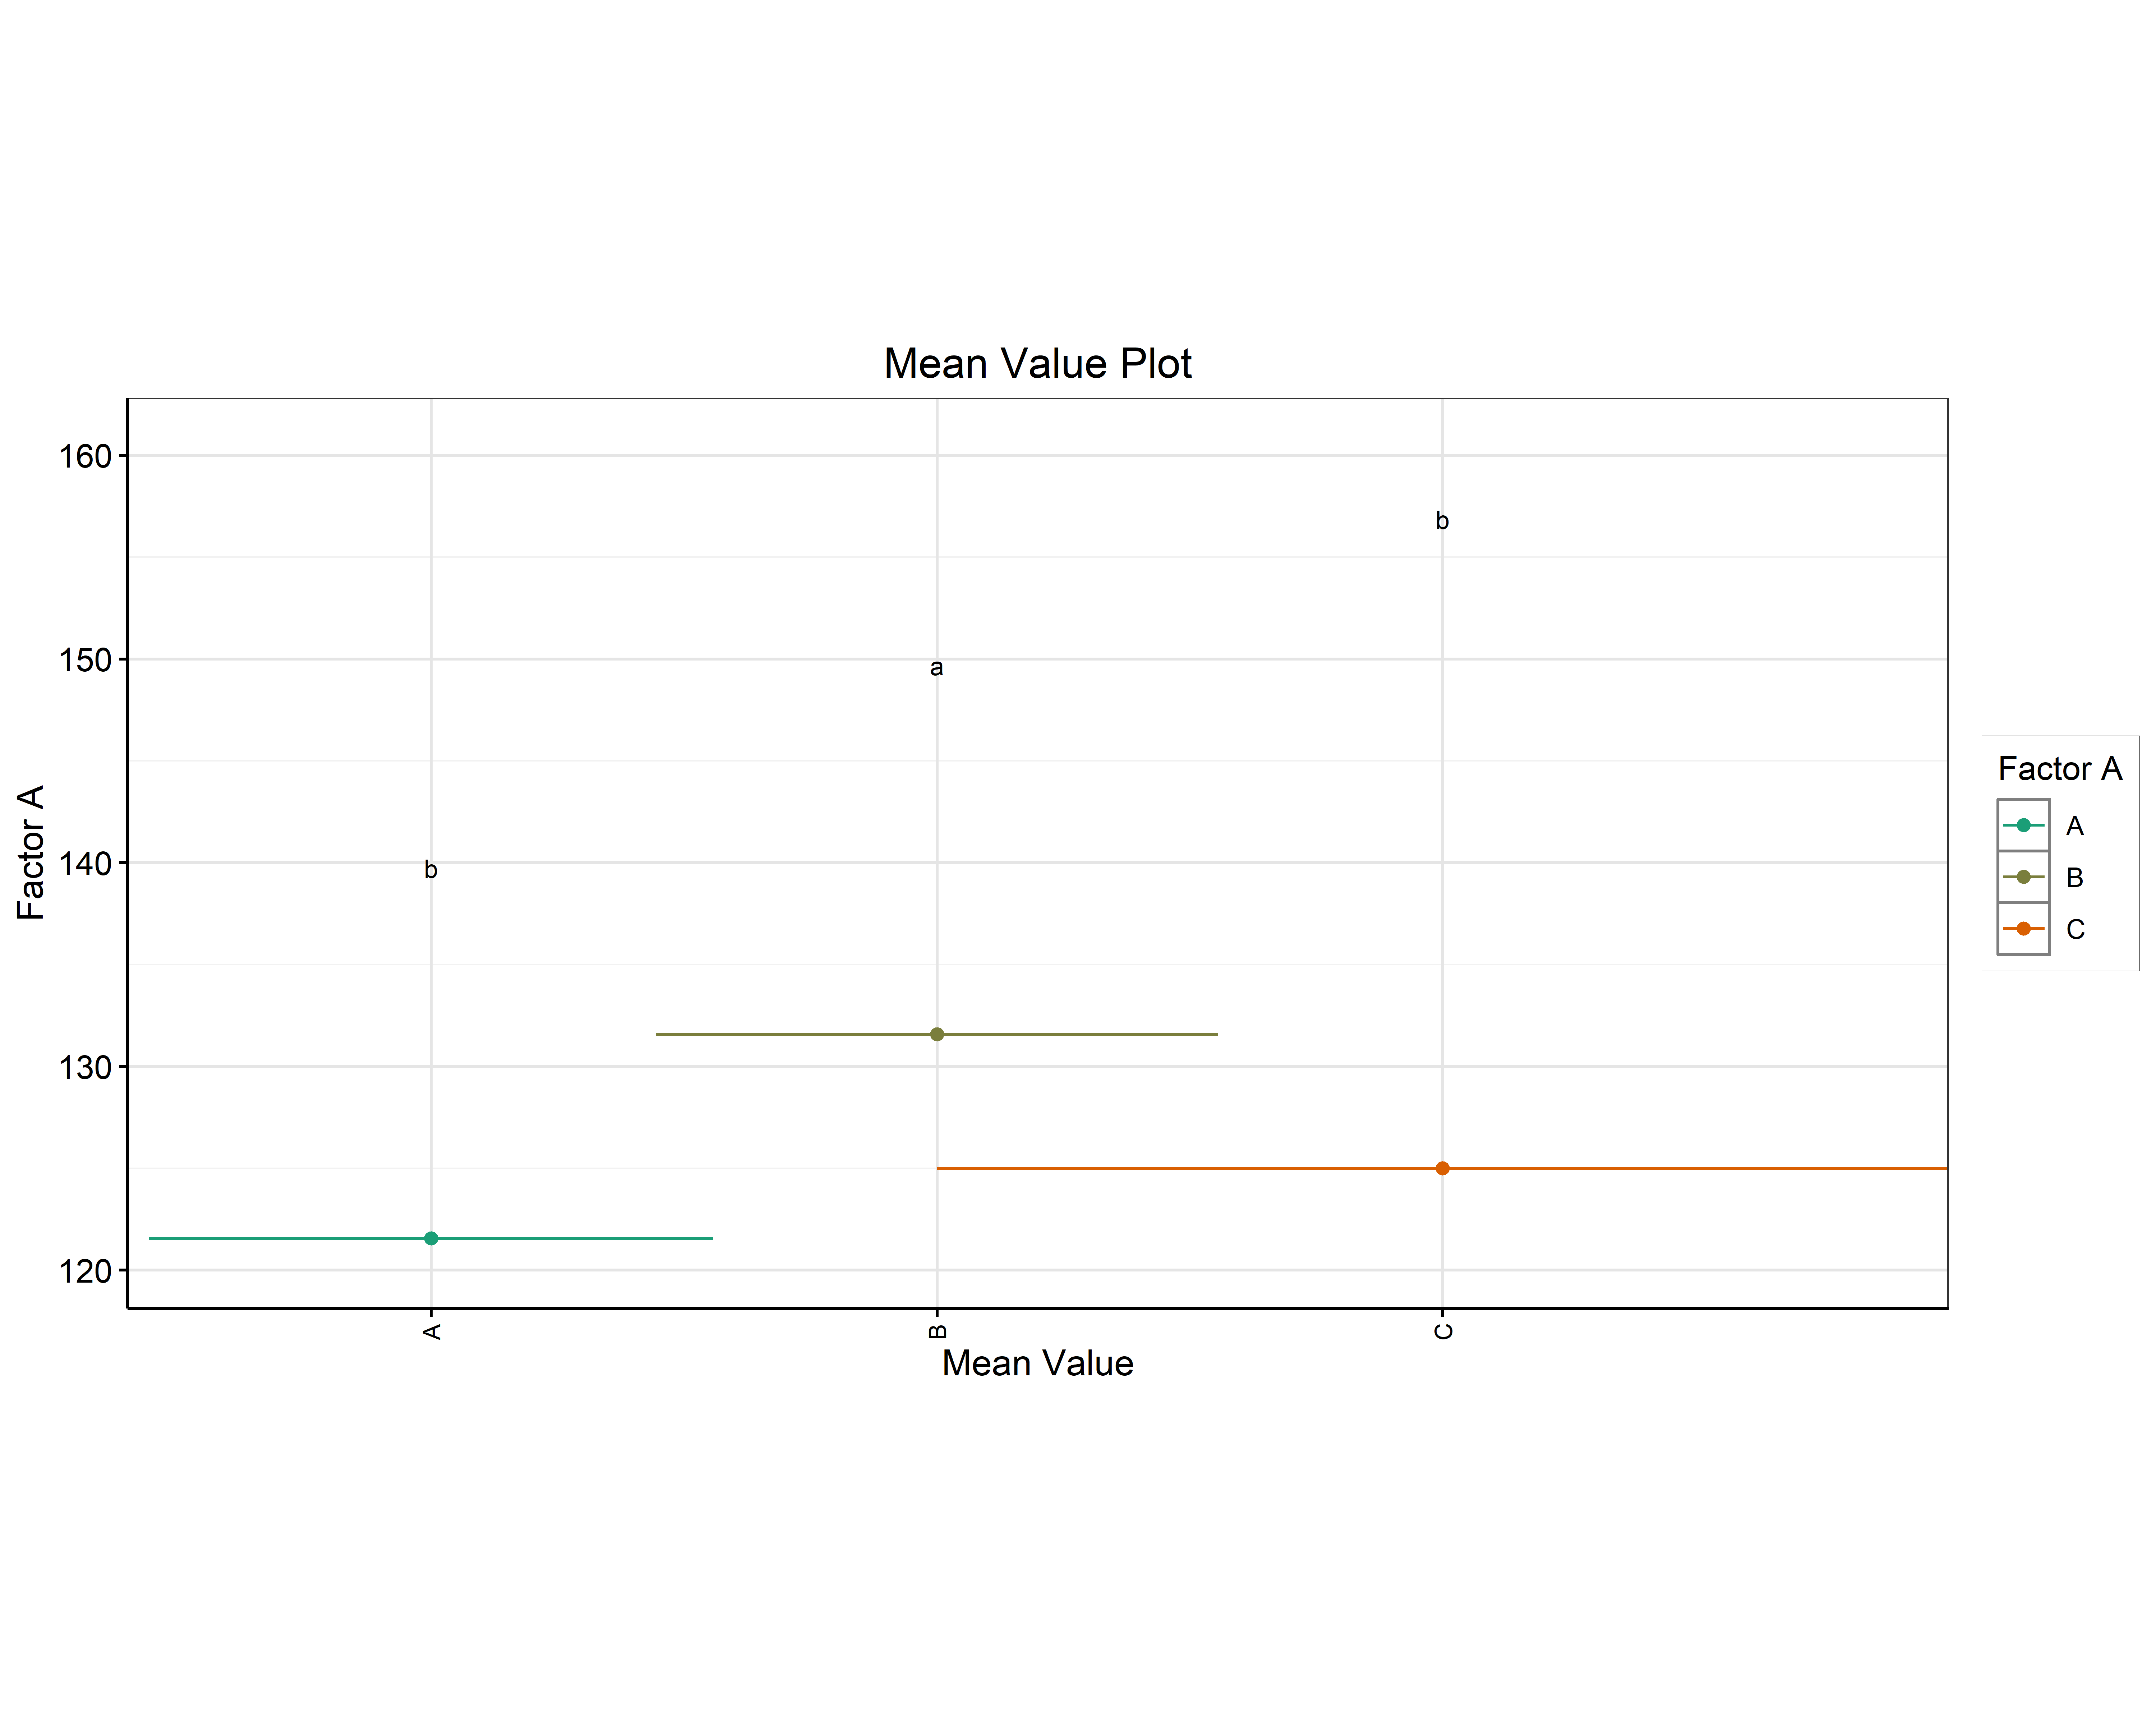
The Basic Plots tab (Figure 14) offers five everyday graphics: a Boxplot, a Violin Plot, a Mean Value Plot, a Connected Line Plot and a Bar Plot. Choose Select Factor (FactorA, FactorB or FactorC) and Select Y-variables to plot, and the chosen response is drawn across the levels of the chosen factor. Figure 15 shows the same comparison, char1 across the three levels of Factor A, drawn four ways.
11.2 Advanced Plots
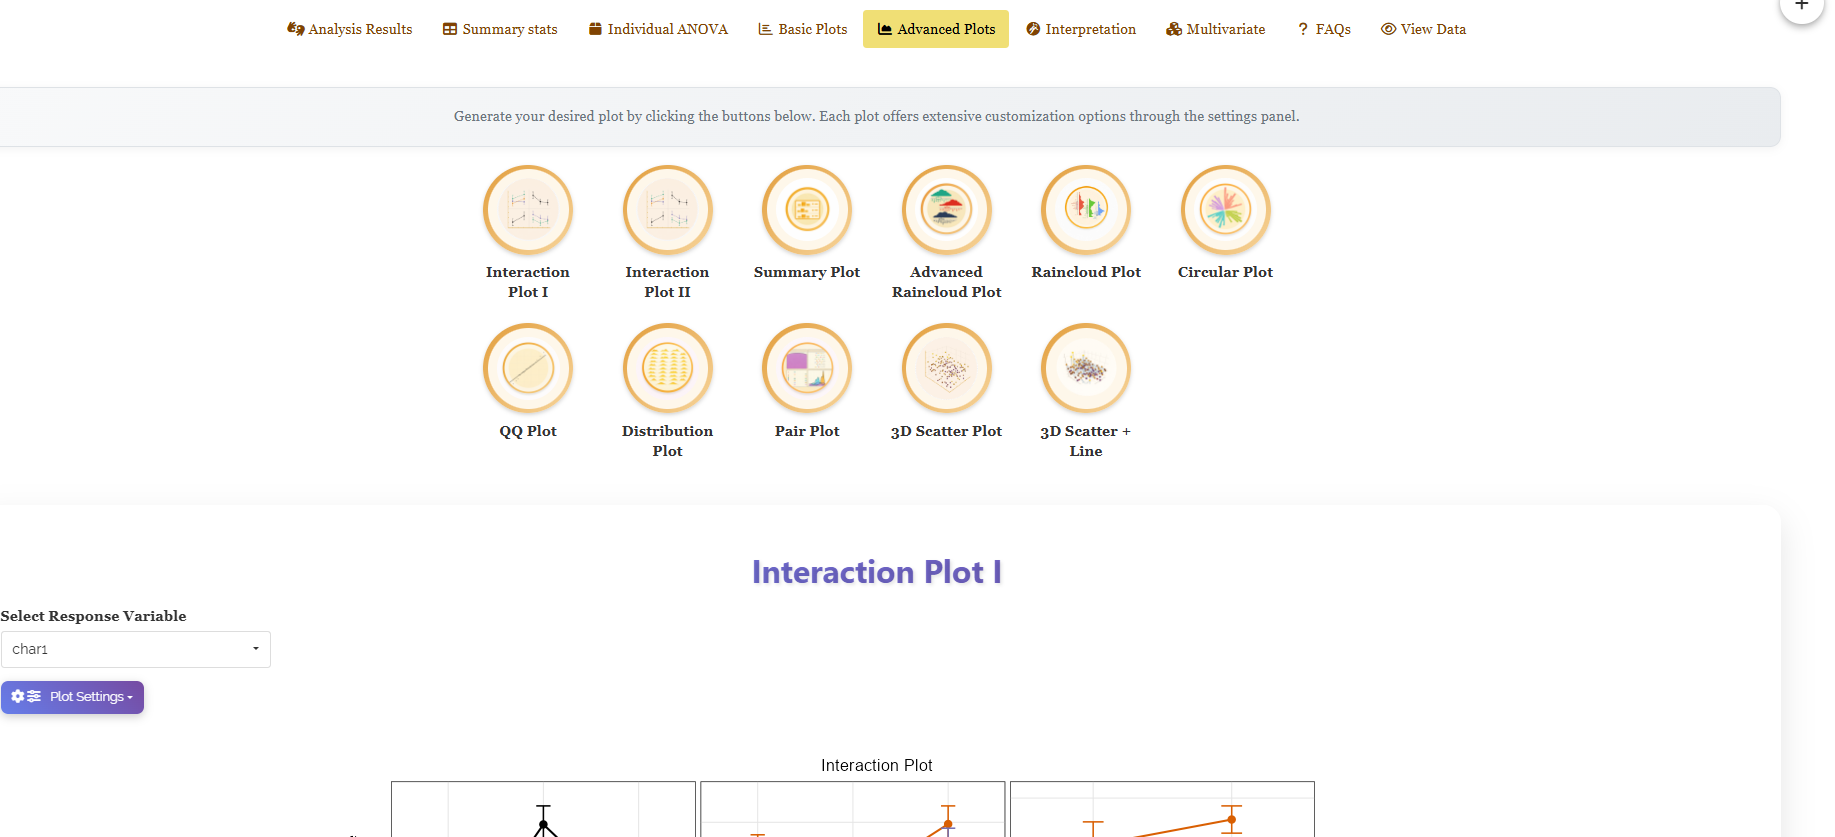
The Advanced Plots tab (Figure 16) adds the specialised graphics: Interaction Plot I and Interaction Plot II, a Summary Plot, a Raincloud Plot and an Advanced Raincloud Plot, a Circular Plot, a QQ Plot, a Distribution Plot, a Pair Plot, and 3D Scatter Plot and 3D Scatter + Line views. Each has its own Select Response Variable control and Plot Settings panel.
The interaction plot
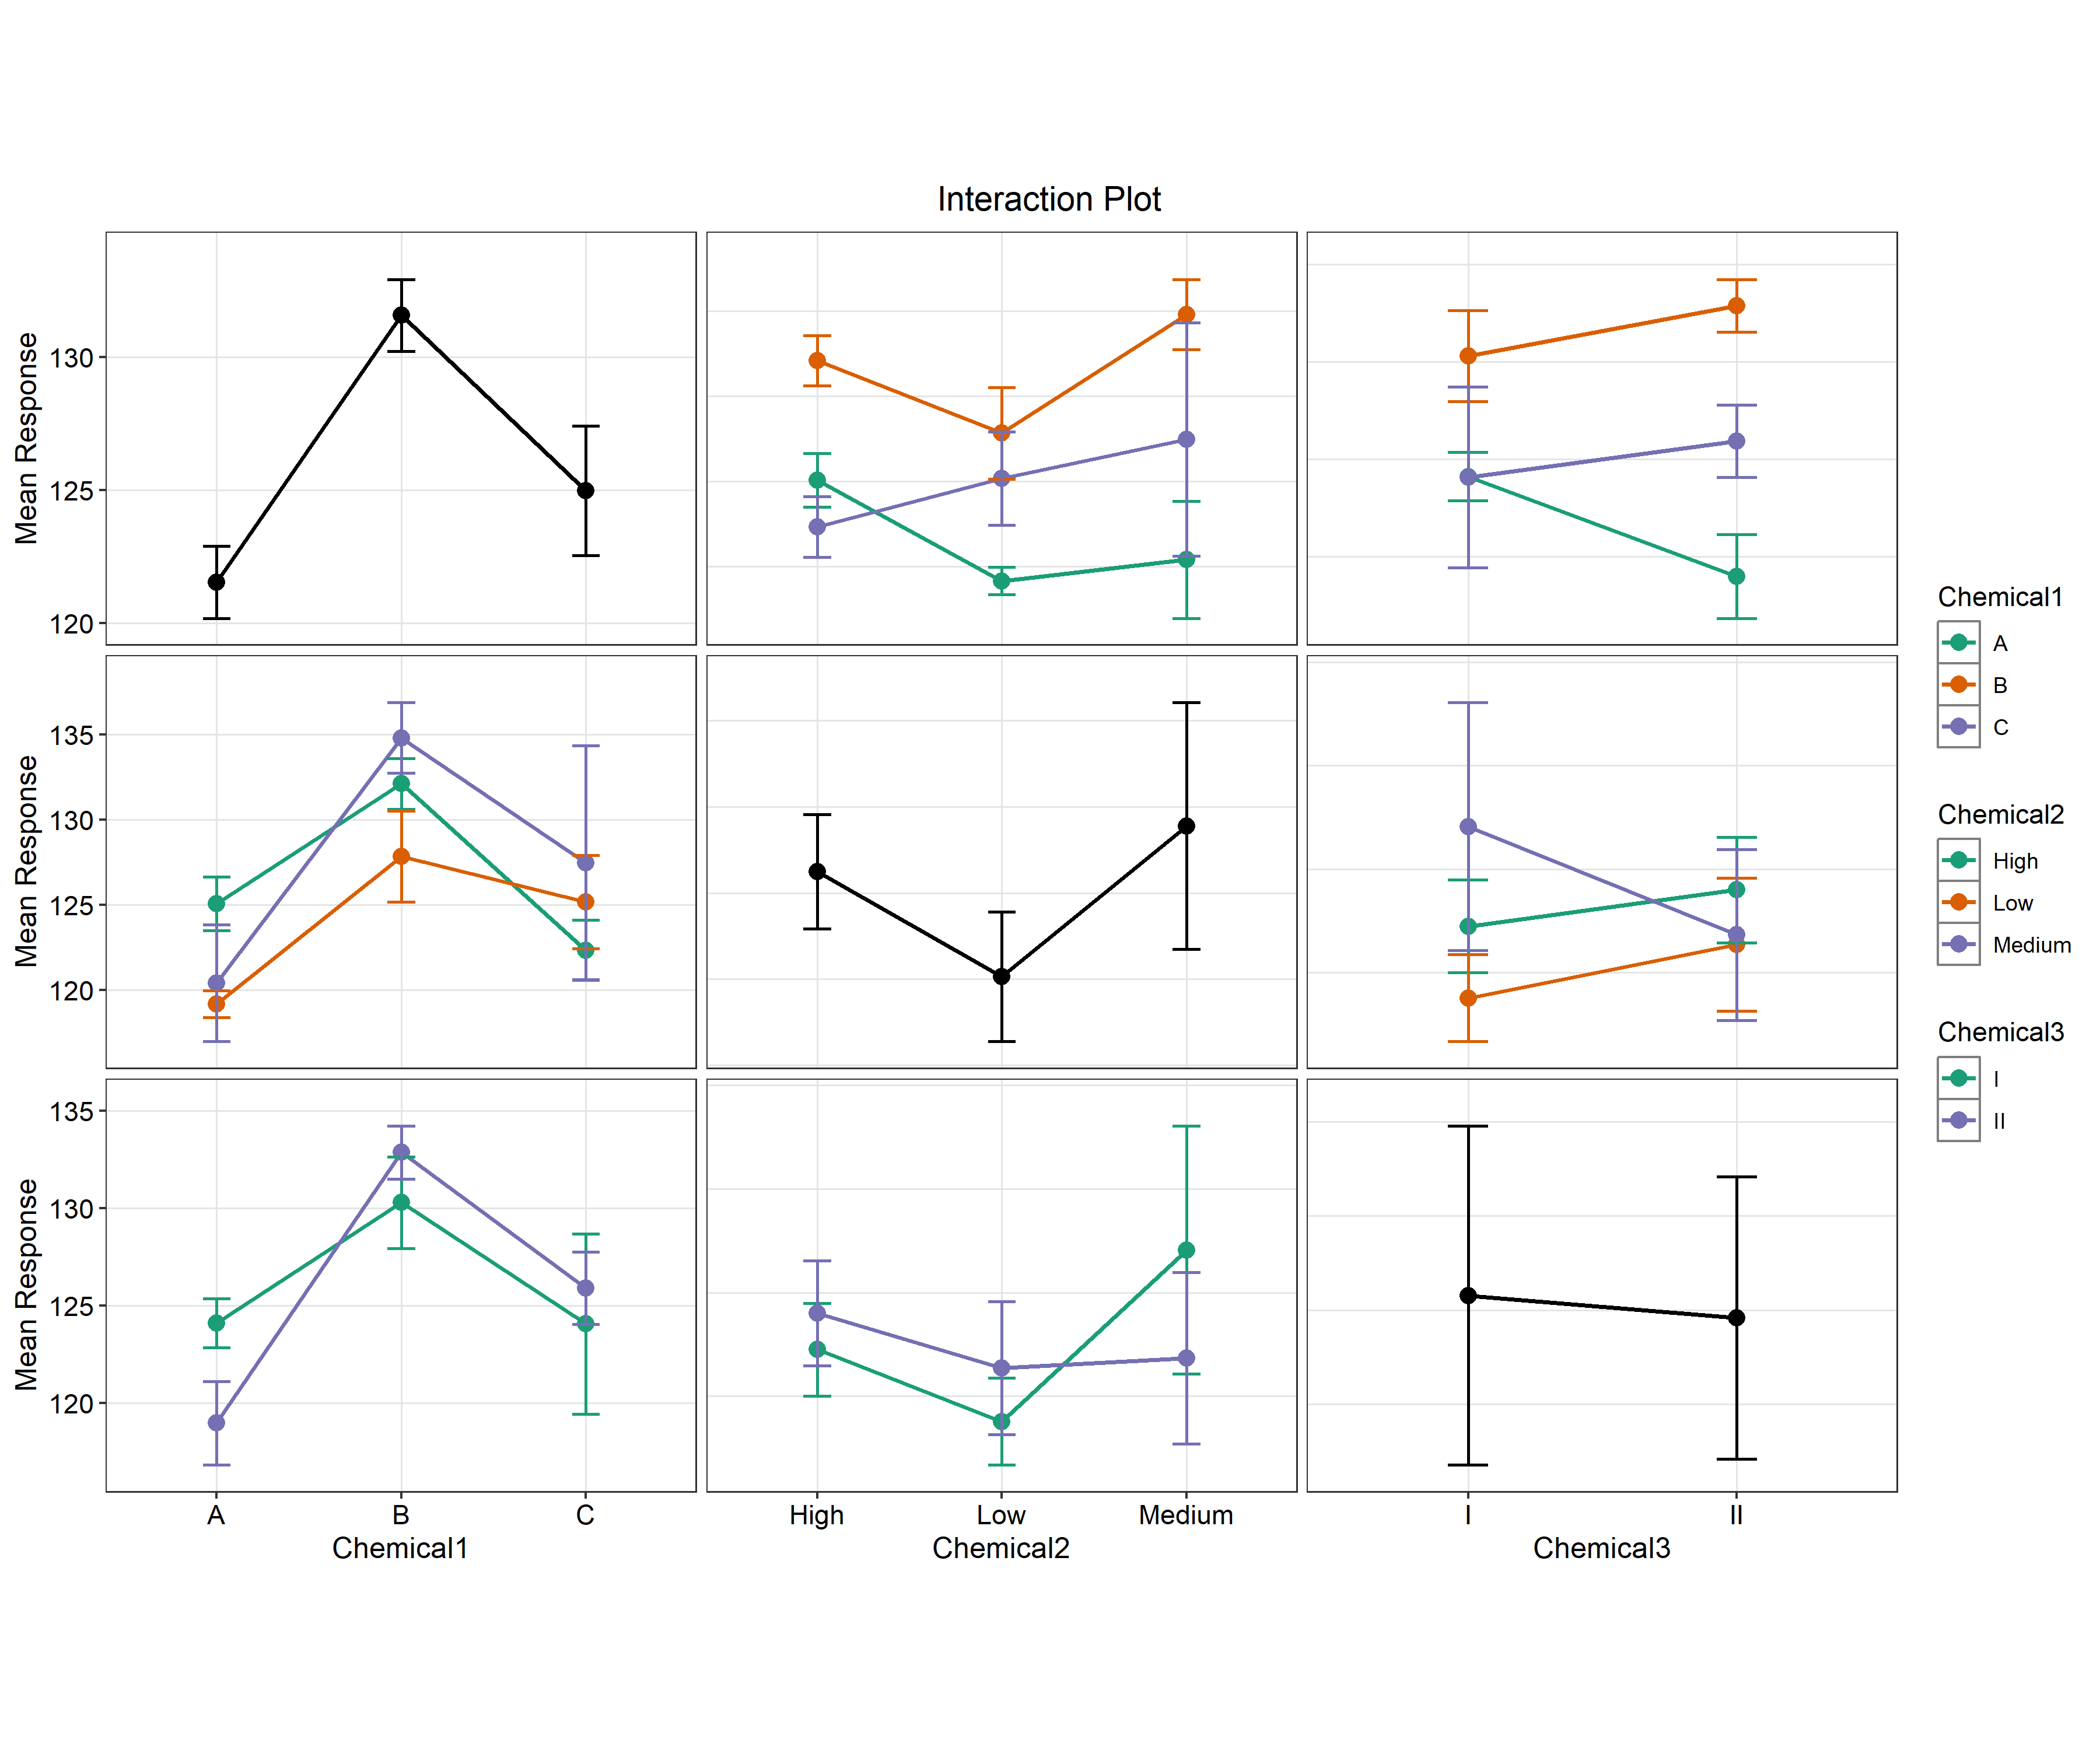
The Interaction Plot is the single most important graphic on this tab, because it is the visual form of the question the whole design exists to answer. For a three-factor experiment RAISINS draws it as a 3 × 3 grid of panels (Figure 17), and the grid is easier to read once you know how it is laid out. The x-axis of every panel in a column is the factor named at the foot of that column, Chemical1, Chemical2 and Chemical3 from left to right. The three panels on the diagonal are drawn in black and carry no legend: each is that factor’s own main effect, the mean response at each of its levels with error bars. The six off-diagonal panels are the two-way interaction profiles: each draws the mean response against the column factor, with a separate coloured line for every level of a second factor. Because each pair appears twice, once in each orientation, you can look at an interaction from whichever side is easier to interpret.
Reading the grid is then a matter of looking at the slopes:
- Parallel lines mean the vertical gap between them is the same at every level of the x-axis factor, so one factor’s effect does not depend on the other. There is no interaction.
- Lines that fan apart, converge, or cross mean the gap changes, so the effect of the x-axis factor differs between the coloured levels. That is an interaction, and a crossing is its strongest form, the ranking of the levels actually reverses.
- The black diagonal panels should be read last. When an off-diagonal panel shows crossing lines, the corresponding main-effect panel is an average over lines that disagree with one another, and quoting it alone would be misleading.
Figure 17 draws char1, which by Figure 7 has a significant Factor A effect and nothing else. The grid shows exactly that. The top-left diagonal panel rises sharply from A (\(121.5\)) to B (\(131.6\)) and falls again at C (\(125.0\)), the large main effect of Chemical1. In the two left-hand off-diagonal panels the coloured lines run broadly parallel, tracing that same peak at B without changing their order, and the error bars overlap heavily throughout. The middle-right panel, char1 against Chemical3 with a line for each level of Chemical2, is the exception: its lines actually cross, the Medium line falling from method I to method II while the Low and High lines rise. That looks like a textbook interaction, yet the B × C mean square in Figure 7 is only \(52.91^{NS}\) (\(p = 0.38\)), and the error bars in that panel are long enough to swallow the difference. This is the case the plot is best at making: apparent non-parallelism that the ANOVA declines to call real. Always read the plot beside Table 1 rather than instead of it.
When you present a significant interaction, put the interaction plot beside the interaction table. The audience sees at a glance that one factor’s effect changes with another, while the table, with its CD and letter groupings, proves it. For a three-factor design the pair is especially valuable, because eighteen cell means are hard to absorb as numbers alone.
The remaining advanced graphics look past a single comparison to the shape of the data and the relationships between traits. Figure 18 gathers five of them.
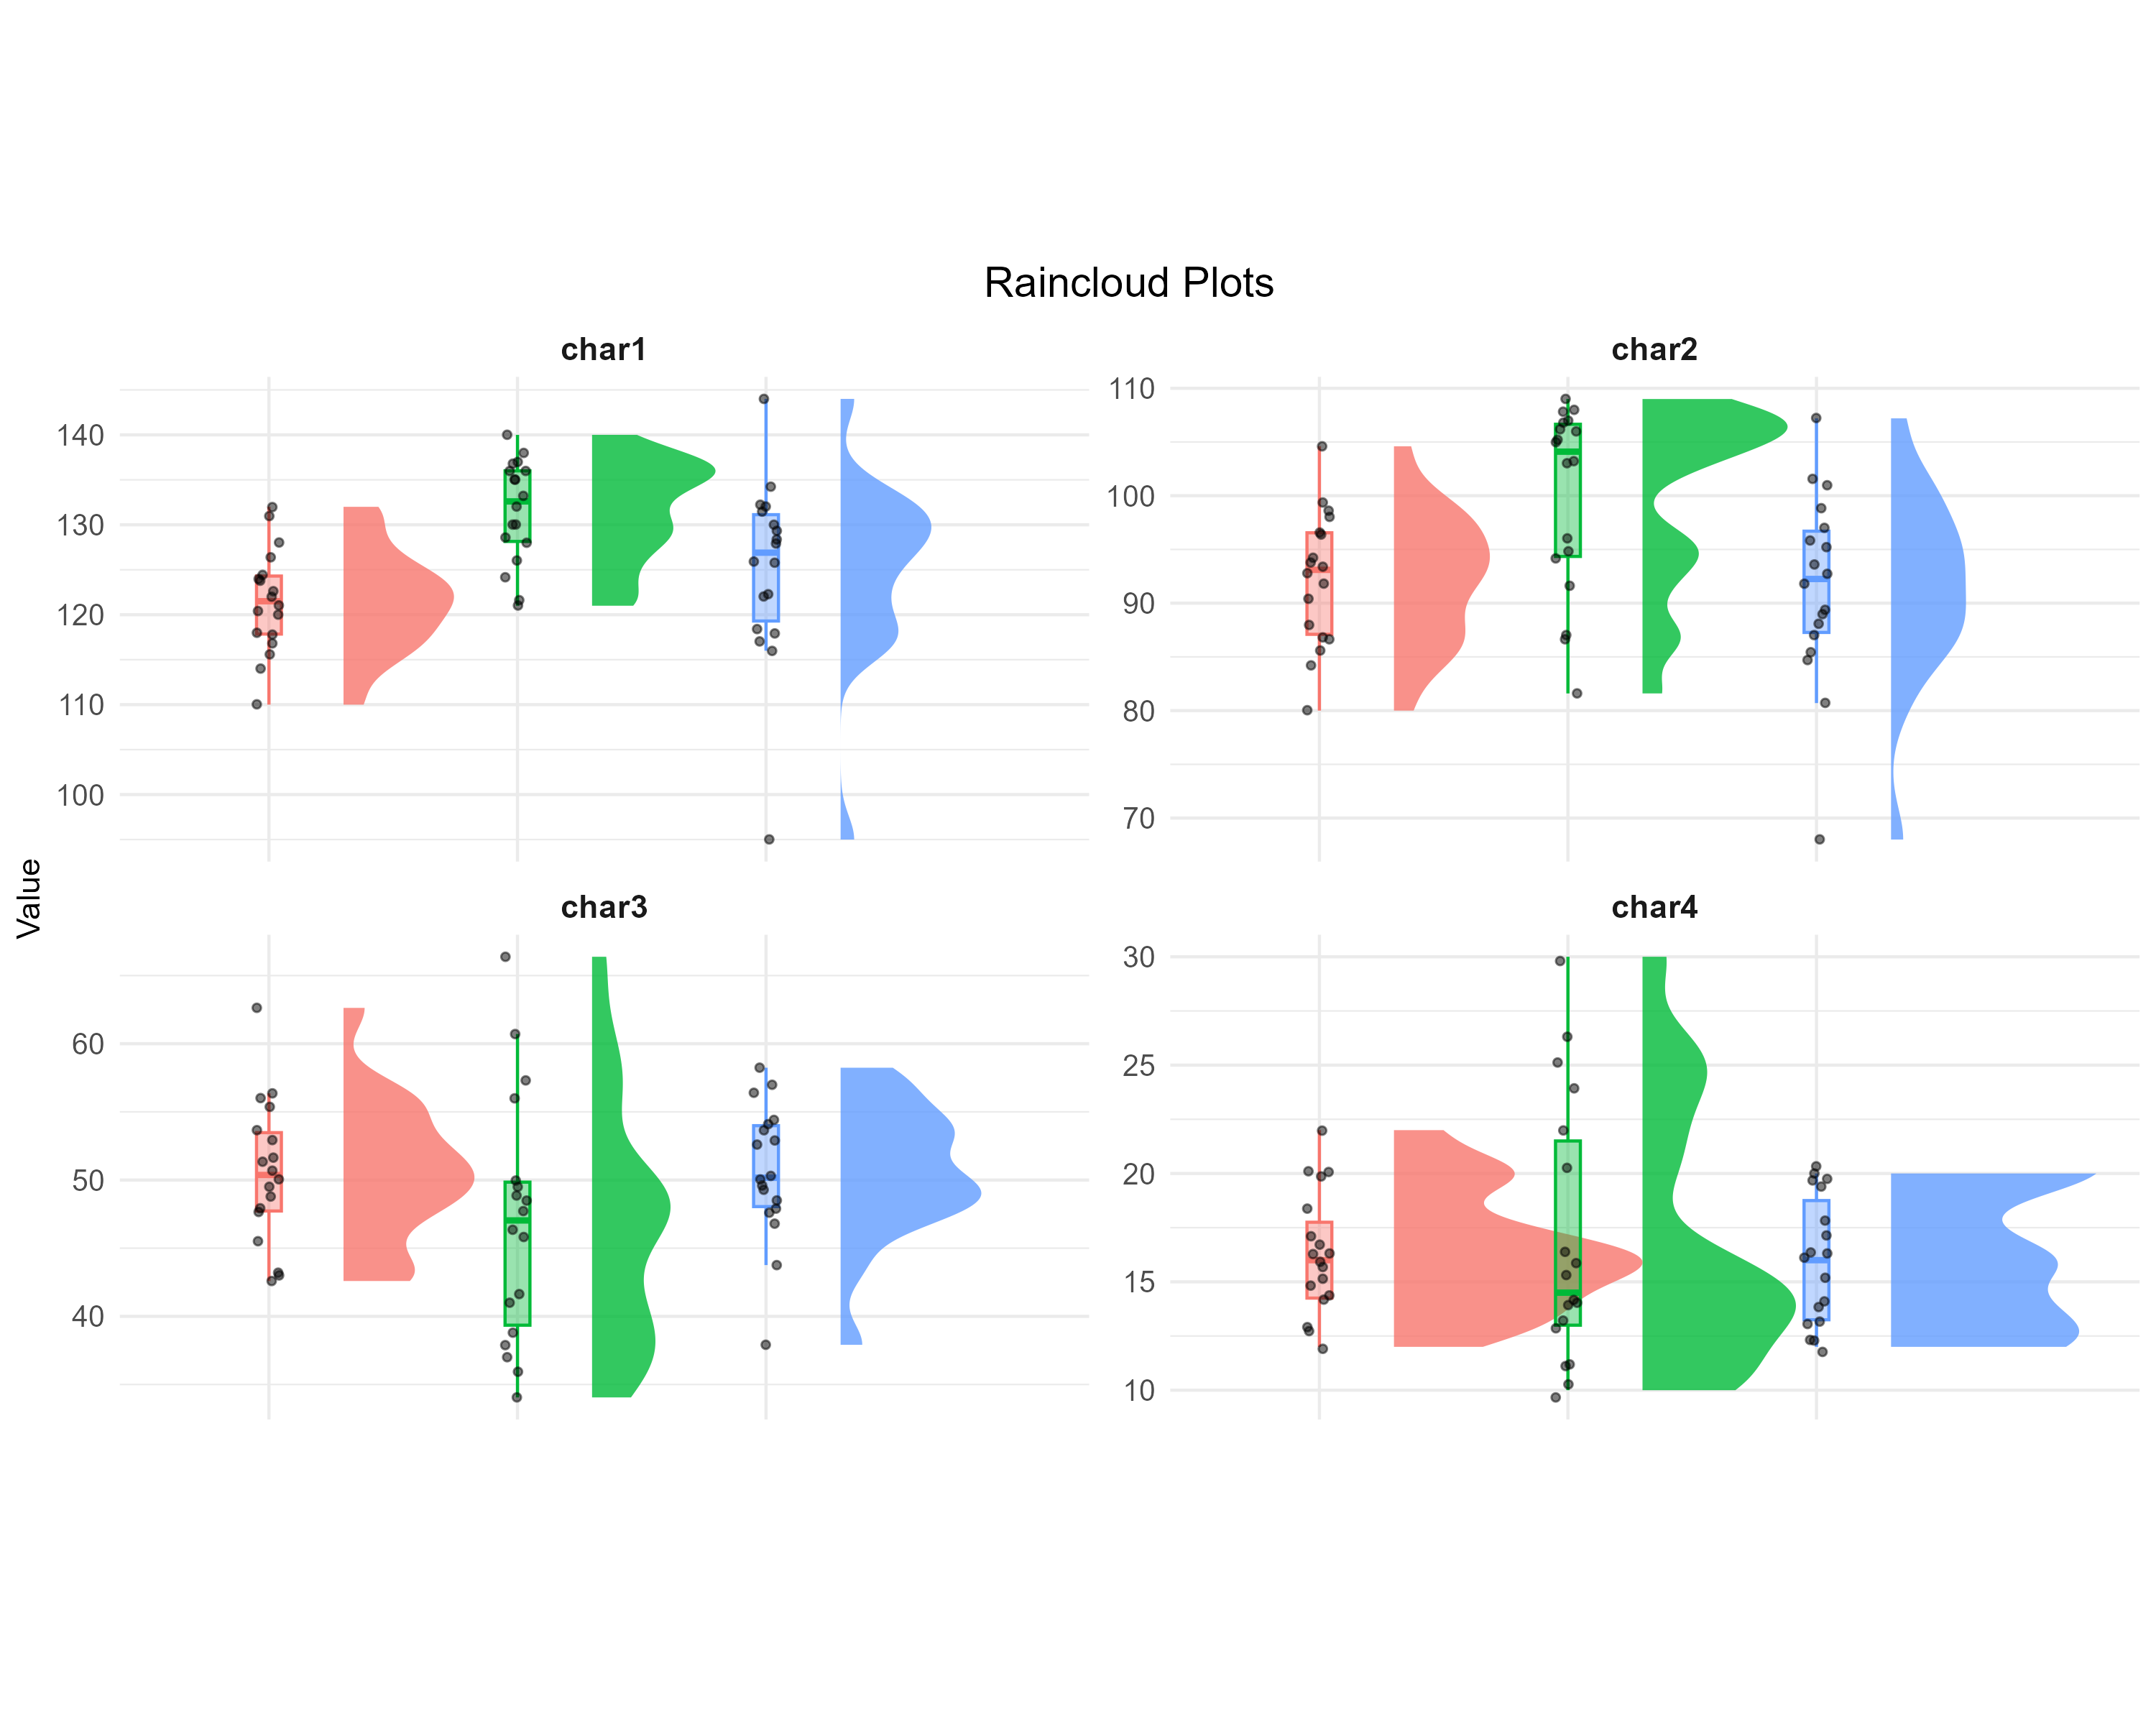
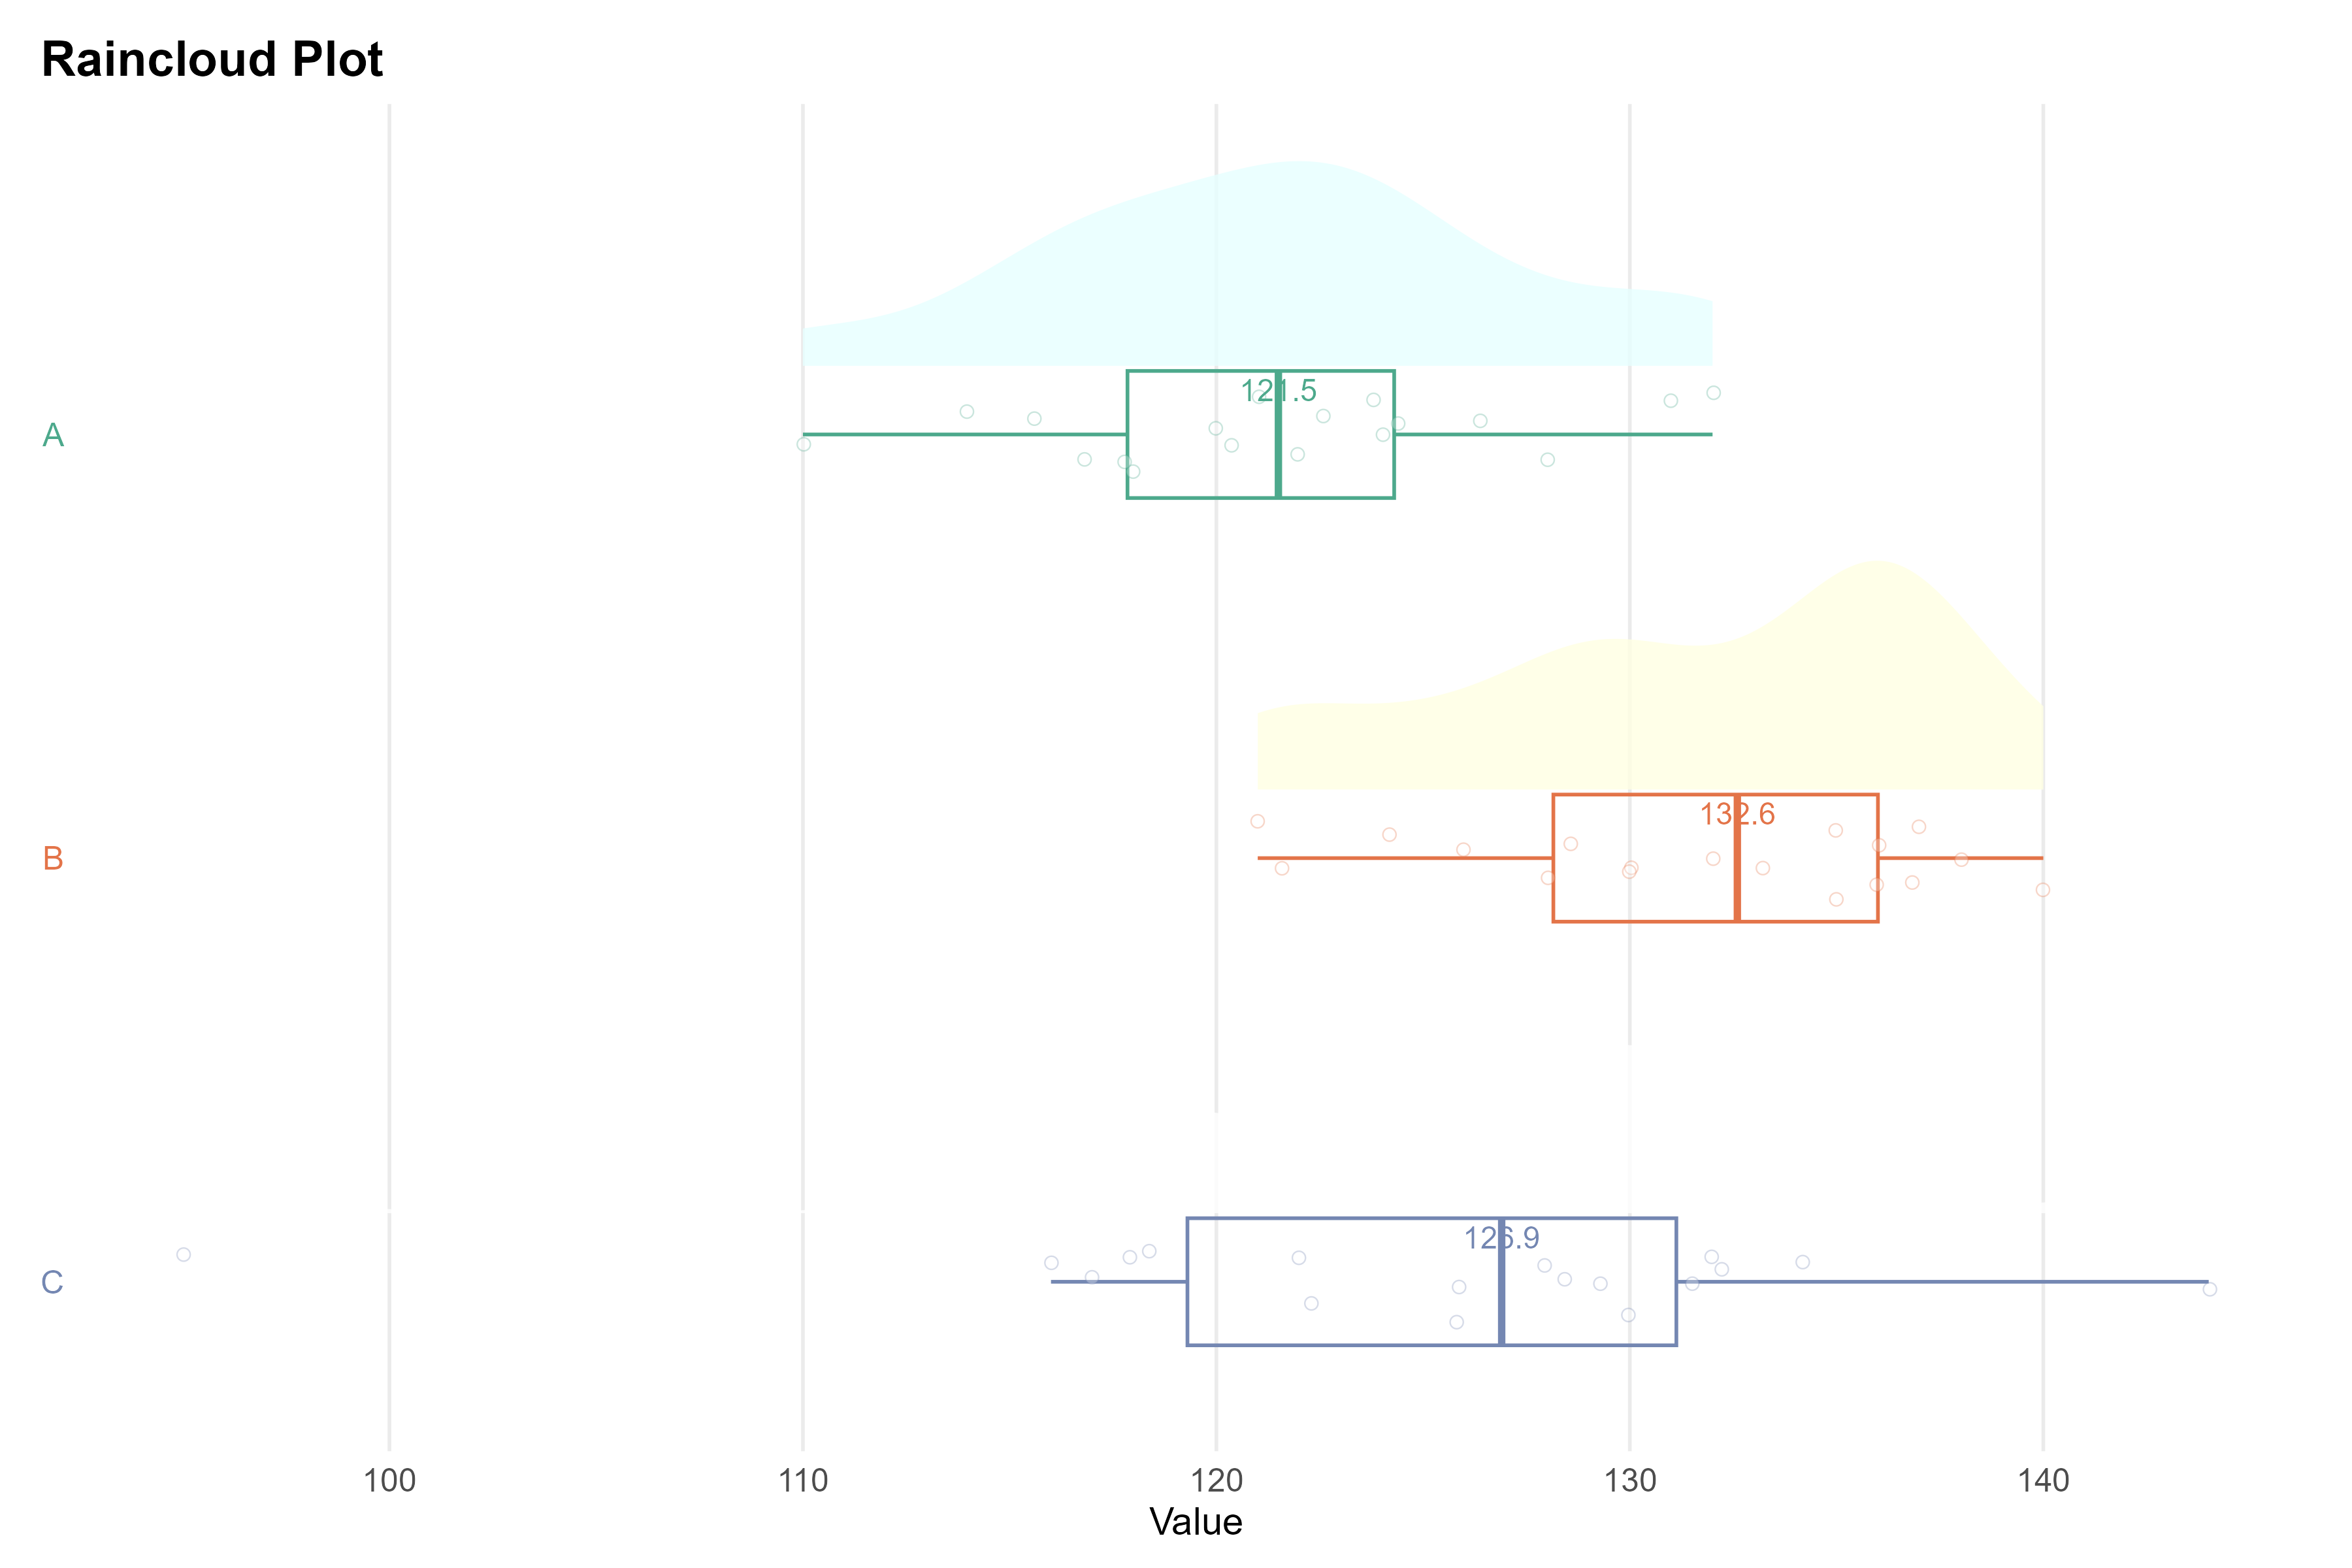
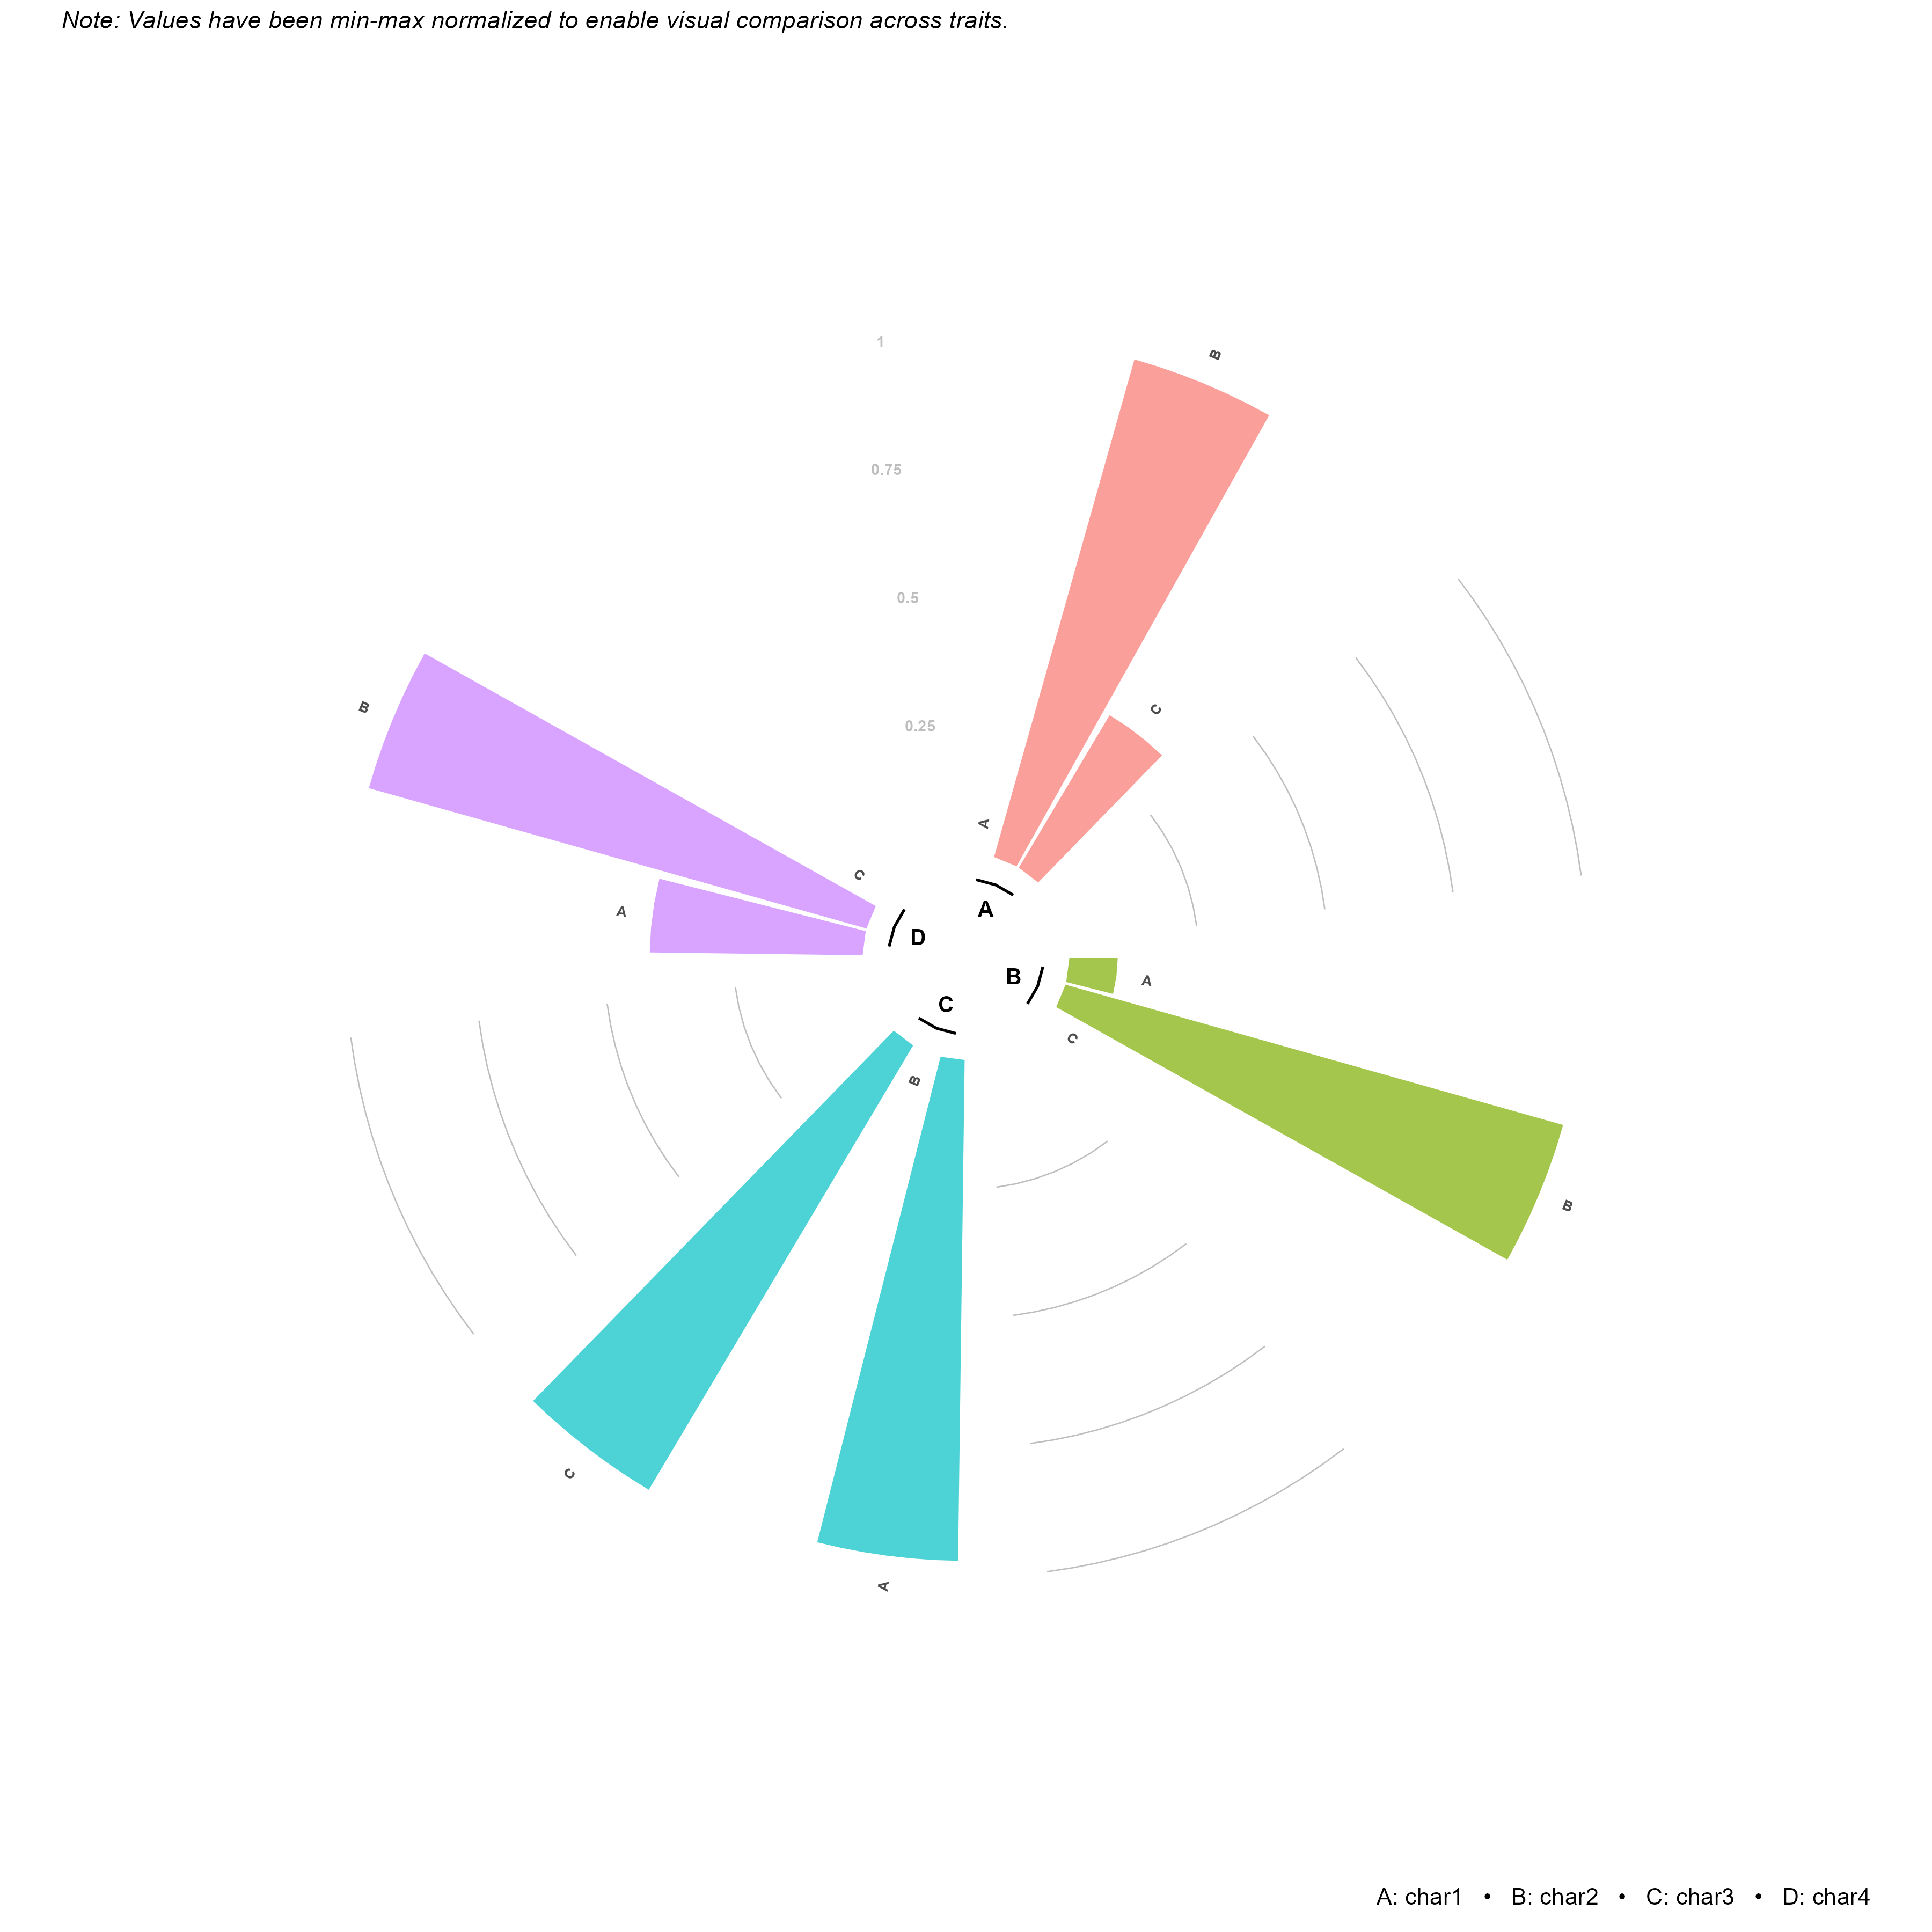
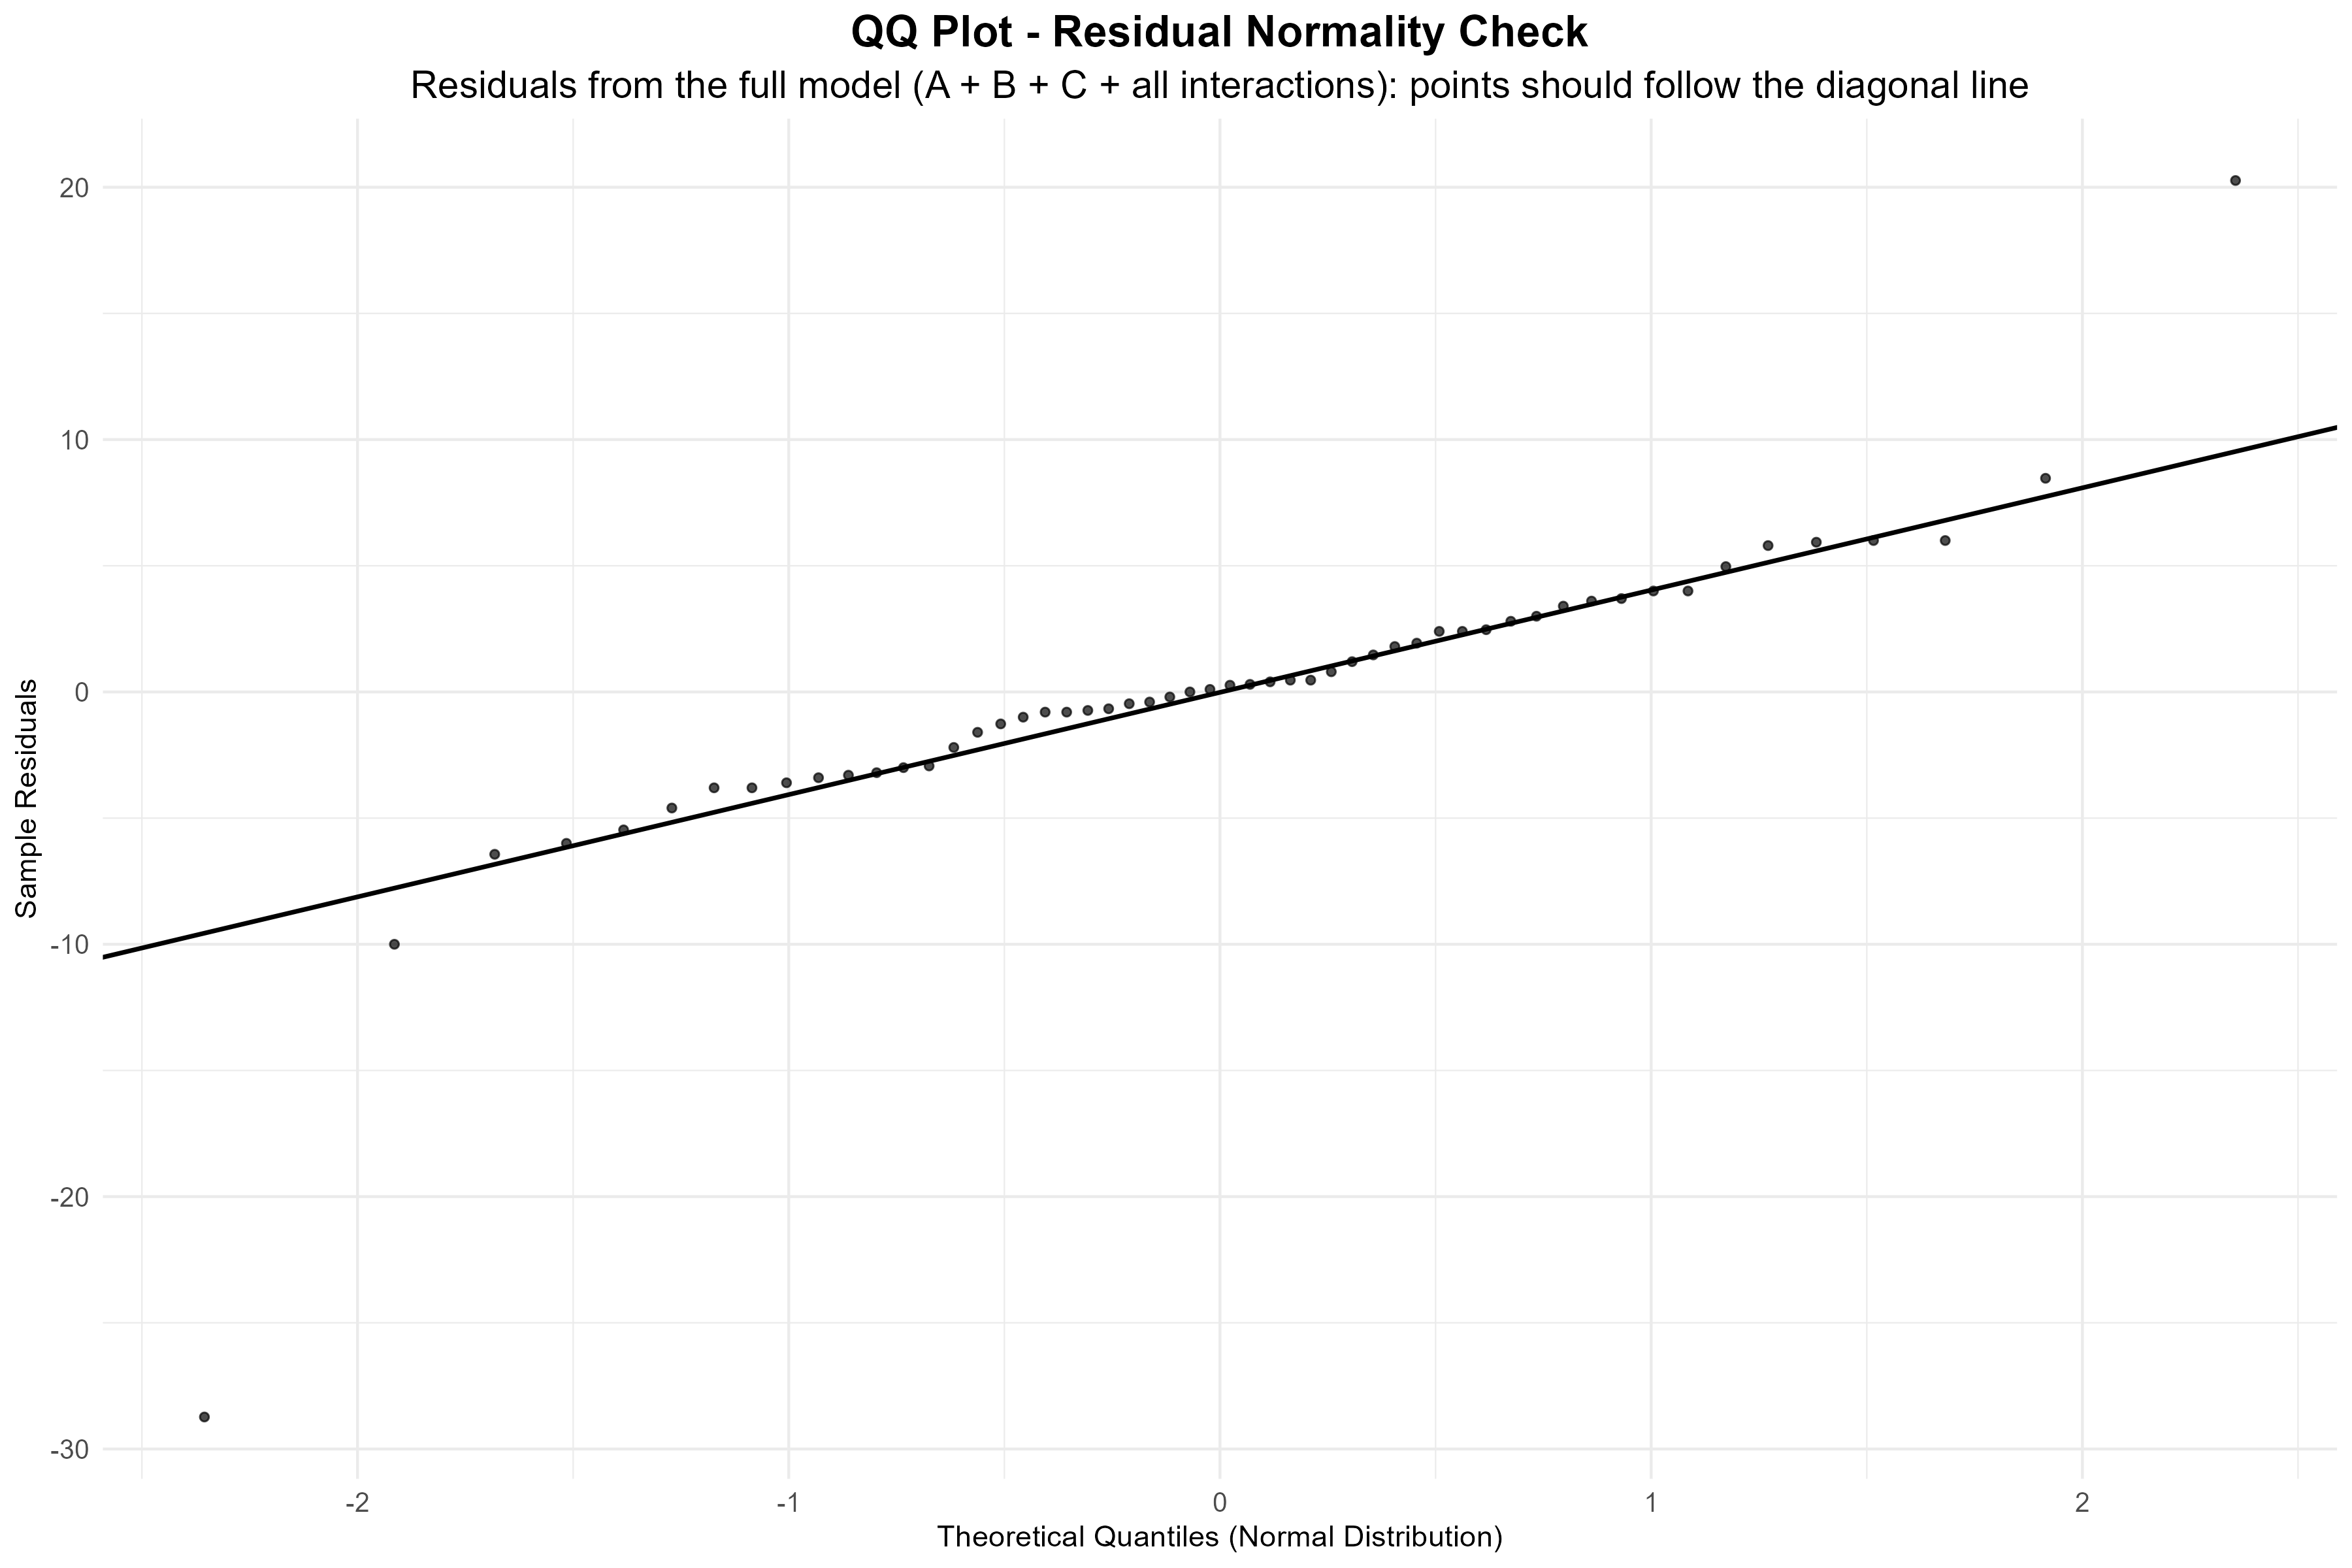
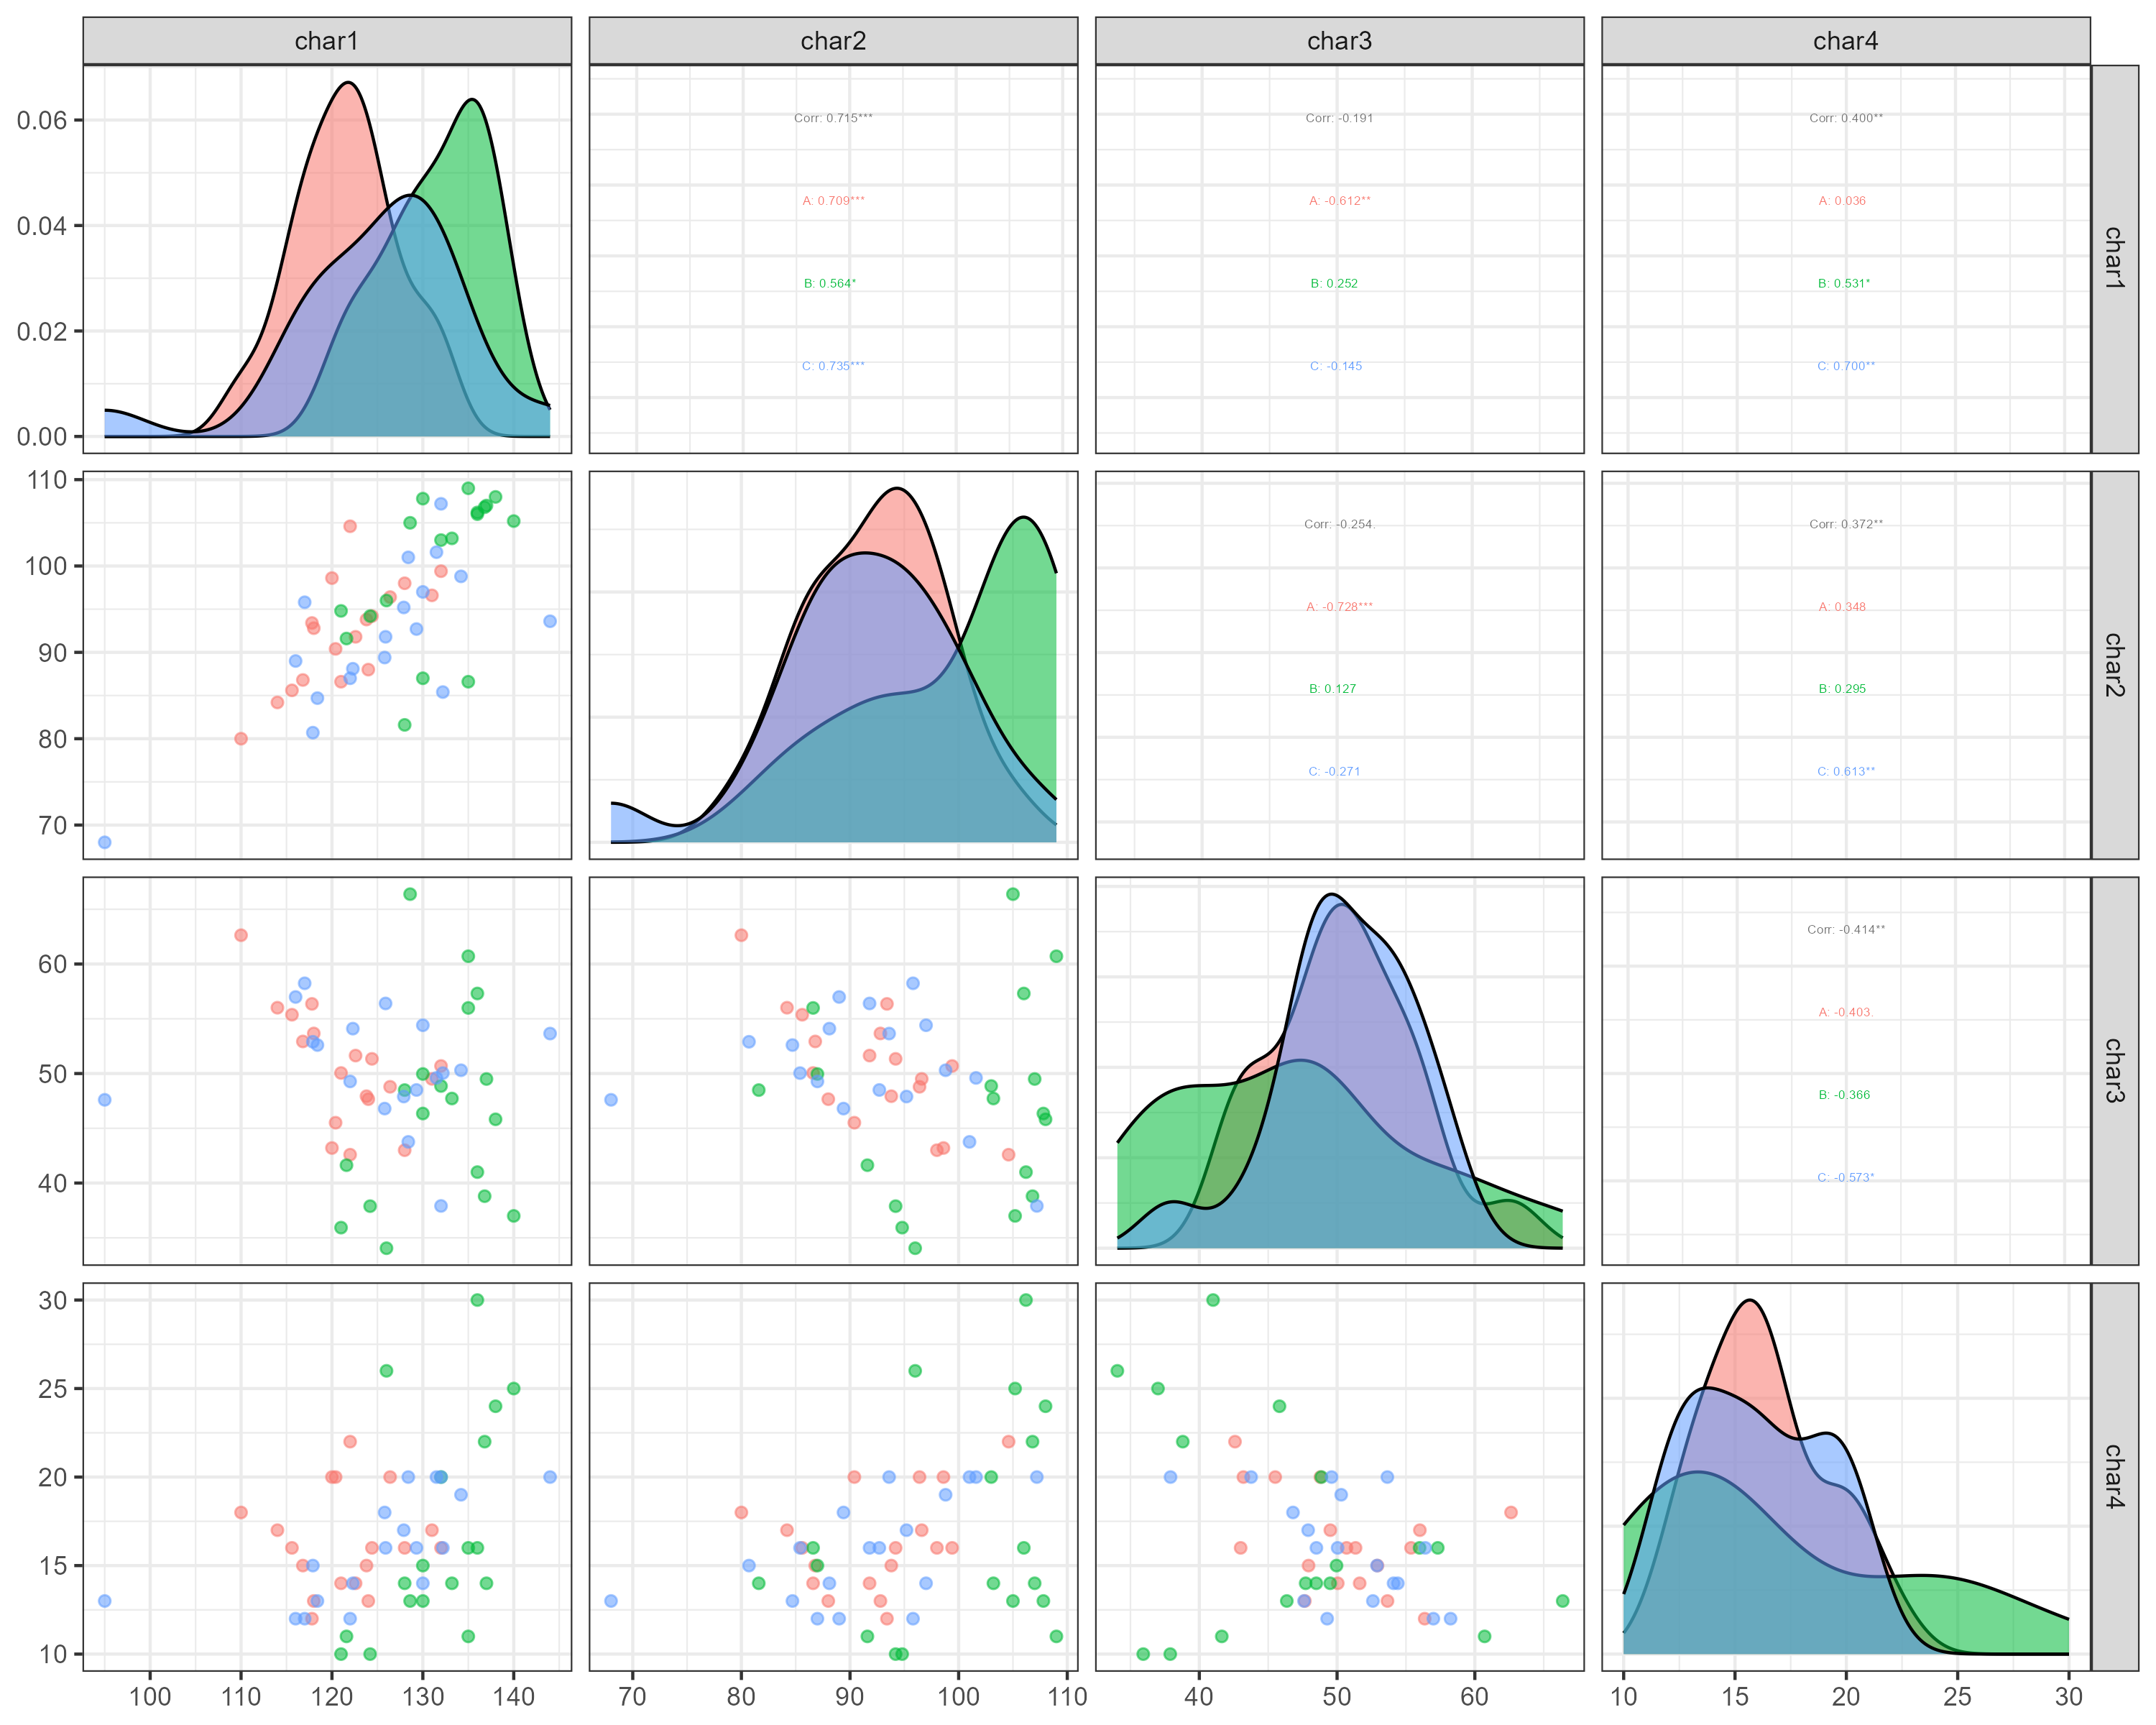
In Figure 18 the residuals of the full model track the diagonal closely across the middle of the range, which supports the normality assumption. Two points sit clearly off the line at the extremes, one near \(+20\) and one near \(-29\); a handful of outlying residuals in 54 observations is not by itself a reason to transform, but it is worth checking those two units for a recording or handling error before publishing. A systematic curve or S-shape, rather than isolated points, would be the signal to return to Section 8 and apply a transformation.
3-D scatter views
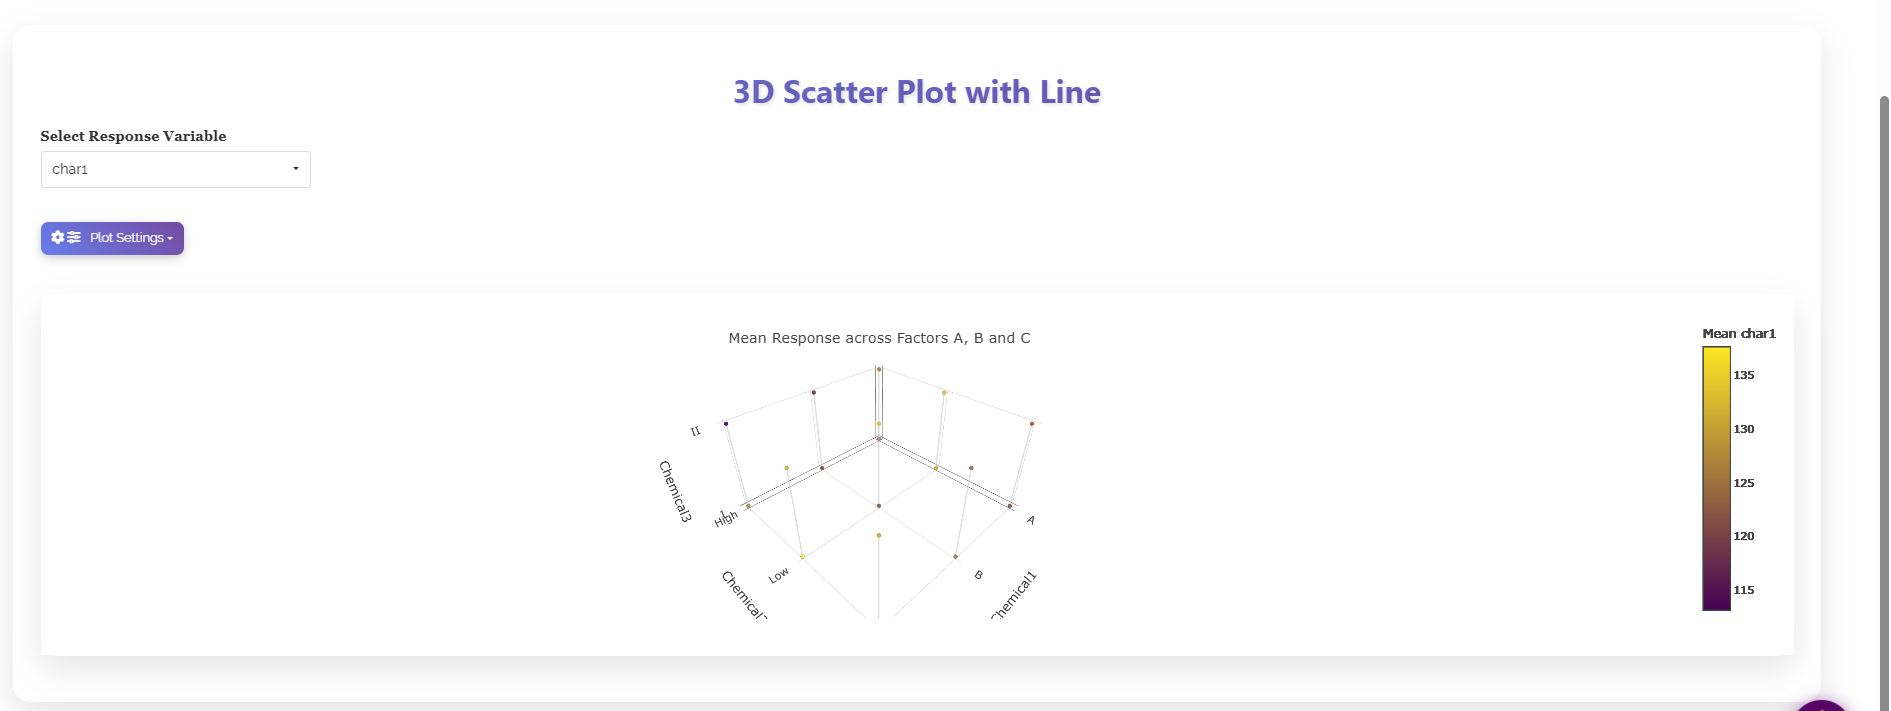
Because there are three factors, the mean response of every treatment combination can be placed in a genuine three-dimensional space, one axis per factor, with colour carrying the response value (Figure 19). The 3D Scatter + Line variant joins the points within each factor level so the joint trend can be traced. The plot is interactive: drag to rotate it and find the viewing angle that separates the combinations most clearly.
12 Looking at all traits together: MANOVA and PCA index
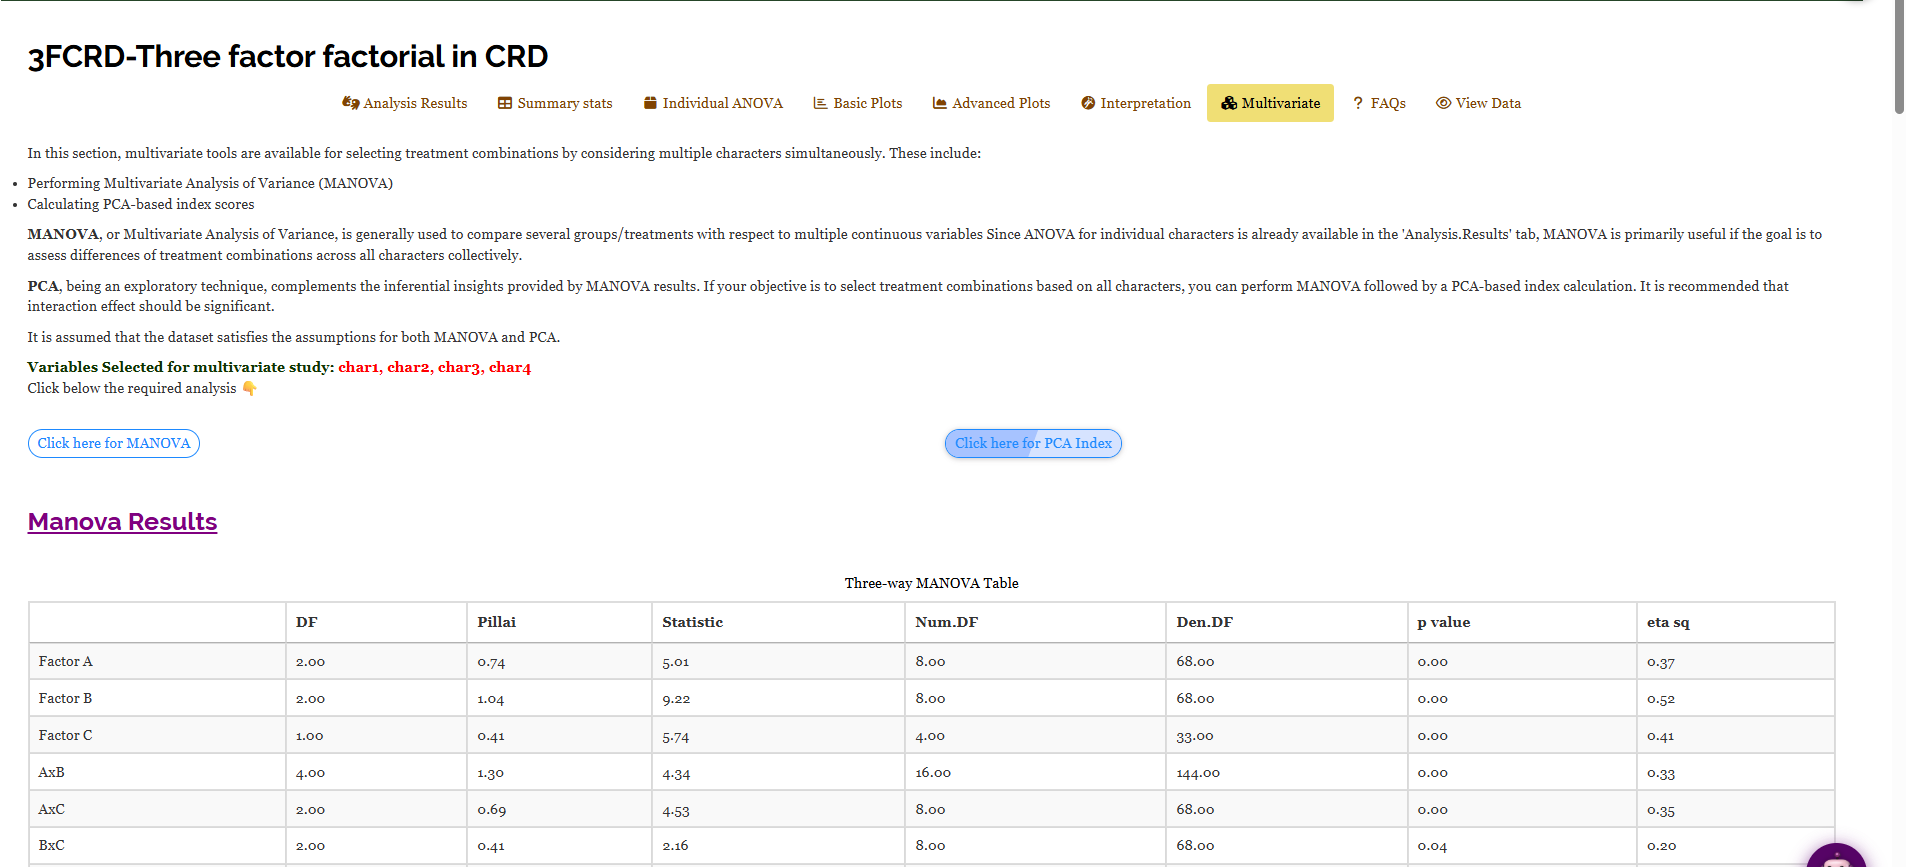
The Analysis Results tab tests each trait one at a time. Sometimes you want to know whether the treatments differ when all the traits are considered together, or to combine the traits into a single selection index. The Multivariate tab (Figure 20) provides both, listing the response variables entering the multivariate study and offering two buttons, Click here for MANOVA and Click here for PCA Index.
12.1 MANOVA across all responses
MANOVA (Multivariate Analysis of Variance) asks whether the treatments differ when char1–char4 are treated as one bundle. RAISINS fits the full three-factor model and reports Pillai’s trace, the most robust multivariate test statistic, converted to an F-value, together with a partial \(\eta^2\) effect size for each of the seven sources. For this dataset (Figure 20) every source is significant: Factor A (\(F = 5.01\), \(p = 0.00\), \(\eta^2 = 0.37\)), Factor B (\(F = 9.22\), \(p = 0.00\), \(\eta^2 = 0.52\)), Factor C (\(F = 5.74\), \(p = 0.00\), \(\eta^2 = 0.41\)), A × B (\(F = 4.34\), \(\eta^2 = 0.33\)), A × C (\(F = 4.53\), \(\eta^2 = 0.35\)), B × C (\(F = 2.16\), \(p = 0.04\), \(\eta^2 = 0.20\)) and the three-way A × B × C (\(F = 4.30\), \(\eta^2 = 0.32\)). Note that B × C is significant here even though it was non-significant for every individual trait: the treatments separate on the four characters collectively in a way that no single character reveals, which is exactly what a multivariate test is for.
12.2 PCA-based index score
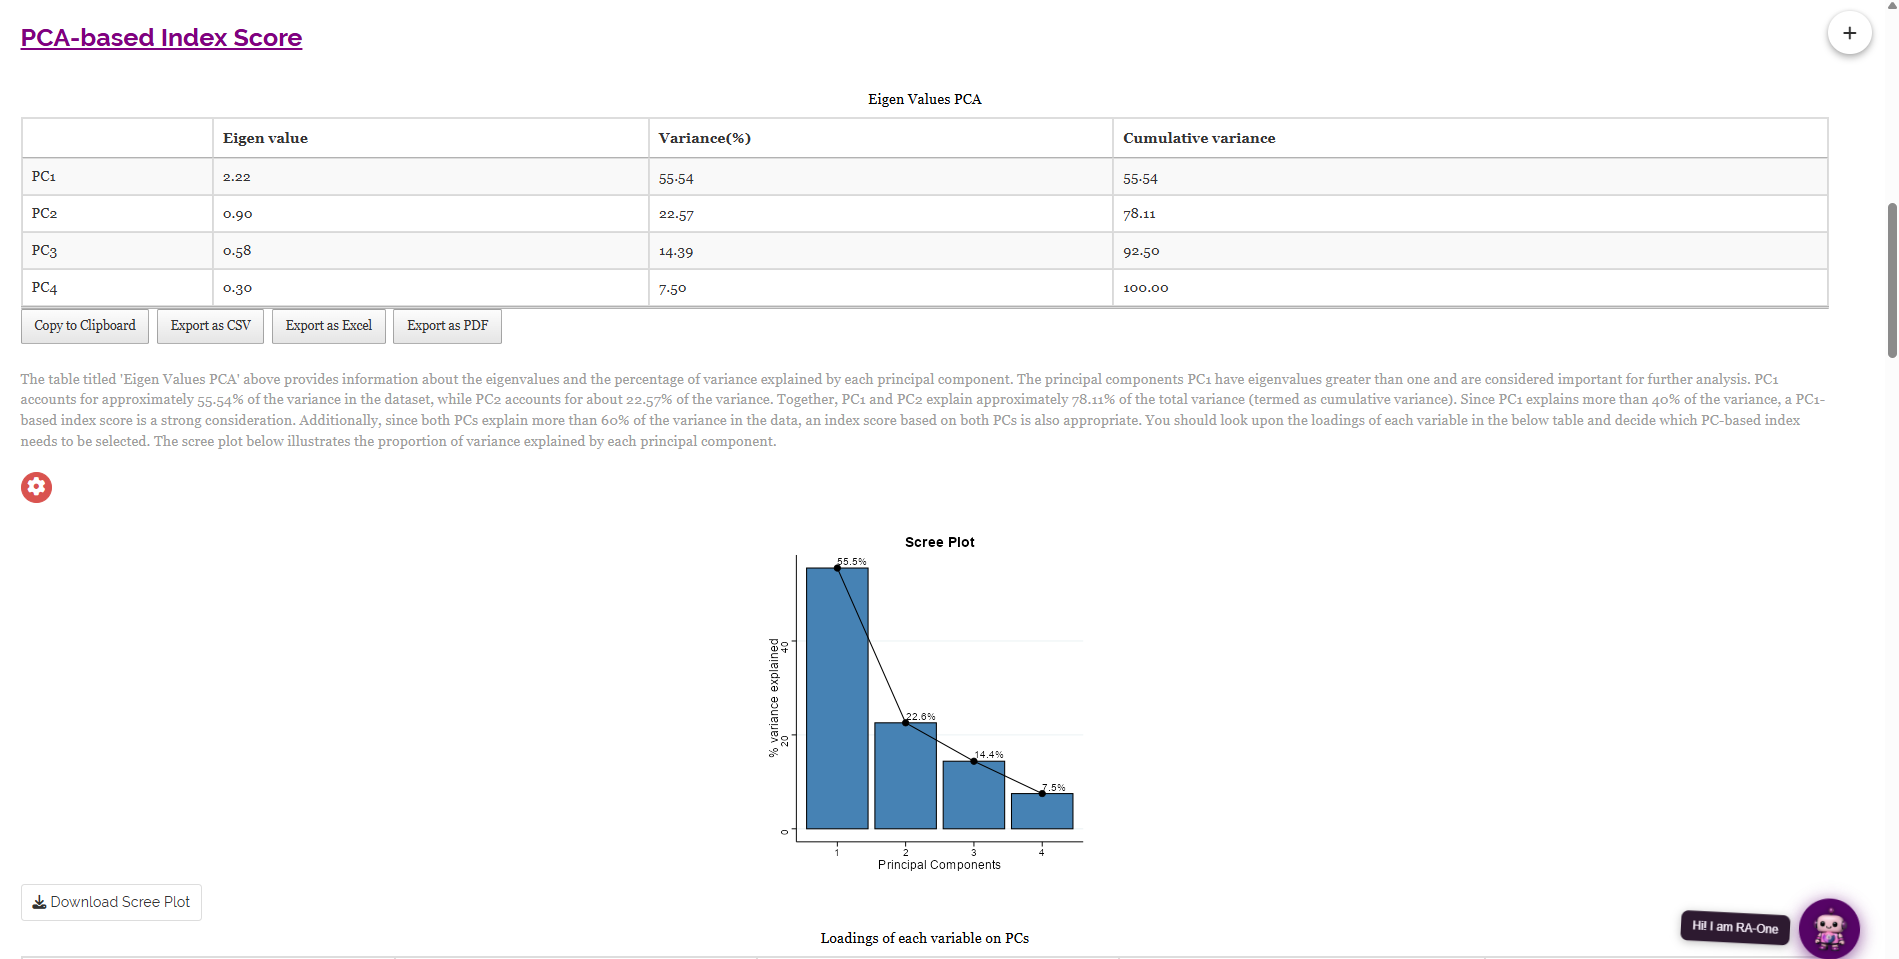
When you want to rank treatment combinations on all traits at once, the PCA-based index condenses the correlated traits into a few independent components and builds a score from them. For this dataset (Figure 21) PC1 has an eigenvalue of 2.22 and captures 55.54% of the total variance, PC2 adds 22.57%, so the two together account for 78.11%. Because PC1 alone explains more than 40% of the variance, a PC1-based index is a sound choice; because both components together exceed 60%, a two-component index is also defensible. The scree plot shows the same information graphically, and the loadings table below it tells you which traits drive each component, so you can judge whether the index is measuring what you intend. RAISINS then converts the chosen index to a scaled 0–1 score, and the Select cutoff for Scaled Index Score control highlights the top or bottom percentage of treatment combinations.
MANOVA is inferential: does any treatment differ across the traits collectively? PCA is exploratory: how can the traits be combined into an index to rank treatments? They complement each other, and RAISINS advises running the PCA index with caution when the interaction is non-significant, since that is when ranking a single “best combination” is least clear-cut. Here the three-way interaction is significant in the MANOVA, so a combination-level ranking is meaningful.
13 Interpretation
RAISINS provides a plain-language interpretation of your results so you can understand the findings without decoding the tables yourself. Open the Interpretation sub-tab, tick the box confirming that the analysis ran without error, and click Click here for interpretation (Figure 22). RAISINS restates the design, then reads every character in turn: which main effects and interactions were significant, what the letter groupings mean, and which levels are statistically on par. For this dataset it reports the Factor A effects on char1, char2 and char3 (B highest for char1 at \(131.58 \pm 5.73\) and for char2 at \(99.94 \pm 8.68\); C highest for char3 at \(50.61 \pm 5.00\)), the Factor B effects on char3 and char4 (High highest for char3 at \(52.97 \pm 5.42\); Medium highest for char4 at \(19.50 \pm 4.41\)), and the Factor C effect on char3 (II highest at \(51.95 \pm 6.24\)), before moving on to the interactions. The text is written to be pasted almost directly into a results section.
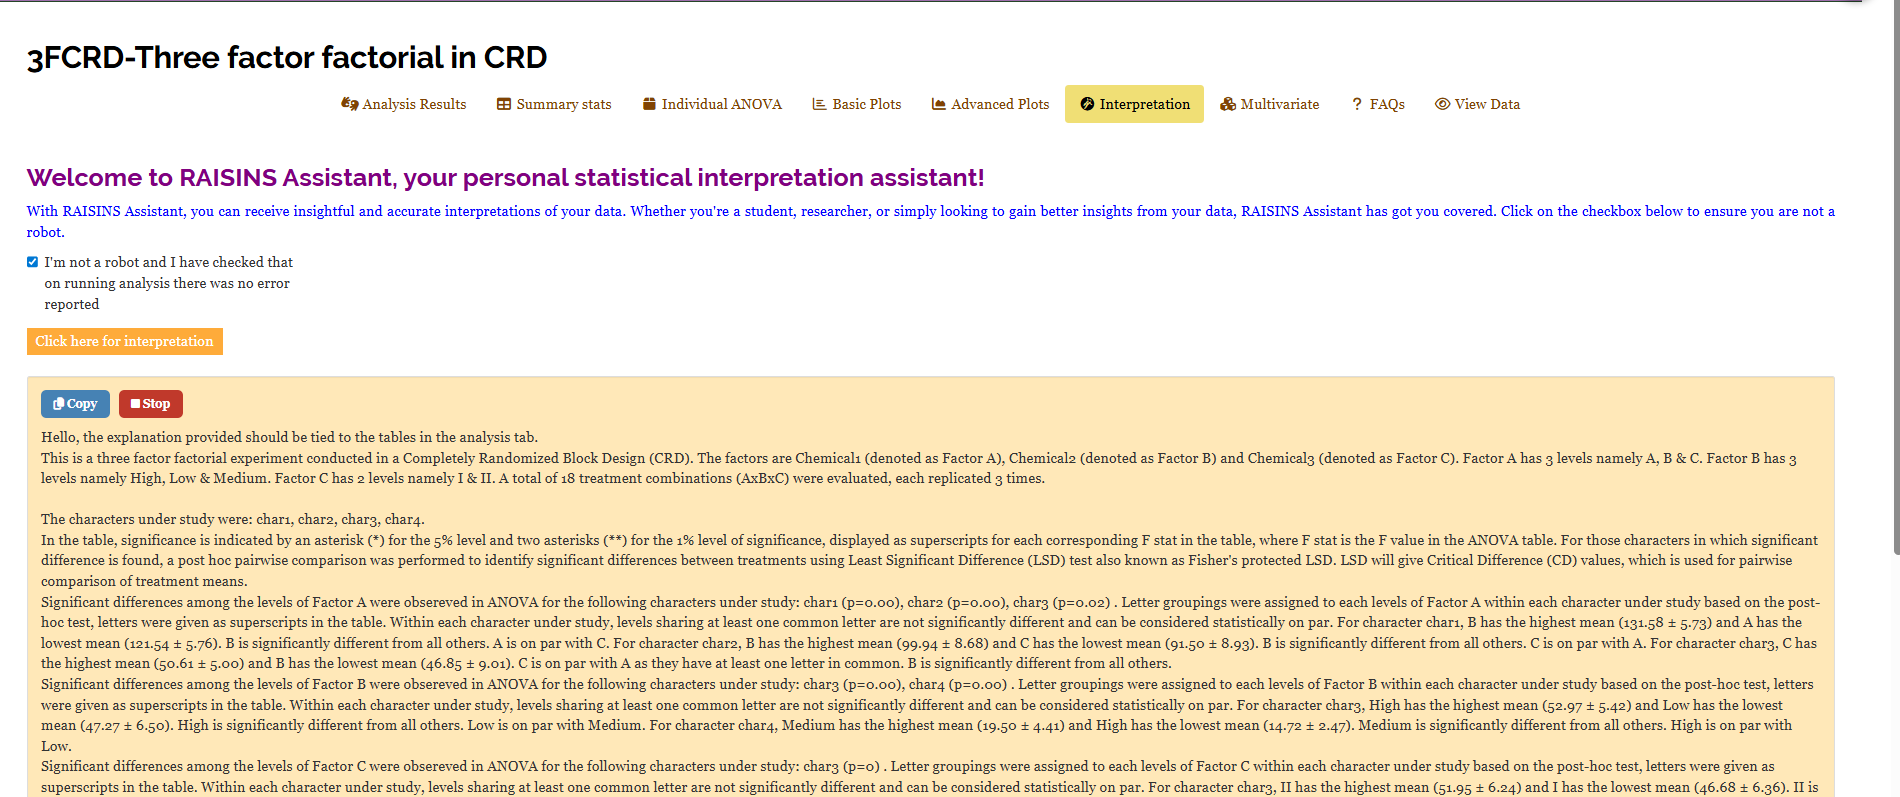
The interpretation comes from the same calculations used to create the tables. You should use it as a guide, not as a replacement for the tables. To check your work, have Figure 7 and Figure 8 open next to the interpretation. The numbers in the interpretation should match the numbers in the tables exactly. This is the fastest way to confirm that you have selected the correct columns.
14 Chat with your data using RA-One
RA-One is the built-in conversational assistant for the three-factor factorial CRD module, available from the RA-One tab. You ask questions in plain language and it answers using your own analysis rather than generic statistical advice. Every result it discusses is drawn from what the module actually computed; it never invents numbers, and if a value is not available it says so instead of guessing. All answers are in plain English, with no code or software commands.
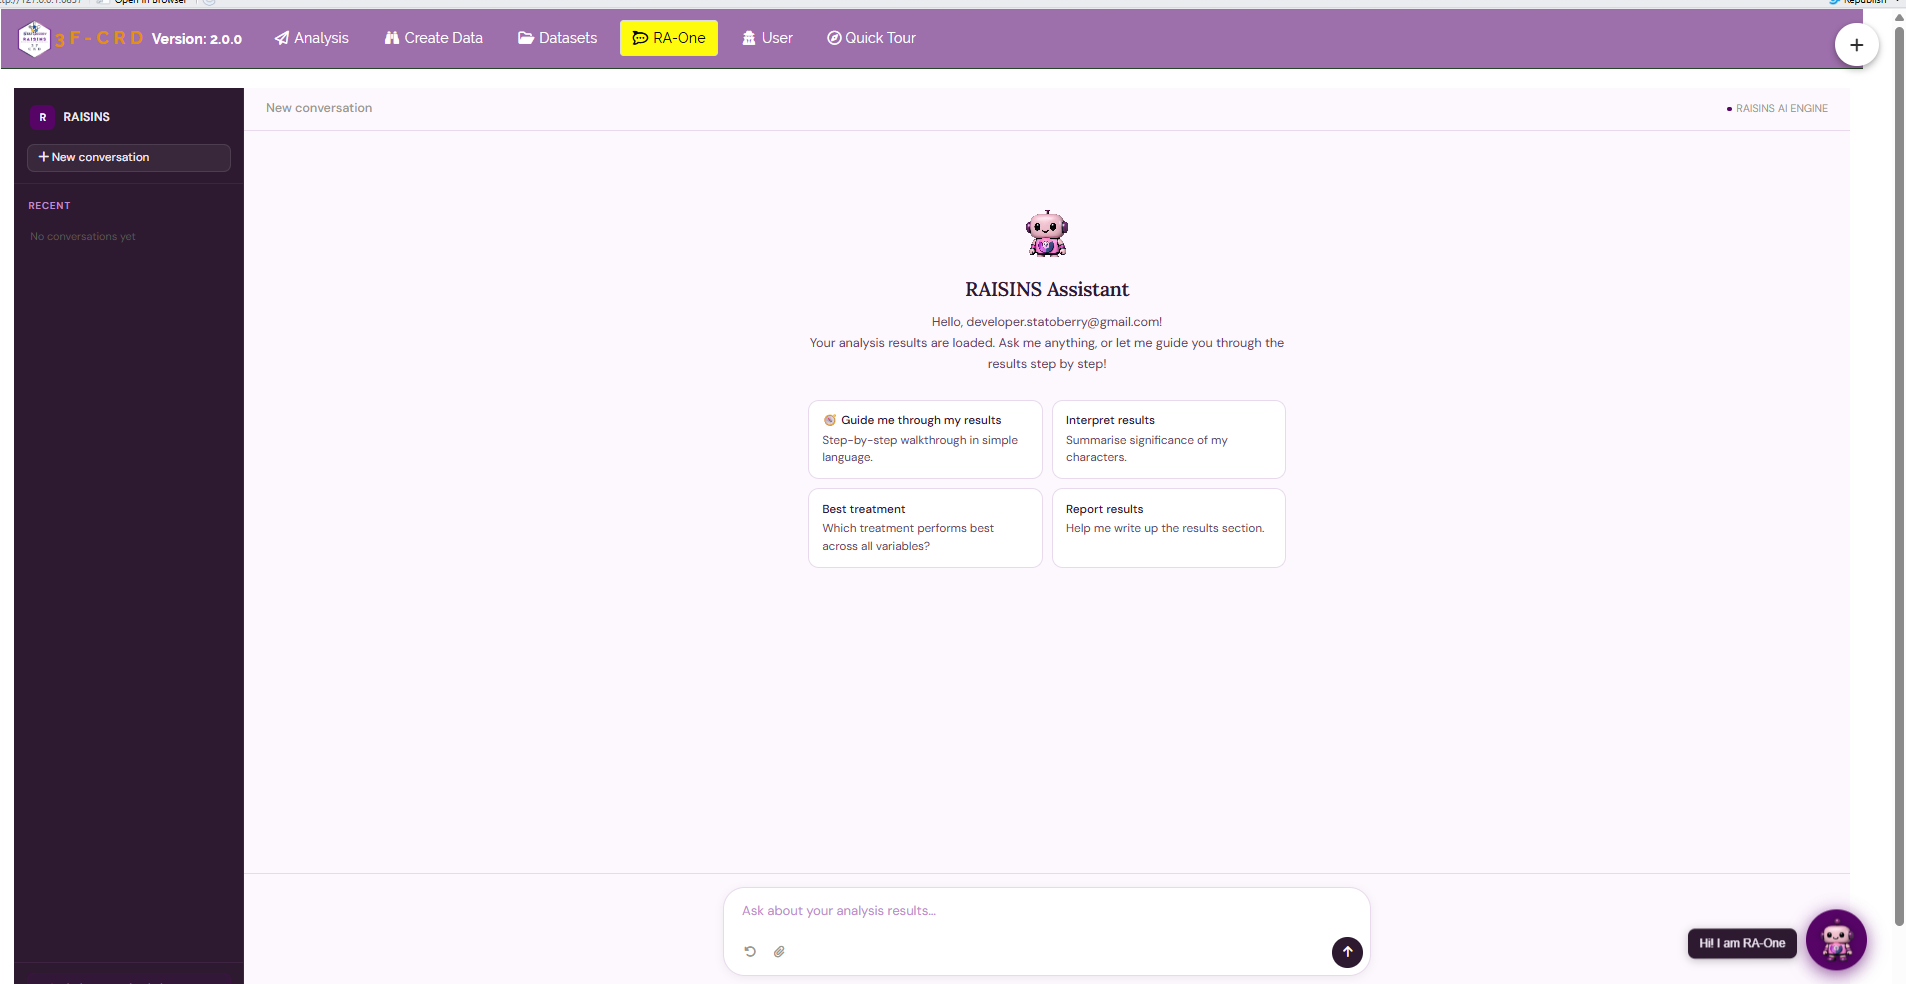
Once your results are loaded, RA-One greets you and offers four quick-start prompts (Figure 23): Guide me through my results for a step-by-step walkthrough, Interpret results to summarise the significance of each character, Best treatment to ask which combination performs best across all variables, and Report results to help draft the write-up. You can also type your own question, for example “is the three-way interaction significant for any trait?” or “which dose of Chemical2 gives the highest char4?”.
Choosing Guide me through my results walks you through the analysis in numbered steps (Figure 24). For this dataset it opens with the experiment overview, three levels of Factor A, three of Factor B, two of Factor C, four responses and three replications, then explains what “significant” means and lists the significant terms for each character in turn, and finally points to the best treatments, correctly starting from the highest-order significant term for each trait: because the A × B × C interaction is the highest-order significant term for char2, it reads the three-way cell means rather than the Factor A averages. It is the same reading the Interpretation tab gives, delivered conversationally.

Within a single conversation, RA-One can interpret your results, build a data template (Section 7.4), fetch the model dataset (Section 7.3), and guide you through the tables, so most of a routine three-factor factorial CRD session can be conducted without ever leaving the chat window.
15 FAQs
The module includes a dedicated FAQs sub-tab with detailed answers and practical tips on the features described above. Typical questions include “what is Cohen’s F in the results?”, “how is the transformation algorithm applied?”, “why should I read the three-way interaction before the main effects?” and, matching the control described in Section 8, “when should I use P-adjustment?”, which explains that the option applies to LSD, when to prefer Bonferroni, Holm or Benjamini–Hochberg, and why the CD and p-value rows disappear once an adjustment is switched on.
16 View data
View Data is the primary diagnostic tool for ensuring data integrity before analysis. When you upload your dataset, RAISINS runs an automated Health Check to validate the file: it confirms that the three factor columns are present and read as categorical labels, that the response columns are numeric, and that there are no stray blanks or misaligned rows. For a three-factor CRD it also reports how many replicates were found for each Factor A × Factor B × Factor C combination, so that any combination that is missing entirely, or that has fallen below two replicates, is flagged before it can distort the error term. Unequal replication is permitted (Section 1), but you should know that it is present and that it was intended. Fix any flagged issue here before trusting the results.
17 Wrapping up
A three-factor factorial CRD exists to answer one honest question: do three factors act independently, or does the effect of each depend on the others? Everything in this module, the ANOVA summary and its seven treatment rows, the three factor tables, the three two-way interaction tables, the three-way table, the interaction plot, the MANOVA and the written interpretation, exists to answer that question fairly, and to tell you which treatment combination to act on when the answer is “they interact.”
This module fits the case where the experimental material is homogeneous and complete randomization is appropriate, and it tolerates unequal replication. If your experimental units fall into natural groups, blocks of field, bench or batch, use a factorial RBD module instead so that block variation is removed from the error. If you are studying two factors, use the two-factor factorial CRD module; for a single factor, use the one-way CRD module. And if you get stuck at any point, RA-One is available 24 × 7, or write to us at [email protected].